The built-in WordPress commenting system does a fine job all by itself, but it’s good to remember that there are a several other systems out there that, for some, provide a better user experience.
One of the most popular is Disqus (pronounced ‘discuss’). It’s used all over the web, across many different platforms. In this article, Im going to provide a tutorial how to install it on your own WordPress blog.
There are two ways to install Disqus on your WordPress blog. One way is to first register your site with Disqus, then install the WordPress plugin and go through the simple configuration steps.
However, because most WordPress users install a plugin first, I’m going to describe the setup process following the second method. Either way works, and they’re pretty much the same, except the steps are taken in a different order.
Let’s get started . . .
First, download and install the Disqus plugin. Once installed, you should see this instructional pop up at the top of your dashboard.
Click on the Comments tab in the side menu.
The next step is to connect your blog with the Disqus system. You can either enter your existing user information (if you already have an account), or you create a new account. For the purposes of this tutorial, I’m assuming that you don’t already have an account, so I’ll guide you through the process of setting one up.
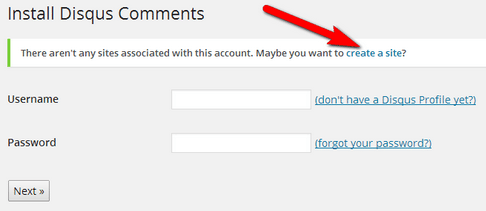
On the WP Admin > Comments page, you should see this login form (displayed below) asking for a Disqus username and password. It also displays a link to where you create a new profile—click the link to start creating your Disqus account/profile.
As you can see from the screenshot below, you have a few options for creating an account. You can enter sign up via email or an existing social media account.
I chose to create an account using my email address, which I had to verify to move to the next step.
When you’ve created your Disqus profile, it’s time to go back to your site and enter your username and password, which connects your blog and Disqus.
If there are no sites associated with your profile, which there won’t be if it’s brand new, the plugin prompts you to create one.
Click on the “create a site” link to create your first site.
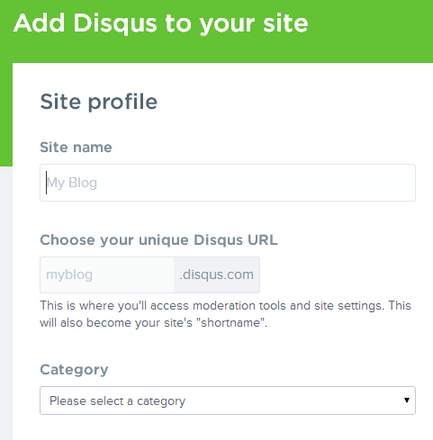
Now enter your website’s details.
When you enter the name of your site, Disqus creates a ‘shortname’ for you, which is usually the same as your site name without spaces or special characters (provided that it is available—if it isn’t, you can custom create an alternative). Choose something similar and memorable to your current blog URL, as the ‘shortname’ is the URL you will use to access moderation tools and settings.
Finally, select the category that best fits your blog.
When you have completed each of these steps, click on the Finish Registration button.
Next, you will see a screen on the Disqus website asking you to select the platform your website is built on. Click on the WordPress icon to view the setup instructions for this CMS.
Now, go back to your blog and go to the Disqus settings in the Comments tab. Enter your username and password and login. This time, you should see your site listed. Click on the radio button to select the site, then click Next.
You should see this message.
At this stage, you have the option to export your existing comments from the WordPress standard commenting system to the Disqus system. If you skip this step, all your existing comments will not display on your site.
Clicking the link ‘export them’ (see screenshot above) takes you to this page.
Click ‘Export Comments’ to transfer your existing comments. You will then see the following message.
You now have the Disqus commenting system installed and working on your WordPress blog. Be sure to do a trial comment on one of your posts to ensure everything is working correctly.
In the future, anyone commenting on your blog must do so through their Disqus, Twitter, Facebook or Google Plus account (they can create a Disqus account through your site before they comment, if they don’t already have one).
To moderate comments, click on Comments in the left menu and then follow the on-page instruction.
The link takes you to the Disqus website where you can manage & moderate your blog comments.
This area is neatly divided into five categories: all, approved, pending, spam, and deleted—which you can easily switch between by clicking the tab for each category. As comments come in, you can either approve them or mark them as spam. You can also keep track of older comments within the system.
Disqus is one of the best alternatives to the standard WordPress commenting system out there. It encourages meaningful interaction, threads comments neatly, and comes with an integrated voting system.
The only question is, why aren’t you using Disqus on your site yet?
 Jonathan John is a WordPress enthusiast and freelance blogger. He loves comparing WordPress plugins and themes, sharing the latest Automattic news, and helping non-techies get the most out of the world’s favorite CMS.


160 Comments