WordPress has changed a lot over time.
What used to be a pure blogging platform has evolved into a robust and full-fledged content management system that is used by brands, companies, and celebrities worldwide.
One of the milestones and breakthroughs of this development was the creation of Custom Post Types (CPT).
By default, WordPress comes with a number of standard content types, such as posts, pages, and attachments. Each type has its own set of formatting, settings and other options.
However, there are many cases in which these types just aren’t enough. With WordPress running millions of websites, it’s only natural to find many cases in which the standard content doesn’t cut.
Plus, we can create custom menus, widgets, page templates and more — why stop at posts? WordPress wouldn’t be what it is if it didn’t allow you to customize this part of your site as well.
This tutorial is geared toward beginners and uses mostly plugins instead of code.
Sound good? Then let’s get cracking.
What Are WordPress Custom Post Types?
Before going into detail, we should first figure out what exactly we mean by Custom Post Types.
In a technical sense, they are very much like normal posts. The only difference is that they come with a different value for post_type inside the WordPress database.
To understand this, you need to know that for each piece of content on your site, WordPress saves what kind of post type it is in the MySQL database. For pages this value is page, for attachments it’s attachment and so on.
What’s also important to know is that each post_type value comes with a bunch of pre-defined properties, such as:
- User access level
- Ability to receive comments
- Meta data
- Templates used for display
- Display rules
- Taxonomies
For example, one of those parameters is the reason why posts and pages show up on the front page but post revisions don’t.
Public is set to true for the posts and pages post type and to false for revisions. Because they belong to different post types, this property is assigned automatically.
As a consequence, creating your own custom post types also enables you to match an entirely customized set of properties to them. That way, you can set up completely new types of content that exactly fit the needs of your website.
However, isn’t this just a fancy technicality that’s only interesting for developers? How does this help you — the site owner or casual user?
Let’s look at some practical uses next to see how custom post types can benefit almost any type of website.
Why Use Custom Post Types At All?
The best way to understand the value of CPTs is to go with a concrete example. Let’s say you run a website where you review a lot of books.
Of course, book reviews can very well be done inside a normal blog post. However, you might find that they contain quite a bit of specialized information that could be displayed prominently.
For instance, you may want to show the author’s name, the book’s publishing date, and genre to allow users to search your books by these taxonomies.
Plus, the featured image could use a different format since book covers tend to have a more upright rectangular shape.
If you are part of an affiliate network, you may also like to add a Buy Now button that sends interested visitors to Amazon or some other site.
Also, since book reviews are pretty timeless content and you run a one-person site, you don’t need a post author name or publishing date for these pieces.
Sounds like quite a bit of customization work, don’t you think?
Now, in theory you can achieve all of this with your categories and tags, conditional statements, and (quite) a bit of CSS trickery.
But who wants to do that?
Apart from that, if you are not a coder, this kind of work might be far beyond your capabilities and you would prefer doing it via the WordPress back end.
That’s where WordPress custom post types come into play.
With their help you can create a post type that has its own design, comes with custom fields for adding affiliate links and does away with all the meta information you don’t need.
Plus, as a custom post type, all your book reviews will now get their own archive link. That way you can easily add them anywhere on your site.
Of course, this isn’t limited to books. You can do the same with other types of reviews, products, portfolio items and whatever else you want to add to your site.
The possibilities are literally endless.
Are you convinced of giving custom post types a shot yet? Then let’s get to the part where I tell you how to implement them on your own website.
A Quick Word On Custom Taxonomies
Before we move on to setting up custom post types, let’s shortly talk about custom taxonomies.
You will hear often hear this phrase in relation to CPT and many plugins that create the latter also offer a function for setting up customized taxonomies.
The reason behind this is that it often makes sense for custom post types to have their own set of taxonomies to order them by.
For example, the products on your shop page probably need different categories and tags than blog musings on the latest celebrity gossip.
That’s why we often create both custom post types and custom taxonomies at the same time.
Daniel Pataki has written an excellent article on this topic if you’d like to know more.
But now let’s move on with our original topic.
How to Create Custom Post Types in WordPress
For setting up CPTs, we have two different methods at our disposal: coding them by hand inside functions.php or using a plugin that does all the heavy lifting for us.
This can be easily done using a plugin. However, which plugin should we use? There is more than just one.
Types
Types is an entire suite of custom content-related functions. It enables you to set up both custom content types and taxonomies as well as custom fields.
While it has a lot of functions and can overall be a bit overwhelming, the plugin is also quite powerful and I have successfully used it on several sites.
Since I found it to be one of the most complete solutions so far, I will be using this plugin in the tutorial below.
Pods – Custom Content Types and Fields
The next plugin in line can not only create new custom post types and fields but also extend and manipulate existing post types set up by other plugins or themes.
In addition to that, it comes with a number of pre-set field types you can use out of the box. If that isn’t enough, you can also set up your own.
Also, our very own Josh Pollock is part of the team behind the plugin, so you are in good hands.
Custom Post Type UI
This next contender is a slimmer alternative to Types and other, more feature-rich plugins.
It helps you register custom post types and custom taxonomies on your site via a graphical user interface.
Behind it are the guys from WebDevStudios, who have also brought us plugins like AppPresser.
WCK – Custom Fields and Custom Post Types Creator
WCK stands for WordPress Creation Kit and it is a collection of tools for creating your own taxonomies, fields and post types.
The plugin seems relatively new and does not have a lot of active installs yet. However, ratings are good and it seems worth checking out.
Custom Post Type Maker
Another plugin that’s fresh on the market and promises to take care of all your needs concerning custom post types and taxonomies.
The makers promise that it makes creating CPT as easy as setting up posts and pages.
Comments in the support section make it sound like they are still working on some kinks, but you may want to give the plugin a shot anyway.
How to Create Custom Post Types with Types
As mentioned, in this tutorial we will be using the Types plugin in order to create our custom post type. Don’t worry if you decide to go with another solution, the process should be quite similar across all plugins.
For demonstration purposes I will use my earlier example and create a post type for book reviews.
1. Install the Plugin
Naturally, the first step is to install the plugin. For that, go to the plugin menu and choose Add New at the very top.
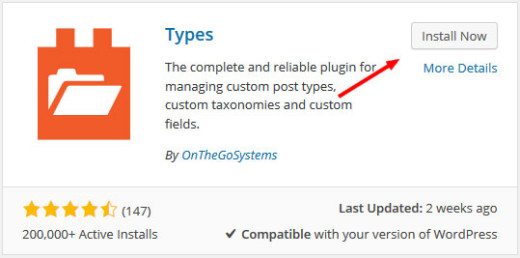
In the following screen, search for “types” and hit enter. What you are looking for should be on the first place of the list. A click on Install Now will download it to your site.
After the installation is finished, don’t forget to activate the plugin!
2. Create Your Custom Post Type
After this process is done, you will see a newly created Types menu item in the main menu. When you hover over it, you can choose Post Types from here.
In the next screen you will find all currently existing post types on your site.
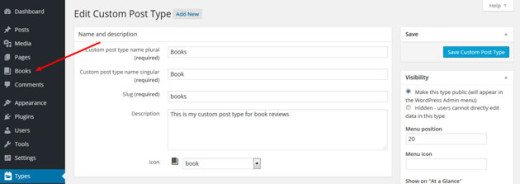
To create additional ones, hit the button that says Add New Custom Post Type at the top. Everything you need to configure for your custom post type happen will happen inside this screen.
I know, in the beginning it may seem like a lot, but don’t worry about it we will go through each section one by one.
Also, a lot of settings come pre-configured, so you won’t have to do a thing there.
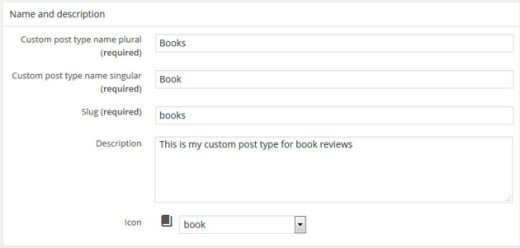
Name and Description
Here is where you provide some general information about your custom post type and make sure it integrates well into the WordPress back end.
- Custom Post Name Plural/Singular — Enter the name of your custom post type in both plural and singular. This is important so that status messages and buttons will end up grammatically correct.
- Slug — The slug for your CPT. This is the permalink extension each content piece of this type will be posted under. For example, in my case I choose “books” as my slug and end up with http://mysite.com/books/my-post-name.
- Description — A short description of your custom post type. It’s more of a hint for other people so you might be able to leave this empty if you are the only one using your site.
- Icon — Here you can choose an icon from the official WordPress icon font. This will show up in the back end main menu, so try to choose something appropriate. Lucky for me, the font contains not only one but two book icons.
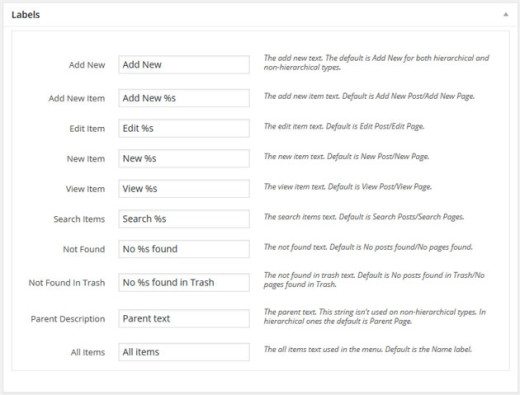
Labels
As already mentioned, the CPT name is used in different places, which is the reason you need to provide it in singular as well as plural.
Under Labels you can then edit the wording for different buttons, actions and messages. The ‘%’ icon is a placeholder for your custom post type’s name. Usually everything here can stay as it is.
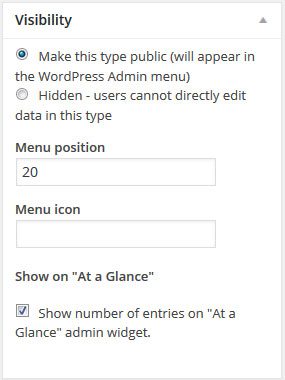
Visibility
This field is where you configure where in the WordPress front end and back end your post type will show up.
- Public/Hidden — A public post type will be displayed in the WordPress admin menu, is included in searches and will generally behave similar to posts and pages. If hidden, it will more like post revisions. Visibility can be modified even further under Options. I set my CPT to Public since I definitely want my book reviews to show up on my site.
- Menu Position — Determines where in the WordPress back end the custom post type will show up. You can check the WordPress Codex to see which number is reserved for which position. I go with number 20 here in order to place my post type directly under Pages.
- Menu Icon — Here you can change the menu icon. Leave it blank in order to use the one set under Name and Description.
- Show on “At a Glance” — If you check this box, your custom post types will be displayed in the widget on the WordPress dashboard that reports basic numbers of posts, pages, comments and more.
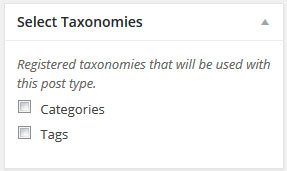
Select Taxonomies
Here you can determine which taxonomies will be valid for this post type. If you create custom taxonomies, they will show up here, too. I have decided not to use the standard categories and tags and leave both boxes unchecked.
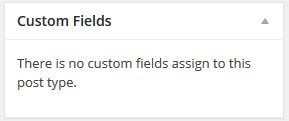
Custom Fields
Once you have created custom fields, you can enable them here for any custom post type you create.
Custom fields would, for example, be used to create an extra box in the WordPress editor where you input an affiliate link that then shows up automatically as a Buy Now button within the post.
Since I don’t have any custom fields right now, there is nothing to do here.
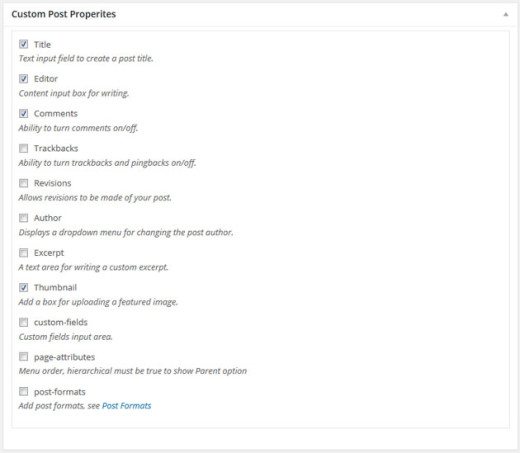
Custom Post Properties
This set of options basically determines what you see inside the WordPress editor when creating a custom post type. So, if you have ever worked with the editor before, the options here should be familiar to you.
For now, all I want is the ability to set a title, the WYSIWYG editor, be able turn comments on and off and a post thumbnail (aka featured image). Easy.
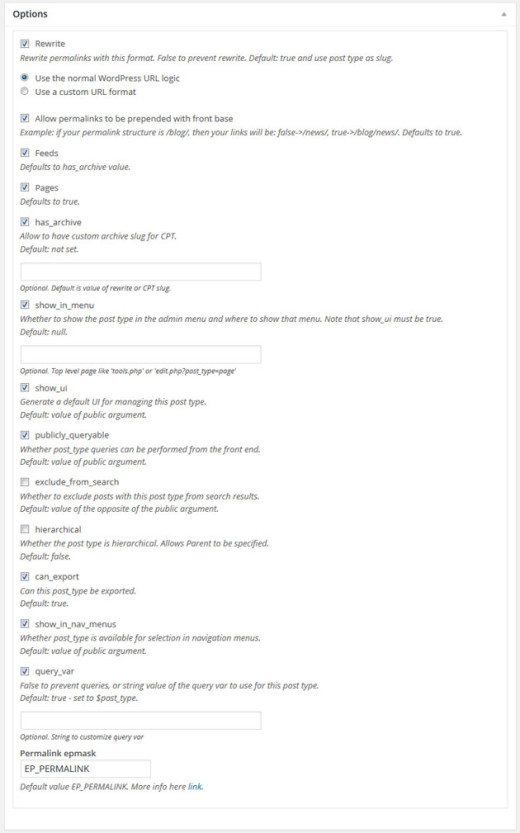
Options
The Options field contains a number of advanced settings for custom post types. In most cases everything should be left as it is and we will do so for the time being.
Post Relationships
In the last set of options you can create parent-child relationships between different post types. If you don’t know what that means, just think of post categories and how they work with sub-categories (like Jazz inside the category Music). Again, this is a bit of an advanced setting that we will not go into at this point.
After you have configured everything to your liking, scroll all the way back up to the top and click Save Custom Post Type.
After a moment of loading time, you should now be able to see your new post type as an option in the WordPress main menu.
Well done indeed. Congratulations!
3. Create Your First Custom Post
However, there’s no time to rest on your laurels. We gotta keep right on doing things.
Before you can get your new post type to show up on your site, we first need to create at least one example post.
This works the same as creating any other post. Hover over the CPT menu item and then choose Add New. Fill in some content, give it a title, featured image and whatever else you need and publish. Done.
Displaying Custom Post Types on Your Site
Now that we have created a custom post type, it is time to make it show up on our site. Since WordPress has built-in support for CPT, this is not too complicated. However, there are several ways to do so.
Display Custom Post Types on Your Blog Page
While one of the advantages of CPT is that you can keep them completely separate from the rest of your content, there are cases in which this might not be desirable.
For example, my book reviews should definitely be part of my normal blog posts and show up in the main loop.
Luckily, I can achieve this easily by inserting the code below (courtesy of the WordPress Codex) into my functions.php file and so can you.
add_action( 'pre_get_posts', 'add_my_post_types_to_query' );

function add_my_post_types_to_query( $query ) {
 if ( is_home() && $query->is_main_query() )
 $query->set( 'post_type', array( 'post', 'books' ) );
 return $query;
}
Just remember to change books into the name of your custom post type.
Use The Default WordPress Archive Function
Unless you have specifically switched it off earlier, an archive of your custom post type will be available under its slug, e.g. in my case http://mysite.com/books.
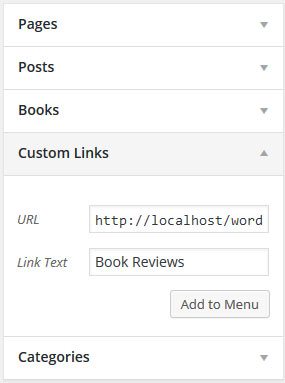
Because of that, you can easily add CPTs to your site via a custom link to the archive in the main menu.
For that, merely go to Appearance > Menus and find Custom Links on the bottom left side. Here, enter the URL to your CPT archive and give it a name under Menu Item.
After that, don’t forget to add it to your menu (via the big gray button) and save the menu.
Good job! But it gets even better.
By using a custom template you can further enhance the display of your CPT archive.
The default template used for WordPress archives is archive.php. However, if that’s not up to your liking and you would like to change it, you can do so — thanks to the WordPress template hierarchy.
To create a custom template for the CPT archive, merely copy archive.php, change its name to archive-[post_type].php (e.g. archive-books.php) and add it to your theme folder.
Any customizations in this file will now take effect on your site.
By the way, the same is true for the look and formatting of single custom post type entries. Due to recent changes in the template hierarchy, custom templates of the format single-[post_type].php are now supported.
Copy single.php, rename it and modify as needed. Done
Show Custom Post Types Inside a Widget
Finally, another way to put CPT on your front page is via the Ultimate Posts Widget plugin.
Simply install and activate the plugin on your site, then go to Appearance > Widget and drag the widget of the same name to any place you want your post types to appear.
After that, it’s only a matter of setting the widget to display your custom post type and you are good to go.
A Note About Creating CPT Manually
Everything that we have done here with the help of a plugin can also be done by hand.
In fact, if you take a look at the WordPress Codex on the register_post_type function, much of what you have seen in this tutorial will seem familiar.
The options, parameters and everything else stay the same. The only difference is that we have a plugin do it for us instead of writing code.
WordPress Custom Post Types in a Nutshell
Custom post types have played a big role in WordPress’ shift to become a full-featured content management system.
With a user base as large as that of the WordPress platform, it’s hard to cater to such a wide set of different demands and the ability to create specialized forms of content is hugely important in succeeding to address them.
Whether you post recipes, movie reviews, portfolio items, products for sale or whatever your game is, with custom post types you can create posts that do exactly what you want them to.
As you have hopefully seen in this article, doing so is not very hard. The support of CPT within WordPress is excellent and we have plenty of high-quality plugins at our disposal to help us.
Plus, once you have understood the principle behind custom post types, creating them via code isn’t such an obstacle either. However, that’s a story for another post.
Are you using Custom Post Types on your site? For what purpose? Can you recommend a plugin? Let us know in the comments!



17 Comments