“I don’t have time.”
“I’m too busy.”
“I would love to but. . .”
If you recognize yourself in the above sentences—Congratulations!—you are running a blog or website and have discovered that, as rewarding as it is, it also requires a lot of work.
Who knew that creating something that you are proud of, or pouring your heart and expertise into a project, or sharing amazing content takes more than half an hour out of your day? It’s mind blowing, isn’t it?
The bad news is: That’s just how it is. To create something worthwhile, you will have to put in the time and energy it takes to complete it.
The good news is: WordPress offers ways to make running your website more convenient and efficient. With a few WordPress hacks, plugins, and shortcuts, you can improve your workflow, streamline your processes, and save time in the everyday tasks of running your site.
1. Learn WordPress keyboard shortcuts
I already mentioned the keyboard shortcuts in an earlier article, but it warrants repeating. Being able to make complex edits to your content without taking your hands off the keyboard is a serious time saver.
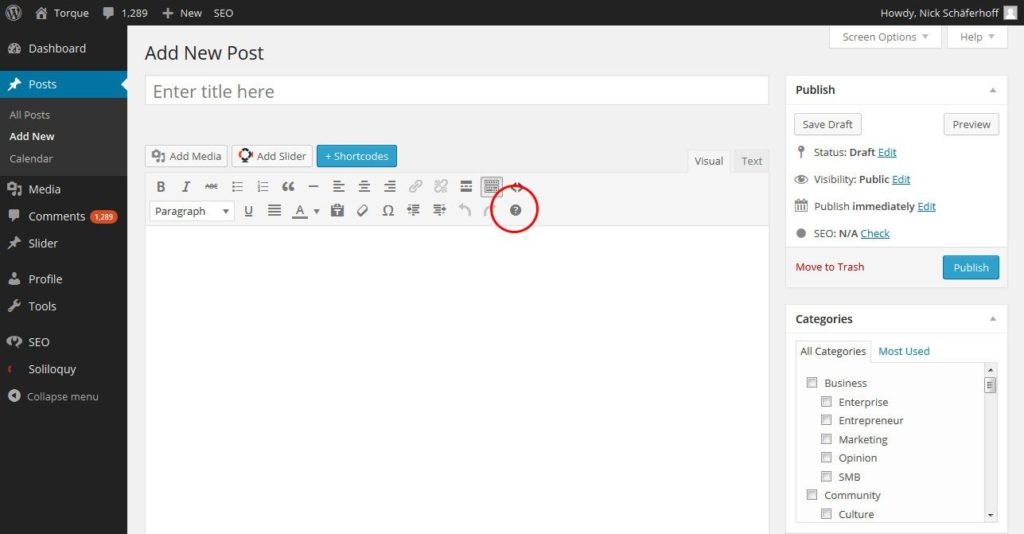
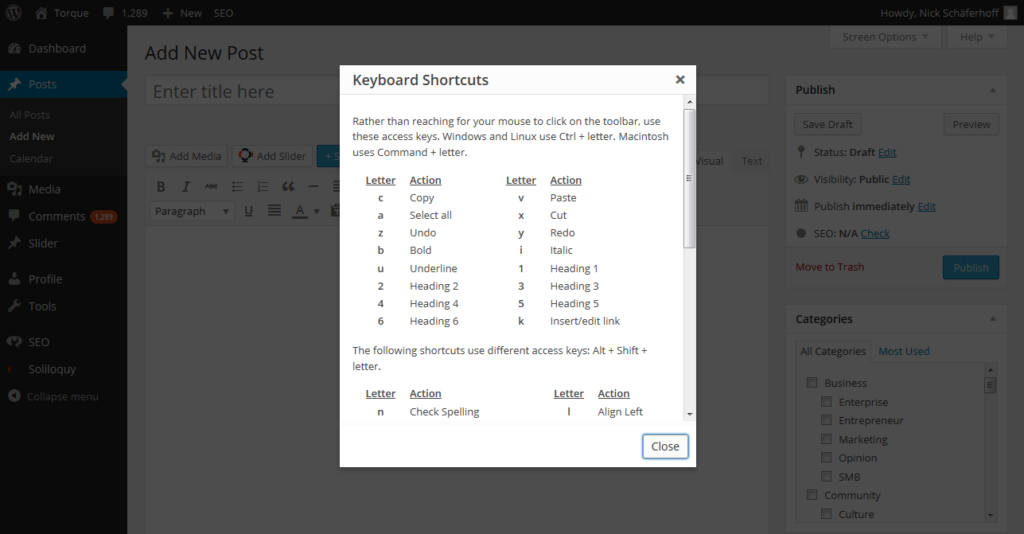
You can find the full list of shortcuts by clicking on the question mark icon in the second line of the editor toolbar. Make sure you have the ‘kitchen sink’ enabled to see it.
However, not all shortcuts are created equal. Below are a chosen few you are likely to use more than anything else. Commit them to your memory and use them for your next article. You will see, it makes a huge difference.
- Bold text (Ctrl/Cmd+b)
- Italicize text (Ctrl/Cmd+i)
- Underline text (Ctrl/Cmd+u)
- Set heading h1-h6 (Ctrl/Cmd+1-6)
- Set to paragraph (Ctrl+7/Cmd + 7)
- Create an unordered list (Alt+Shift+u)
- Create an ordered list (Alt+Shift+o)
- Insert/edit link (Ctrl/Cmd+k)
- Insert media (Alt+Shift+m)
- Insert ‘read more’ tag (Alt+Shit+t)
For more, be sure to check out the full list.
2. Use the WordPress internal linking tool
Does your workflow for creating links seem a bit daunting?
- Open up your site in new tab
- Browse to article or page you want to link to
- Copy link from browser bar
- Go back to editor
- Mark text where you want to insert the link
- Click on ‘Insert/edit link’
- Paste link address
- Go back to article to copy its title
- Insert title
- Click ‘Add link’
A bit lengthy wouldn’t you say? Fortunately, you can achieve the same thing in just a fraction of the steps. How? Through WordPress’ internal linking tool.
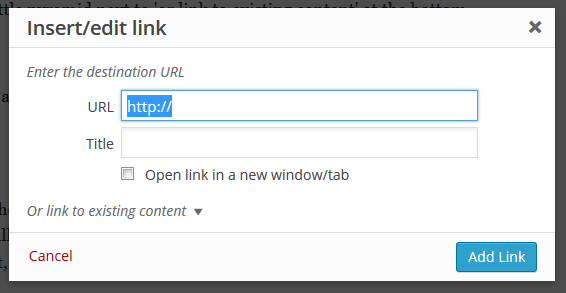
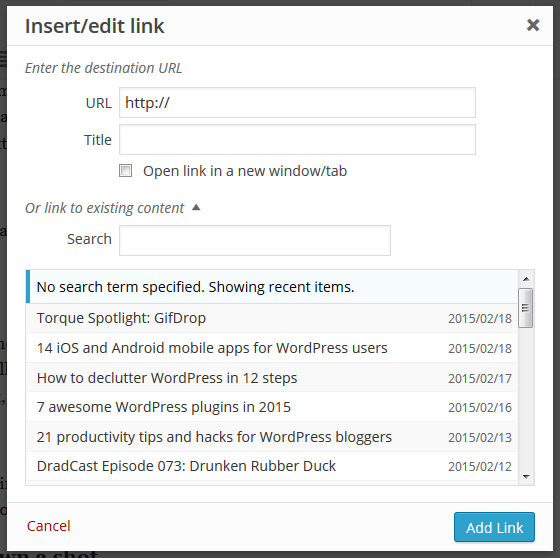
To see what I mean, merely mark whatever text you want to add a link to and press ‘Insert/edit link’ (or, as we have learned earlier, press Ctrl/Cmd+k). In the pop up that opens, click on the little pyramid next to ‘or link to existing content’ at the bottom.
This will give you an additional menu, from which you can create a link to any content already on your site.
Merely scroll down the list or enter a search term to find the page or post you are looking for. A click on the title will not only add the correct link in the upper field but also populate the title field. Pretty neat, isn’t it?
And the best thing: Since the linking tool uses the internal IDs from your database, the links created in this way won’t break even if the url of posts or pages change.
3. Give Markdown a shot
Markdown is something I already mentioned in the 42 must-have blogging tools for WordPress bloggers. It is a syntax for formatting content similar to HTML. However, instead of wrapping text in opening and closing tags (such as <p> and </p>) tags, it uses a number of characters, symbols and punctuation marks. For example, in Markdown putting ‘##’ before any phrase is equal to the <h2> tag.
Being familiar with this formatting syntax can be a real time saver and there are plugins that make it available in WordPress. For example:
The meta-plugin Jetpack also comes with a Markdown module.
4. Enhance your focus with distraction-free writing
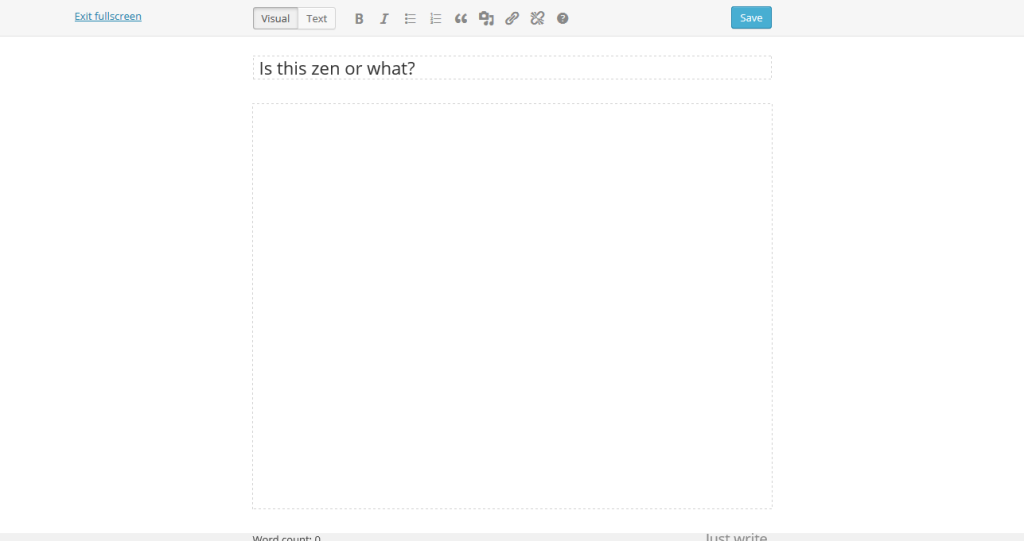
The distraction-free writing mode is one of my favorite features in all of WordPress. With a simple click you can remove all unnecessary elements from the WordPress editor so you can concentrate entirely on creating content. I mean, look at this:
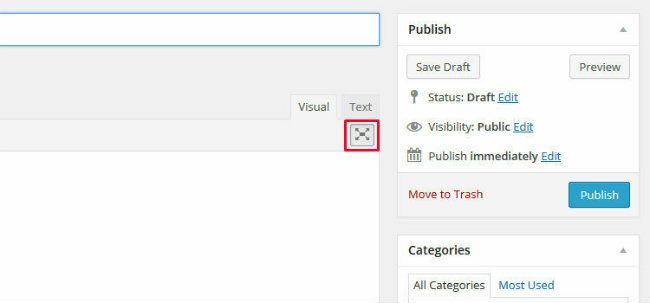
First introduced in WordPress 3.2., the feature was further improved with WordPress 4.1. The new version is a lot more user friendly. I encourage you to give it a try, it’s only one button click away.
5. Always have images in optimal size
You are probably aware that you should be using images and other media to enhance your content. It’s a good idea both in terms of SEO as well as visitor engagement.
However, even though WordPress automatically creates several versions of every picture you upload, making them fit your website can be a huge hassle. And nothing is more annoying than when an image breaks your carefully conducted website design.
Thankfully, there is a way to make sure your uploaded images always come in the perfect size and sit flush inside your content.
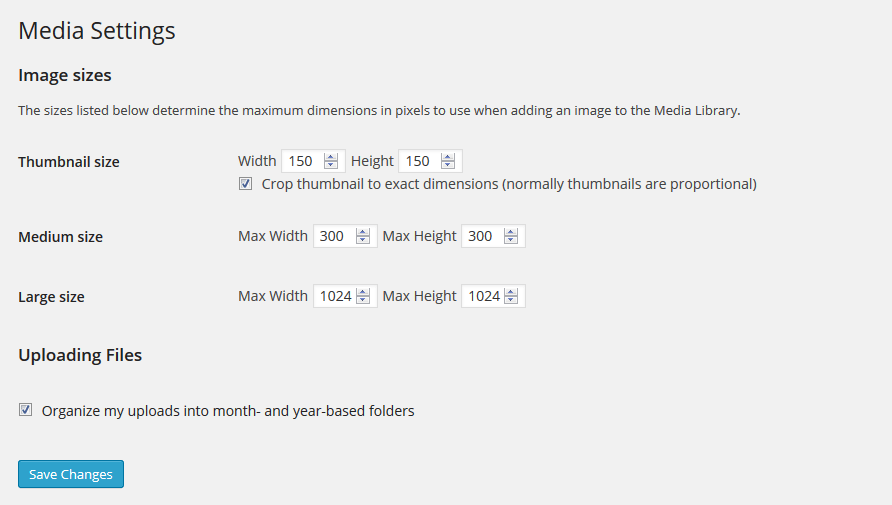
Under Settings > Media, you will find the following options:
These numbers determine the image sizes WordPress will automatically generate from uploaded files. Setting the large images to the exact measurings of your content area will make sure they always fit neatly in there. How do you think the screenshots in this article achieved their perfect size?
6. Use ImageInject to source and insert images
In the hunt for supplementary image material many of us turn to the Creative Commons section of Flickr. Their library holds thousands of free-to-use photos and other images on almost any topic.
However, this sort of thing takes time: Searching Flickr, downloading the images in question, renaming, uploading them to WordPress, and inserting them into your post—sounds like a lot of work, doesn’t it?
ImageInject (formerly known as Wp-Inject) provides a shortcut for this process. The plugin allows you to search the Creative Common library directly from the WordPress editor and insert any image with just a few clicks! And the best part: ImageInject automatically adds the necessary attribution link. I know, right?
7. Use WP Smush.it for automatic image optimization
However, having too many images in your content can contribute to load time, which is both a factor in SEO as well as a turn-off for users. To make them less of a drag on your resources, consider image compression.
That means removing any information and data attached to the files that is not necessary in the context of your WordPress site. This reduces size without compromising quality.
A plugin which makes this process very comfortable is WP Smush.it. Once activated, it will run in the background and compress every image you upload. In addition to that, it can also do the same with all the files already existent in your media library.
8. Directly post media to your content
Similar to adding links, most people’s workflow for inserting media is similarly convoluted and click rich. However, did you know that there is no need to go through the ordeal of clicking the ‘Add Media’ button (Alt+Shift+m, by the way), then go to ‘Upload Files’ and start adding media from here?
Instead, you can simply place your cursor wherever you want your media file to appear and then drag and drop whatever image you want right into the editor. It’s true! How do you think the screenshot below got here?
9. Employ auto embeds
Talking about posting things directly: Long gone are the days where you had to deal with complicated embed code and iframes in order to enhance your content with YouTube videos, Soundcloud songs, and other media.
Thanks to auto-embedding, you can simply post links into the editor and WordPress will take care of the rest. Confused? Here is what I mean:
Check out this video:


Did you like it?
Instead of the link, WordPress will automatically embed the video it is pointing to. No joke, try it for yourself. What’s even better, this works for a wide range of Internet services, a list of which you can see here.
10. Schedule posts ahead of time
When I first starting blogging and wanted to adhere to a set publishing schedule, it was one of my rituals to get up on Monday morning, log into my WordPress site, and then hover over the ‘Publish’ button of my latest blog post to make it go live at the desired time.
While satisfactory, little did I know that my presence was in no way needed to make my content appear on the blog at a set point in time. Nobody had told me about WordPress’ scheduling feature yet.
In case it’s the same for you, direct your attention to the box with the publishing options in the WordPress editor (usually in the upper right quadrant), in particular to where it says ‘Publish immediately’.
If you click on ‘edit’ here, you are given the option to choose any point in time in the future where your blog post is supposed to go out in to the world. Click ‘OK’ and you can schedule it automatically.
You will notice that even the ‘Publish’ button changes to ‘Schedule.’ One click and your blog post is on its way with no further action required on your part whatsoever.
11. Set a standard category
Every WordPress post automatically receives a category as soon as you start working on it. Unless you have changed this setting manually, it will be the bland ‘Uncategorized.’ Not very meaningful at all, is it? However, there are two things you can do to change this.
For one, you can set a different default category to be assigned to your posts automatically. Merely go to Settings > Writing and choose whichever is your most frequent taxonomy from the dropdown menu next to ‘Default Post Category.’
Secondly, you can also change the ‘Uncategorized’ taxonomy item into something else. This will also affect older content that has already been tagged with this boring category.
To do so, go to Posts > Categories and click on the ‘Uncategorized’ label in the list. Now you have the option to rename it to something more user friendly like ‘general’ or some other catchall category.
12. Use the ‘Quick Edit’ function
If you need to make changes to one or several posts that don’t involve editing the text body, you can do so without visiting the editor and save yourself some loading time.
You might have noticed that when hovering over any post in the ‘All Posts’ list, a small menu appears underneath the title. This includes a ‘Quick Edit’ option.
This function allows you to make a lot of changes to your posts:
- Change the post title
- Change the permalink/slug
- Set a publishing date
- Enable password protection/set post to private
- Change categories and tags
- Switch on/off comments and pings
- Change post status
- Make post sticky
This option really deserves its name, right?
13. Use bulk edit
And since we are talking about quickly making changes to your posts: You can do the above with not just one but several items at once. No kidding!
Under ‘All Posts’ simply tick the boxes on the left of those items you want to make changes to. Then in the upper left corner, choose the ‘Bulk Action’ dropdown and click ‘Edit’ to get to the bulk editing screen.
Similarly to ‘Quick Edit,’ you can assign categories and tags, change the author, enable and disable pings and comments, assign a post status in bulk, as well as make posts sticky. Don’t tell me this won’t come in handy.
14. Get a spam plugin
Spam is a real plague. Is there anything worse than logging into your WordPress site and seeing the spam counter show astronomical numbers?
Yes, there is. Seeing the same spam messages intermingled with legitimate comments and having to go through all of them in order to decide which one is worth keeping and which one isn’t.
Therefore, in order to save time and nerves, you should definitely invest in a proper spam plugin. There are many options out there and they have become quite good at determining between real and fake comments. Your only duty then will be to empty the spam folder once in a while.
Akismet is a paid plugin and a community favorite. If you are looking for a free (and reliable) alternative, my personal go-to plugin is Antispam Bee.
15. Integrate Google Analytics into WordPress
Traffic analysis is an important part of running a website. Most of us rely on Google Analytics to keep us up to date. However, the service is several clicks, open browser tabs and logins away. Wouldn’t it be great if we could check our stats right from the WordPress backend?
Yes it would. And with the latest version of Google Analytics by Yoast you can do just that. The plugin creates a dashboard within WordPress where you can check your latest stats and keep up with your traffic. Besides making connecting your site to Google Analytics a breeze that is.
Turn yourself into a blogging machine with these WordPress hacks
Running a WordPress website can be a lot of work, no matter how advanced the platform already is. However, by taking advantage of the many shortcuts the CMS offers, you can cut down on the time it takes to complete many of your everyday tasks. Time that can then be spent on high-impact measures to extend your website’s reach, increase traffic, and improve your overall business. Or, if it has a higher priority, just taking a little time off.
What tips and hacks do you use to cut down on WordPress tasks? Invest the time you save into letting us know about it.




7 Comments