WordPress is the most popular CMS used by millions of bloggers. Initially it was considered just as a blogging platform.
There are different useful plugins available for WordPress and due to this reason, managing content online was never easier than today. A stylish and eye catching blog attracts more visitors and the users also feel comfortable while browsing.
WordPress blogs can be fully customized and designed by use of WordPress plugins.
Today I am going to share a WordPress plugin with you guys that will let you add peel away effect to top right corner of WordPress websites. I had first seen this effect on a Fashion website and was really inspired from their concept. So, I thought to give it a try.
After successful integration of Page peel away effect to my blog, I thought to share my experience with it.
Why to Add Page Peel Away Effect?
Page peel away effect is certainly useful to draw attention of users to a specified page or product. I know that not everyone may be a fan of this particular implementation, but I’d honestly like your feedback and thoughts (in the comments).
It’s not commonly used so adding such a thing on your blog will make your blog look unique from others. It has the potential to grab your visitor’s attention and click the link to see what’s inside.
It will also make visitors more curious about the release of new products and encourage them to check the specified product or page through Page peel effect. You can also place ads to the top right corner of your blog by using this feature.

WP Peel Off Plugin
The process of adding peel away effect to websites is a little bit tricky. It involves a lot of JavaScript placements and HTML codes additions.
With the release of WP Peel off Plugin, it became easy for WordPress users to add a page peel away effect to their blogs. Following are some features of WP Peel off Plugin:
- Limit Peel off to specific IP (For testing purposes)
- Custom Pre-Hover Image
- Custom Post-Hover Image
- Custom destination URL
- Peel off Scheduling
- Displaying Peel off on specific Pages only.

In order to create a peel away effect follow the simple procedure explained below:
- Download and install WP peel off plugin by clicking here.
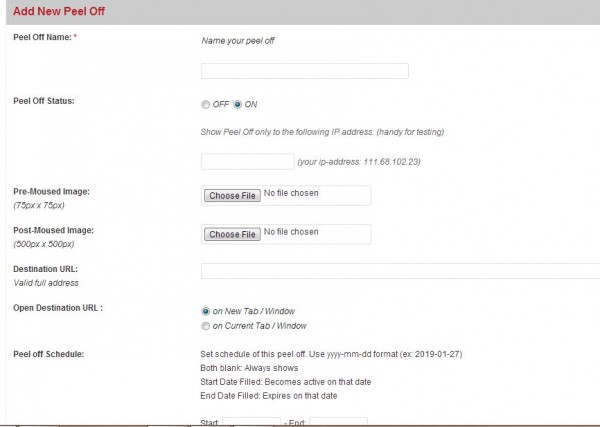
- Move to the SoftWarp tab from the admin menu and click on WP-Peel off link. Now, fill out all the required fields according to your needs.
- In order to test the functionality of this plugin, you can put your IP address in the relevant field and it will limit visibility of peel away effect to that specified IP address.
- After testing the working of peel away effect, you will have to remove IP address from that field in order to make this effect visible to public.
- You will need an image of 75×75 pixels, to be shown before a visitor moves mouse cursor over the peel away corner.
- Another image of 500×500 pixels will be required to be shown after a person moves mouse cursor over the peel off corner.
- You can schedule peel away effects for promotions and those will be automatically expired after a specified time.
That’s all for creating a Peel Away Effect on WordPress blogs. You can see a live demo of Peel Away effect on my blog AR Web Zone.
If you face any problem then feel free to comment below.

9 Comments
Join the conversation