Instagrate pulls in Instagram photos from your personal collection, your feed, or from a variety of filters, then puts them on your WordPress site—anywhere you’d like. That’s it! Now go buy it and use it.
What? You want more? You always want more. Here are the details.
The Features
One of my biggest problems with third party services like Instagram is that if they ever go down you can lose everything, and then you’re stuck. With Instagrate you can import photos right into WordPress and Media Library on your own server. That way you never have to lose them. And Instagram videos and photos are both supported.
I don’t want to just rattle off Instagrate’s feature list, so here’s a demonstration of what you can do with it. After you connect WordPress to Instagram, you load in photos from your Instagram account, to display them on your personal blog, for instance. Alternatively, you can pull in from your feed, any other user’s public feed, or even from a filtered list that scoops up a specific hashtag, if you’re trying to show photos from an event (a wedding perhaps?).
After photos have been loaded in, you can customize how you want them to be output to your site. You can create a new post for each Instagram photo complete with a caption, title, tags, etc. using a template and some custom shortcodes. You can also group photos together into one post, or just append them to an existing post.
Then you can specify how frequently new photos should be added. Want a new photo to be added to your blog every time your site is visited? That’s an option. Want to schedule new posts every day? Every fortnight? You can do that too. Of course, you can always just set everything to manual and do it yourself.
And Instagrate has just enough features to let you do what you want with it. For instance, you can save images to your Media Library, and set the frequency of posting to manual. Then all of your Instagram photos will be in your Media Library and you can use them in any of your posts, using the media uploader, without having to manually duplicate them.
The Nitty Gritty
My favorite thing about Instagrate is that it takes the photos and decouples them from the rest of your site. It makes clever use of the Instagram API by first loading images in, then letting you distribute them to your site how you would like, and when you would like. This also means that images, posts, etc. are only loaded when they are needed without reliance on external libraries, which has become a mantra of mine. This puts a bit of a learning curve on the interface, but is a small sacrifice for achieving the necessary flexibility.
So how does it work? Let’s take the simplest of use cases, adding Instagram photos, each as its own post, into the stream of posts on your blog. The first thing you do is visit the “Add Account” tab and connect WordPress to Instagram using your login credentials. Then you set how frequently you want to add photos to your blog using a meta box in the sidebar. Let’s say “Constant,” so new photos will be added every time the site is visited (if there are any new photos to add).
You can also chose to group photos together on a single new post, or attach to an existing post. Then we can check the box below this “Save Instagram Media to Media Library.” This will take any photos posted to my Instagram site and add them to my Media Library. New posts will be automatically be timestamped with the same date and time as Instagram, so they’ll fit into the flow of your site.
Next up, let’s add them to the “Photos” category by selecting that from the “Category” meta box on the right. Even if the “Photos” category is in a custom taxonomy, we can select it. Then we can customize the default author for these posts, automatically convert hashtags to WordPress tags, and specify the Post Format. “Image” seems like a good fit. By default, the post status of these posts will be set to “Publish” but we can set it to whatever we want, “Pending Review” for instance, so that we can look at the list of the posts in our dashboard before pushing them live to the site.
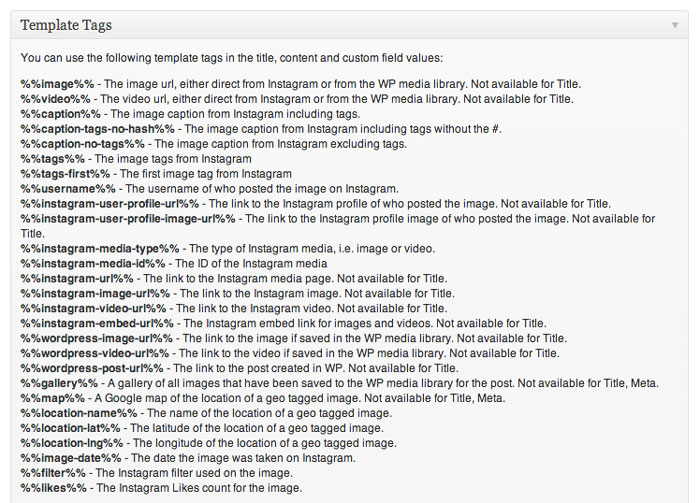
The next step is to customize the actual output of the posts. What do we want to include in the posts themselves? The image of course, but also maybe the caption on Instagram. Then we can stick the Instagram user name, location, and number of likes below this. Each one of these attributes has a custom shortcode you can use in the editor, which looks something like: %%caption%%. You can arrange these however you like within the post, and incorporate metadata by using these shortcodes.
Below this you will see a grid of the actual photos that were imported from Instagram according to your criteria. Posts that have not yet been posted will be highlighted orange, existing posts will be green and ignored posts will be black. You can select any image and bulk set as either pending or ignored posts. Ignored photos won’t be added to WordPress and are useful if you are adding posts manually. If you click on any image it will open up a lightbox with associated metadata, such as caption and tags, which can be edited one by one.
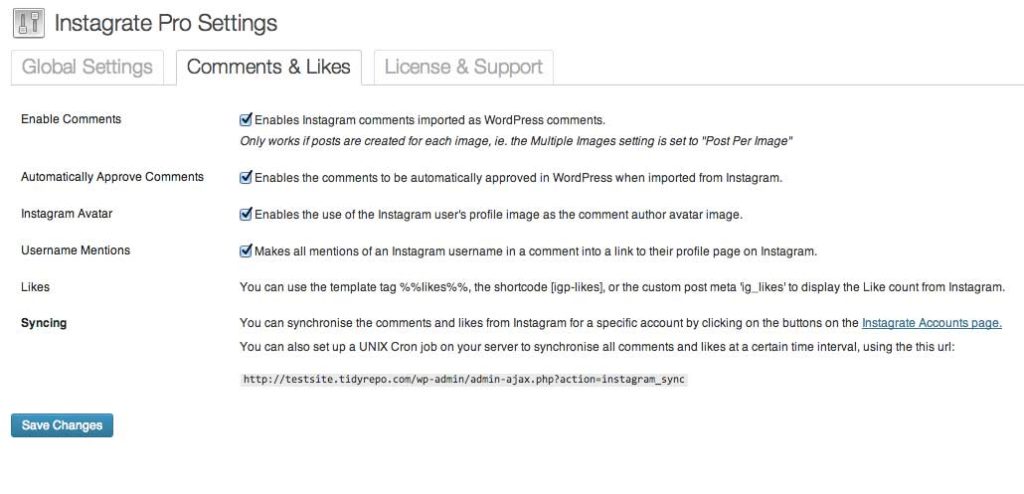
Lastly, let’s hop over to the settings and check the box that enables comment imports. Now, whenever a new photo is added, the Instagram comments will be imported, and user profile pictures can optionally be used as gravatars. Then just click the “Publish” button and you are all set.
That’s just one use case. There are plenty more to explore.
A Few More Things
Like any good plugin, there are a couple of extras that make it just a little more special. First and foremost, there’s a URL in your settings that you can set up with a custom UNIX Cron job, so that new posts and comments can be added behind the scenes, automatically, if you feel so inclined.
The plugin also lets you pass a custom “rel” attribute to images posted with Instagrate. This lets you integrate with various lightbox plugins that might require this (i.e. rel="lightbox"). Pretty handy.
Lastly, there’s full support for location metadata. When posting multiple photos to a single post grouped together, you can stick a Google Map at the bottom that shows where photos were posted. You can customize that map, of course. You can also include location data, such as location name, or latitude and longitude, in the output of your posts with the same shortcode syntax you use for caption or image URL.
The last thing to keep in mind when using Instagrate is that when posts are published, they are published like any other post. So if you are using the single post per photo or grouped photos on a new post option, the only way to delete a post is to trash like you would any other. It’s very important that you set up the plugin right before you hit “Publish” so that everything publishes right. Otherwise, you’ll have to trash these posts and start over.
The Final Word
The bottom line: if you’re looking for a way to integrate your Instagram photos into WordPress, Instagrate is a great way to go. It’s quick, it’s lightweight and it’s got the features you need. I will admit that getting started can be a bit tough, as photos are pulled in separately from the rest of the site—in an attempt to silo the photo content. But once you get the hang of it, you should be fine.
Instagrate is a premium plugin with licenses for single site, multiple sites, unlimited sites, and an unlimited plan ($35 / $95 / $155 / $255). Each plan comes with updates and support.
Been wanting to integrate Instagram with your WordPress site? Give Instagrate a try and let us know you go!
 Jay Hoffmann is a WordPress developer hailing from NYC. In the strictest sense of the word, he is a WordPress enthusiast with an eye for front-end development and design. He has been working with WordPress since 2006 and currently works for a popular children’s media company. This year, Jay started Tidy Repo, a curated list of the best and most reliable plugins from around the web. You can also follow Jay on Twitter.


No Comments