
Custom Sidebars is a free plugin recently released by the team from WPMU DEV. The creator of this extremely useful plugin, Javi Marquez, is now part of the WPMU DEV developer team.
From its title, it’s obvious what this plugin does. But I’m going to tell you a bit more about why it is so useful, and provide a short tutorial on how it works.
Most sites running WordPress use one or (maximum) two sidebars. Typically, the same one(s) are displayed on every page, no matter what part of the website a user is browsing. What Custom Sidebars gives you is the ability to create multiple sidebars, which you can set to display only on specific posts, pages, and categories—thus giving you a tremendous amount of power to control what your viewers see.
For example, let’s say you publish a post about web hosting companies or food photography, and want to make sure your readers see very specific affiliate ads. You can easily do this by creating a custom sidebar, loading it with the affiliate ads, and assigning that sidebar to the relevant post, all while leaving another default sidebar to show on all the other posts viewers browse.
The flexibility of the plugin is almost limitless. If you so desire, you could have one sidebar for every post/page on your site. That, however, might be taking it a bit too far, but I hope you can see the power this plugin gives you.
How to Set Up Custom Sidebars
Download and install the plugin in the usual way. When it’s installed, the plugin’s settings page will appear under Appearance > Custom Sidebars.
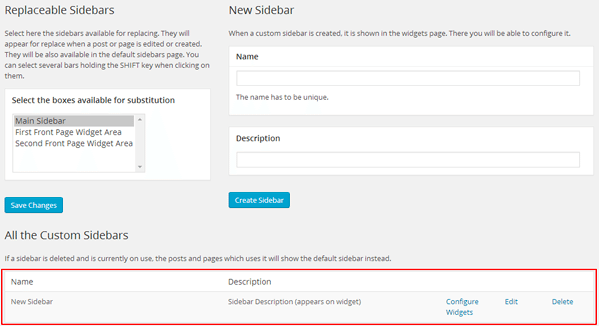
To create your first custom sidebar, click on the New Sidebar section on the right, key in a name, and write a brief description (these 2 snippets of information will show on the widget).

When done, hit the Create Sidebar button.
The new sidebar will be listed at the bottom of the page.
Click over to the main widgets area, Appearance > Widgets, and you can start adding widgets to the sidebar.
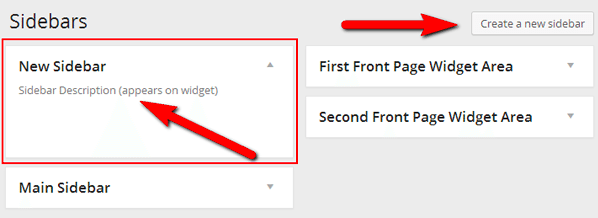
To create another sidebar, click on the button in the top right corner and repeat the process. Alternatively, return to Appearance > Custom Sidebars.
Once you have enough sidebars, it’s time to add content.
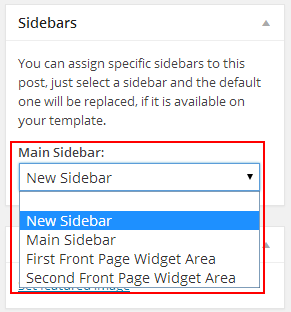
When a sidebar is ready and complete with widgets, you can assign it to individual posts and pages by selecting it from the drop-down menu in the post editor. Look for the new Sidebars metabox, and from the drop-down menu, choose the sidebar you want to use for the post/page.
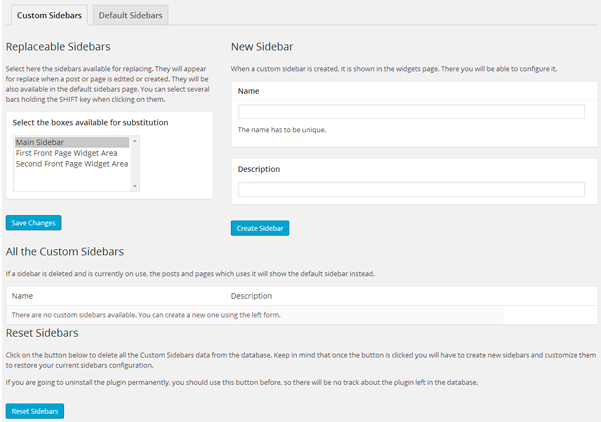
Lastly (and this is a great little feature) you can set up default sidebars for different areas of your site: post type (posts and pages), categories, and archives (tag, author, date etc). To do this, open the Default Sidebars tab (see top picture), click the section you want to set up and choose the custom sidebar from the drop-down menu (don’t forget to Save Changes).
Custom Sidebars is a very powerful plugin, which gives you a lot of control over your site. I’m sure it won’t be long before it starts appearing on those ‘essential WordPress plugin’ lists you undoubtedly read at least once a week. Try it out to see what it can do for you!
Have you used Custom Sidebars?
 Jonathan John is a total WordPress fan and freelance blogger. He loves comparing WordPress plugins and themes, sharing the latest Automattic news, and helping non-techies get the most out of the world’s favorite CMS.
5 Comments