Be honest: Is your WordPress backend a clean and appealing working environment? Does it make you feel relaxed and focused, and taking care of your website a pleasant activity?
Or is it a mess of update messages, unanswered comments, and other distractions? Where you have to scroll over dozens of unused plugins until you get to the one your are looking for?
You know, kind of like this browser window:
If so, it’s time to set aside time for a “declutter WordPress weekend,” and do some serious housecleaning. With spring around the corner, what better time to make a fresh start?
How to declutter the WordPress backend
If you are one of the many people who use or even earn a living with WordPress, the backend is a working area just like the desk in your office and should be treated as such.
Where do you think you would be more efficient, at a desk that is full of papers, unanswered mail, coffee stains, pens and other knickknacks, or at a clean and tidy work surface that only contains what you really need?
Ok, that was a bit of a rhetorical question, but here is how to turn your WordPress admin area into the digital equivalent of the latter.
1. Delete unwanted plugins
It’s easy to become a plugin hoarder. The WordPress directory offers plugins for almost any functionality you can think of (and many things that you’ve probably never thought of).
When looking to change something on your site, common practice is to shop around and try a few plugins before settling on one. While that’s generally a good idea, many people will forgo deleting those plugins that didn’t make the cut, which then continue to hog space and resources.
The plugin department is therefore the first place to unclutter:
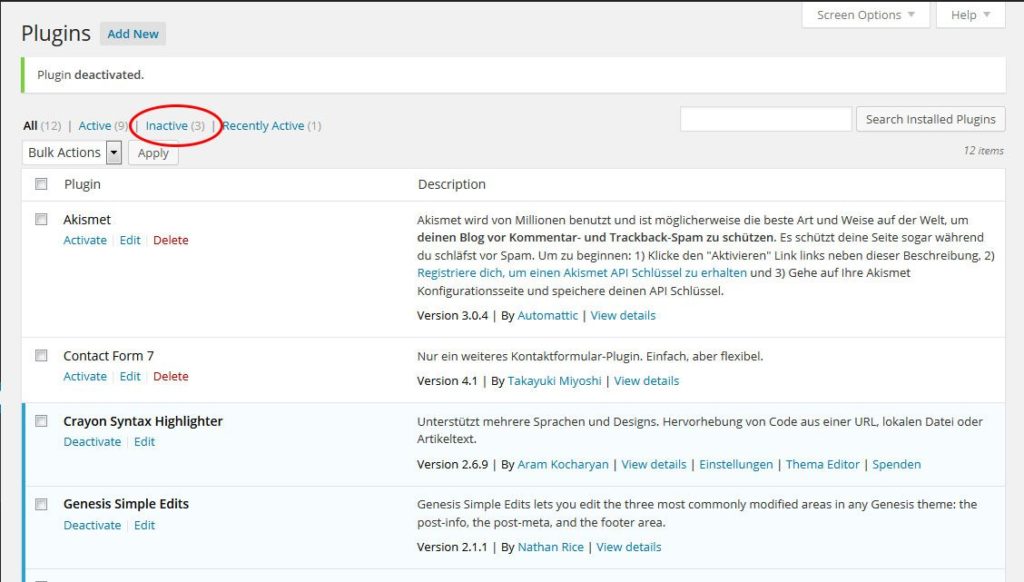
1. Review your entire list of plugins and ask yourself for each one if you are actually using it. You’d be surprised how often you will find a few that no longer provide any function but are nevertheless active on your site. Deactivate them.
2. When you are through the list, click on the ‘Inactive’ tab above the list.
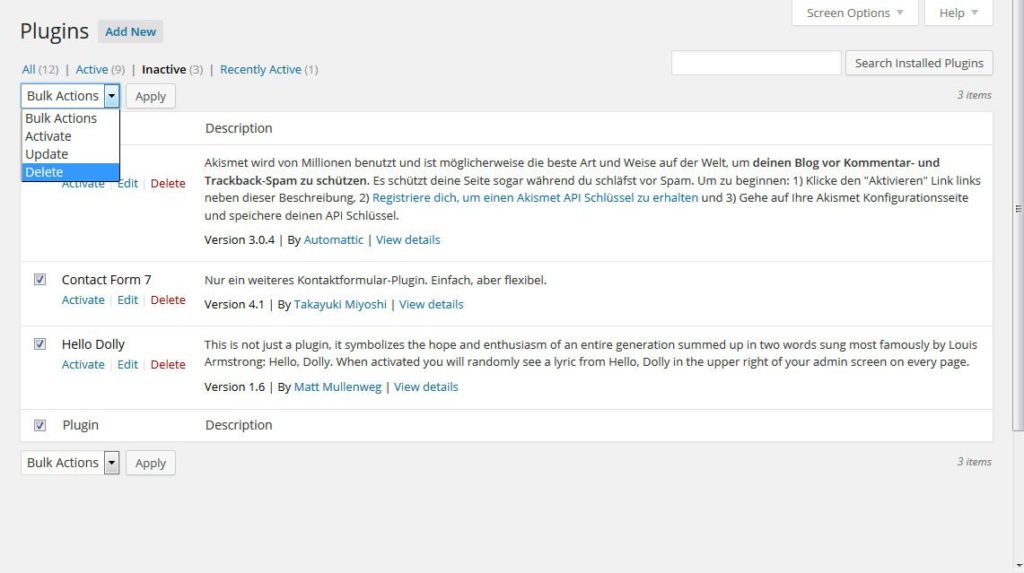
3. Check the box on the left to mark all inactive plugins and use ‘bulk delete’ to get rid of them. Well done!
Ideally you should now end up with a list of only active plugins. Doesn’t that feel good?
PS: Sometimes it can be necessary to keep one or two plugins in the list that you only use intermittently (such as maintenance mode). Use your own judgement, but don’t get stuck in ‘just in case’ thinking.
2. Remove unused themes
What goes for plugins also works for themes, too. You probably have several themes stored on your site (especially since every fresh WordPress install comes with all the WordPress default themes from Twenty Ten to Twenty Fifteen). However, are you really in the practice of changing your site design every week or so? No! So to hell with them!
Go to Appearance > Themes, click on each unneeded WordPress skin and make lavish use of the ‘delete’ button in the lower right corner.
One word of caution, though: If you are using a child theme, be vigilant not to delete its parent! Seriously, you will kick yourself if you do.
All done? Moving on then.
3. Get rid of old post revisions
Post revisions are undoubtedly a nice thing to have. The ability to go back to an older version of your content has definitely been a life saver for more than one WordPress user.
However, allowing WordPress to create revisions indiscriminately quickly leads to bloat in your database and backend. Ever worked on a blog post for a long time and ended up with a list of revisions that was almost as long as the post? Welcome to the club.
In order to avoid this problem in the future, in step one you should limit the number of revision WordPress can create in the first place. For that, all you need to do is add a single line of code to your website’s wp-config.php file:
define( 'WP_POST_REVISIONS', 3 );
The number ‘3’ here signifies how many revisions WordPress can create for each post or page. You can adjust it to your liking. To disable revisions completely, change the code like so:
define( 'WP_POST_REVISIONS', false );
Next up on the declutter list are the post revisions that already exist. Unfortunately, WordPress does not come with a native function to delete those yet.
One way to take care of them is to run an SQL query in your database. However, not everyone will feel comfortable doing that.
Therefore, the easiest way is the plugin route. A very good tool to get rid of rendundant revisions is the Optimize Database after Deleting Revisions plugin. It removes those post revisions you no longer need and lets you keep a set amount of the most recent ones just in case. An alternative is Better Delete Revisions.
4. Remove unused media
One of the main bloat factors in terms of the server size is the ‘uploads’ folder, where WordPress saves any image and other media file uploaded to the website. Especially since WordPress saves up to four versions of every image, this can quickly result in a ballooned up site.
Anyone who has ever done a WordPress backup (so, hopefully everyone) can attest that watching your media files slowly crawl through the FTP connection is a real challenge to your patience.
Therefore, removing any media you are not actually using sounds like a good idea, right? Yet, how to go about and do this?
Luckily, there are plugins to find and delete unreferenced images in your WordPress installation and database. Two of these are Image Cleanup and Cleanup Images (seriously guys, what’s with the innovative namegiving?!).
5. Clean up your taxonomy
Very good reasons to make extensive use of categories and tags exist. Yet, some people go overboard. After all, it’s just so darn easy to create these more taxonomy items with just a few clicks.
If that sounds like you, there is a good chance you have a bunch of unused taxonomy on your site (this possibility also exists if it doesn’t sound like you). Time to change that.
If you only have a few tags and categories not in use, you can take care of them manually. To do so, go to Posts > Categories or Posts > Tags. On the lists given here click on Count to order the list items by number of posts they appear in. Delete those that have a count of zero.
If your attitude towards taxonomy has been more like “more is always better,” there are plugins that let you mass-delete unused tags and categories. The aforementioned Optimize Database after Deleting Revisions plugin is one such example, at least for tags.
6. Delete spam and pending comments
It is no secret that any given WordPress website with even a little bit of traffic can quickly ramp up an impressive spam comment count. Therefore, removing these is a reliable way of trimming some fat from your site.
By now, emptying the spam folder is a matter of one click. You will find the respective button at the top under Comments > Spam. Make a habit of clicking it regularly, your database will thank you.
Of course, to make sure spammers don’t invade your legitimate comments in the first place (so you have to painstakingly go through the list one by one), you should use an anti-spam plugin. My personal (free) go-to is Antispam Bee.
7. Shorten the interval for emptying the trash bin
Posts and pages moved to the trash will continue to take up space in your database until they are deleted permanently. Of course, getting rid of them emptying the trash manually isn’t hard. You find the garbage bin at the top of the list both under All posts and All pages. The bulk delete option makes quick work of anything in there.
However, there is a smarter way to deal with this. WordPress will actually delete trashed items automatically after 30 days. In order to keep your site lean, you can shorten this interval. All it takes is a line of code in the wp-config.php file:
define( 'EMPTY_TRASH_DAYS', 3 );
The number ‘3’ obviously determines after how many days trashed items will be deleted permanently. To take them directly to WordPress nirvana without a stopover in the garbage bin, you can also set this value to zero. However, there are good reasons not to do this.
8. Find and clean up broken links
Having broken links on your WordPress site is an overall bad idea. Visitors hate it, search engines might punish it (the jury is still out on that one) – to be honest, nobody is really a big fan. Consequently your should take care of this nuisance.
There are several free ways to find broken links on your WordPress website:
- Google Webmaster Tools – Find broken links under the ‘Crawl Errors’ section.
- W3C Link Checker – Free tool to check for faulty links on any website
- Broken Link Checker WordPress Plugin – Use this plugin to find and repair broken links on your site
Once you have identified links that are pointing to non-existent addresses, either update them manually or set 301 redirects.
9. Clean up your database
The database is like the heart of your WordPress site. Everything important is stored here. If unchecked, however, it will grow to ungodly proportions over time. But there are ways to prevent this.
Cleaning up your database consists of the following steps:
- Deleting database overhead, meaning temporarily-used disk space
- Reducing data bloat, e.g. post revisions, leftovers from plugins and themes, spam comments and items in the trash
In terms of data bloat, we have already taken care of many things in the earlier steps. Optimization can be done either directly from the database via phpMyAdmin or with a plugin such as WP-Optimize. For more information, be sure to check the detailed article on database cleanup here on Torque.
10. Disable unneeded elements via Screen Options
Now that all the extraneous data is taken care off, it’s time to turn to the declutter WordPress visual. Did you know that you can fully customize the WordPress backend to reflect exactly your working style?
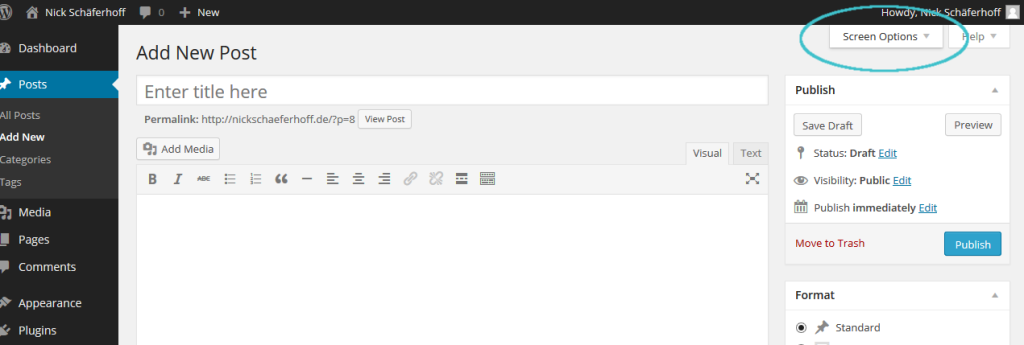
You might have seen the tab in the upper right corner that says ‘screen options’. If you click on it, you will see that you can enable and disable almost any element on the screen by simply checking and unchecking boxes.
Don’t assign tags to your posts? Gone. Never use the excerpt field? Now you will won’t ever have to look at it again. Want the WordPress editor to be in one column instead of two? Be my guest.
I like to leave only the bare minimum of elements on the screen to avoid distractions. If I don’t use, I don’t need to see it. Highly recommended!
11. Employ the distraction-free writing mode
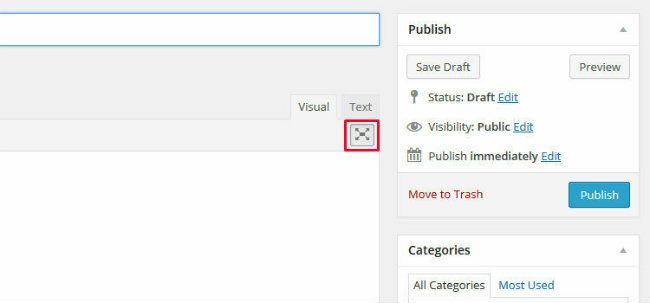
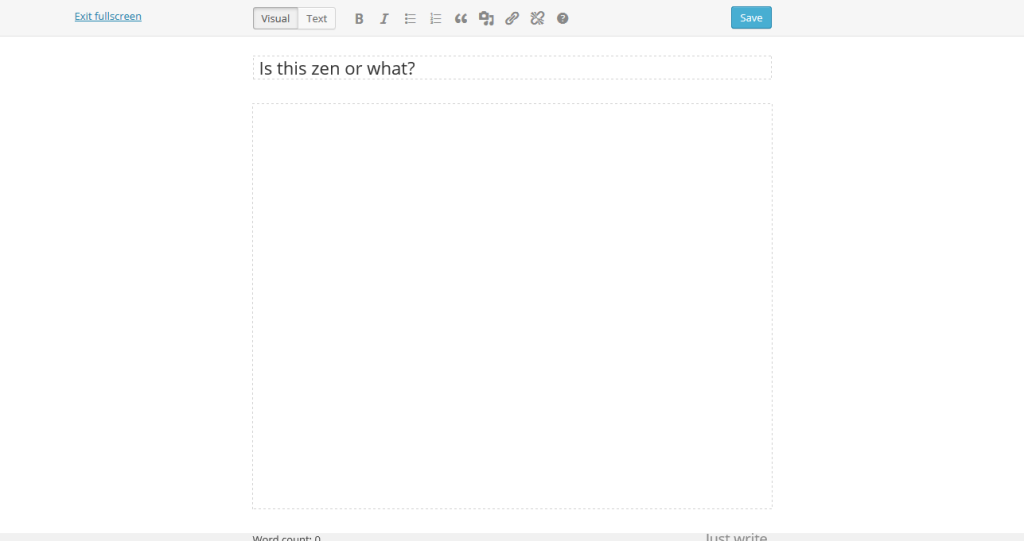
If you want to take backend minimalism even a bit further, you should try the distraction-free writing environment. You can find it in the editor’s upper right corner (if you haven’t disabled it in the screen options that is).
Upon click, this feature will turn content creation into a zen-like experience. No more distractions, you can just concentrate on getting the words out.
12. Use Tabify
And finally, if the remaining elements in your WordPress post editor still take up too much space, how about hiding them as tabs behind the main writing window?
The Tabify Edit Screen will do exactly that and further clean up the editor. If you are interested, WPMU DEV has a detailed post on how to use Tabify.
Declutter WordPress for a smoother workflow
Chaos breeds chaos and order breeds order. Cleaning up your WordPress site will make working with it much more pleasant and streamlined. With a few simple steps, you can let go of unneeded data, smooth out broken links, lighten your database and overall make your website trimmer and leaner. Try it now and thank me later.
Any additional tips on removing clutter from WordPress? How do you make sure your working environment stays squeaky clean? Enlighten the rest of us in the comments.






No Comments