“Plugged in” is a reoccurring feature on Torque that aims to take a closer look at different plugins each week. If you have any suggestions for plugins you’d like to see reviewed, write us at [email protected].
Let’s take a little trip down memory lane, shall we? My first ever article written for Torque was this one: 4 ways to turn WordPress into a multilingual website. As the name suggests, it describes how to display any WordPress site in more than one language.
In the article I also mentioned a plugin which had been among my absolute favorites for a long time: qTranslate. It was an easy-to-use solution for content localization and I had it installed on almost all of my websites (since I like to give out content in more than one language).
Unfortunately at some point qTranslate’s maker stopped supporting the plugin and left a lot of users scrambling for alternatives (or not updating their WordPress version past 3.8.3). Me, I also moved on to other shores.
However, you can imagine my delight when I recently discovered that a few people out there pooled their resources in order to give qTranslate a much-deserved reboot. Ladies and gentlemen, I present to you, qTranslate X.
qTranslate X – first impressions
The cool thing about qTranslate had always been its convenience. All content would be available in one post. By adding extra tabs to the WordPress editor (one per each language), the plugin made working with several localizations as easy as working with one.
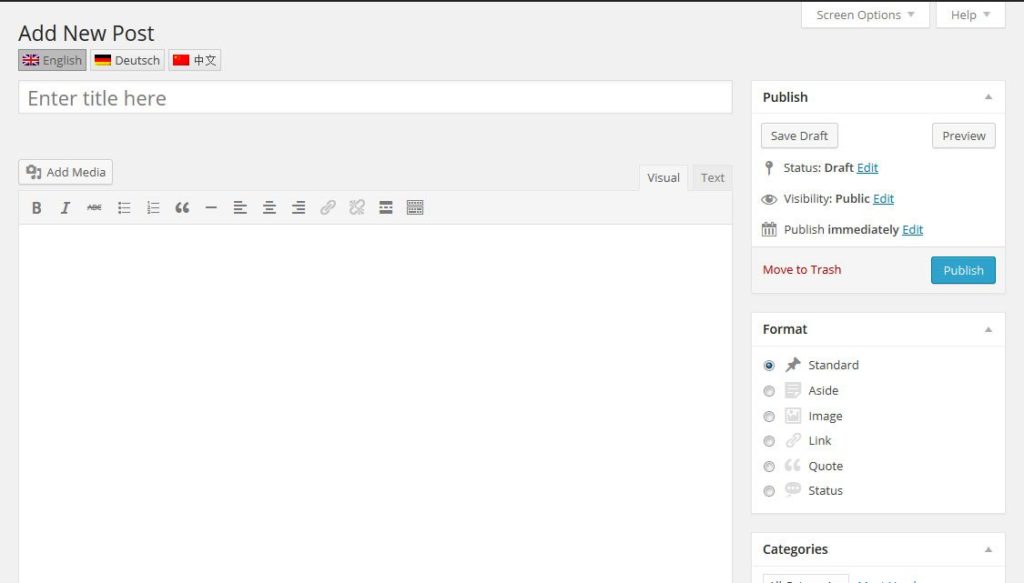
qTranslate X is no different. The only thing that has changed is that instead of tabs, users now find buttons for each language at the top of the WordPress editing screen. No need to switch between different content versions.
Veteran users of the original plugin will quickly find their way around the new version. Settings have basically stayed the same but there are some much needed and sensible additions.
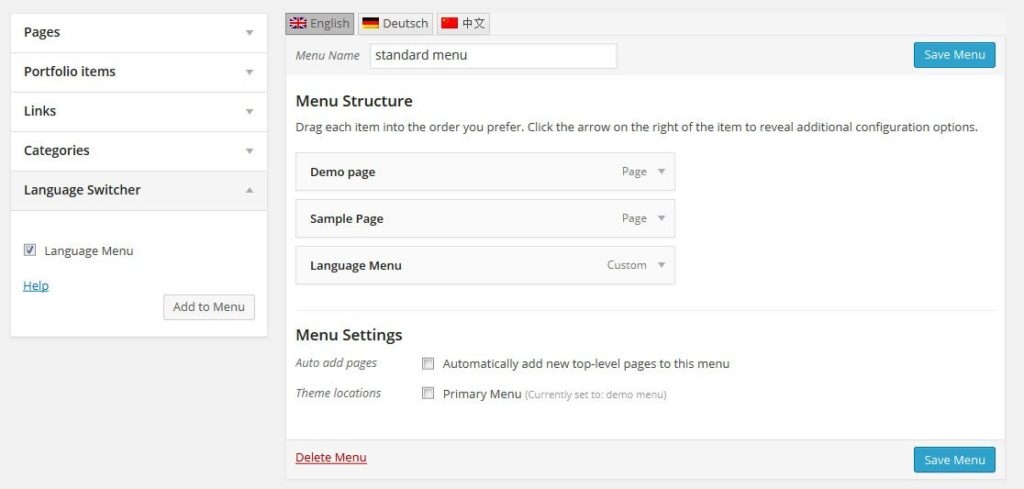
For example, in the earlier version users could only add a language switcher (a button which lets you change between different version of your website) to the sidebar via a widget or by hardcoding it into the menu. qTranslate X now comes with a native option to add the switch as a menu item.
In addition to that, the translation of secondary content, such as menu items, has been improved. This can now be done in the same way as translating posts and pages via extra buttons in the menu section. No more need to mess with shortcodes here (though they are still necessary in other places – more on that below).
Apart from that qTranslate X offers the following additional features:
- 23 languages right out of the box, add as many as you want
- Three different ways of displaying language-specific urls
- One language per url – User and SEO-friendly
- Multilingual date and time formats
Overall, the new version of this classic WordPress plugin makes a very good impression and appears to be as easy to use as its predecessor. Sound good? I thought so. Then let’s go over how to get the plugin on to your site and start translating your content.
A quickstart guide for qTranslate X
If you are reading this, I will assume you are advanced enough in WordPress to install a plugin without me explaining every step of the process.
You can either download qTranslate X from the WordPress plugin directory and install it manually or find it via the plugin installer in your WordPress backend. Whichever route you choose, make sure you activate it afterwards.
Adding new languages
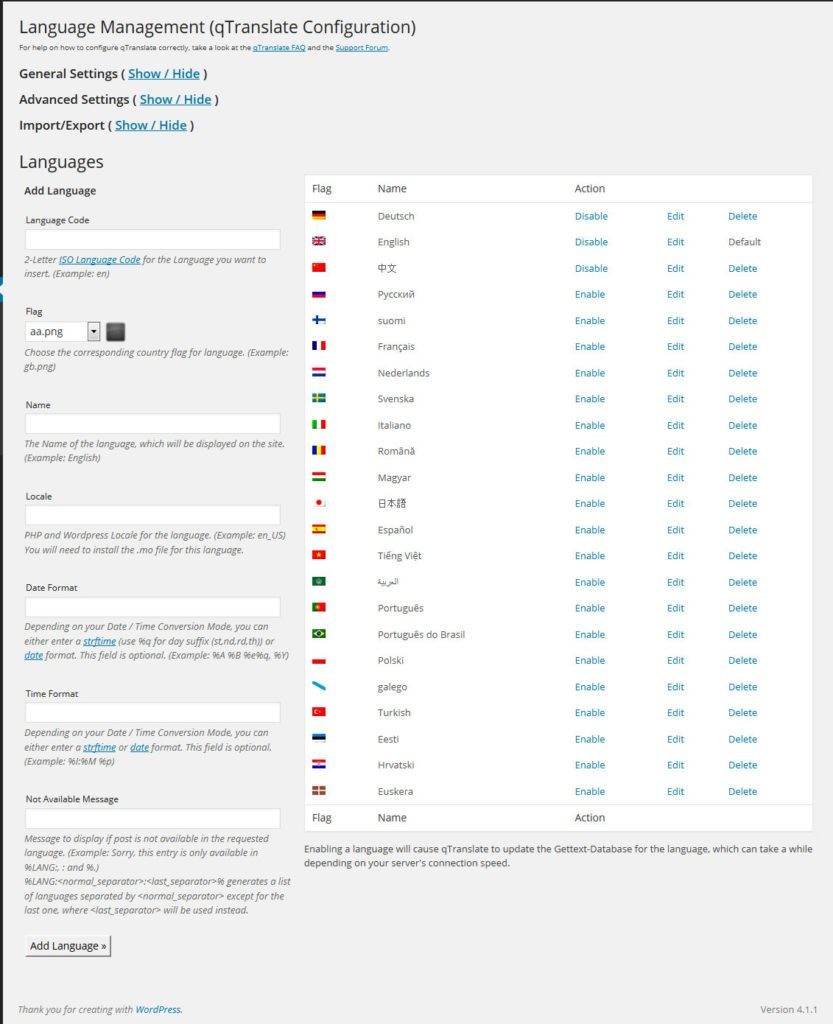
qTranslate X adds a new menu item named Languages to the Settings tab. Here is where all configurations for the plugins are done.
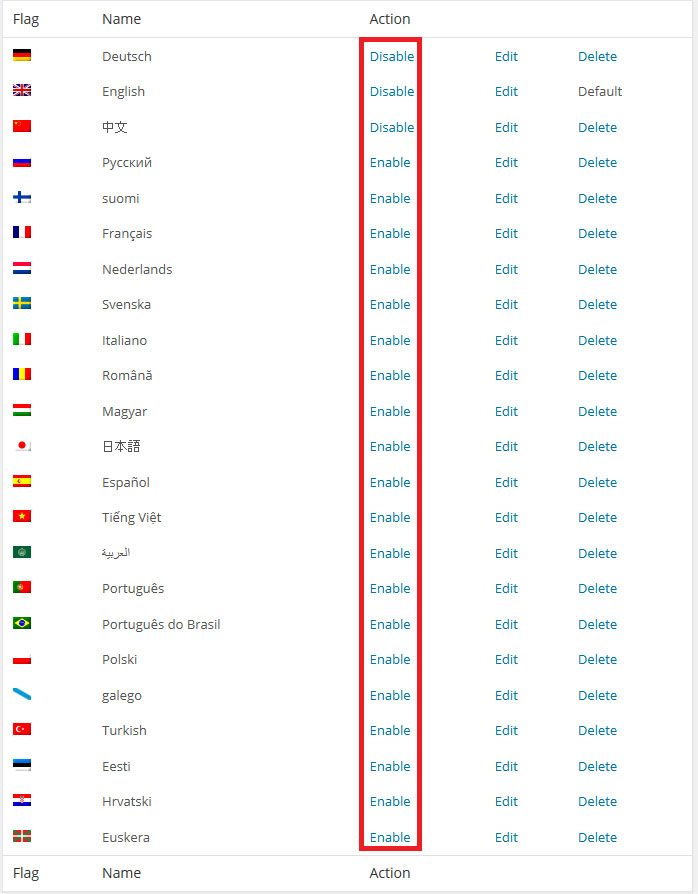
The first thing you want to do is enable all the languages your website should be available in. The plugin comes with 23 languages already set up which you can easily enable or disable by clicking the appropriate field.
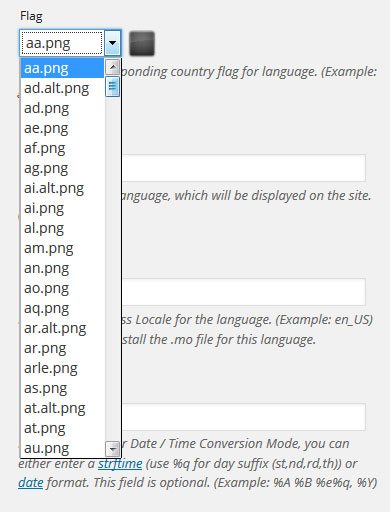
The edit button lets you make adjustments to different settings for each language such as language code, name, and flag, as well as date and time format.
Should your desired language not be in the list, you can also add additional ones. For that all you need to do is add the necessary information on the left side of the screen and click the Add Language button. qTranslate X comes with icons for pretty much all world languages, so finding yours should not pose a problem.
That’s it. Now your website can be localized. But hold on, let’s set up some important settings first!
Adjust the settings
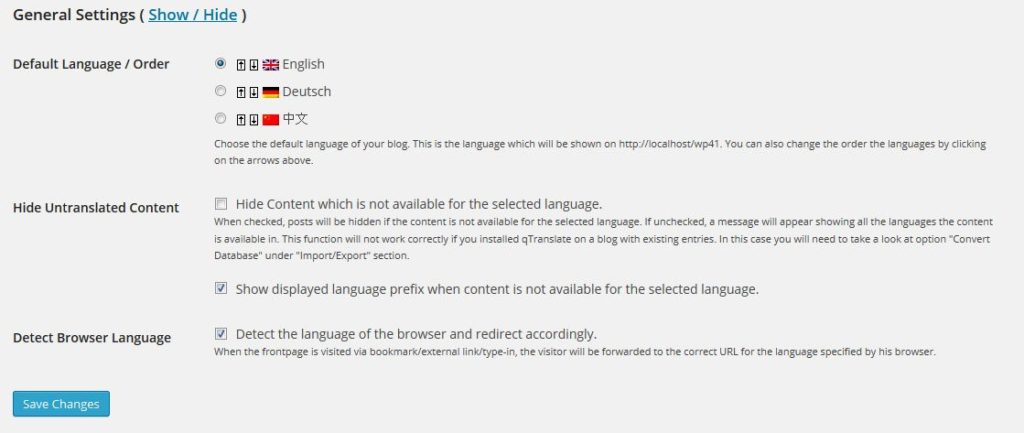
Under General Settings you can choose standard language and language order (important for the language switcher among other things), as well as decide what happens in case the desired content is not available in a particular language. I like to disable Detect the language of the browser and redirect accordingly, but that is just personal preference.
In the Advanced Settings you can determine how urls are rewritten for the different languages. Options are:
- Via query mode (http://yoursite.com/?lang=en)
- Pre-path mode (http://yoursite.com/en/)
- Or pre-domain mode (http://en.yoursite.com/)
The second option is the most convenient. It is much more SEO friendly than query mode and doesn’t need you to configure subdomains as does option three. There is also the possibility to use a separate domain for each language, so you can also go with that if you have purchased several addresses for your site.
Everything else in this section can usually stay the same. The part about date and time conversions usually only becomes important if something in that area is not working right on your site.
Finally, the Import/Export section deserves some attention if you are installing qTranslate X on a website with existing content or on one which was running an older version of the plugin. Either adjust all posts to the correct language manually or have qTranslate X do it for you. In any case, if you mess with the database, make a backup first!
Add multilingual content to your WordPress site
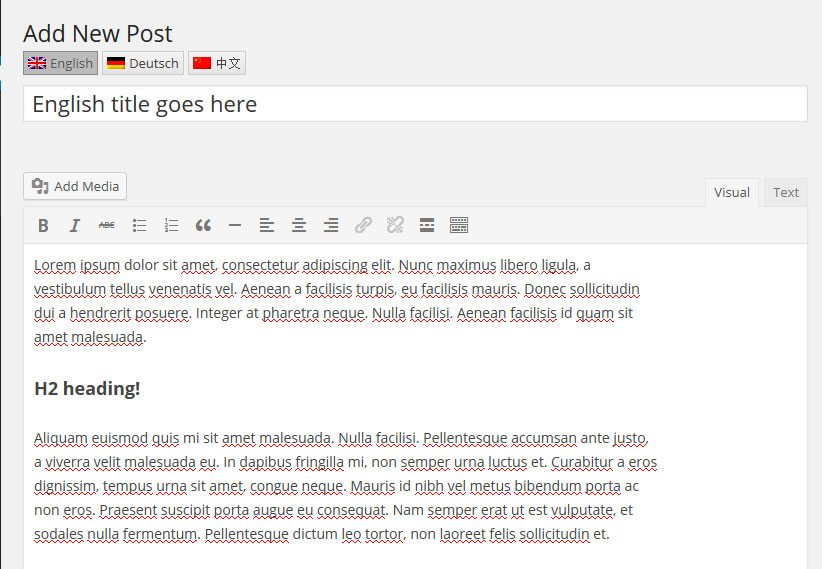
Now that you have everything configured, it’s time to add some multi-language content. You will notice that now when set up a new post or page, the WordPress editor sports a bunch of extra buttons corresponding to your installed languages.
Adding content in several languages is no different than adding content for one. The only thing you need to remember is to switch the editor to the corresponding version.
In this case I will first write my English headline and content.
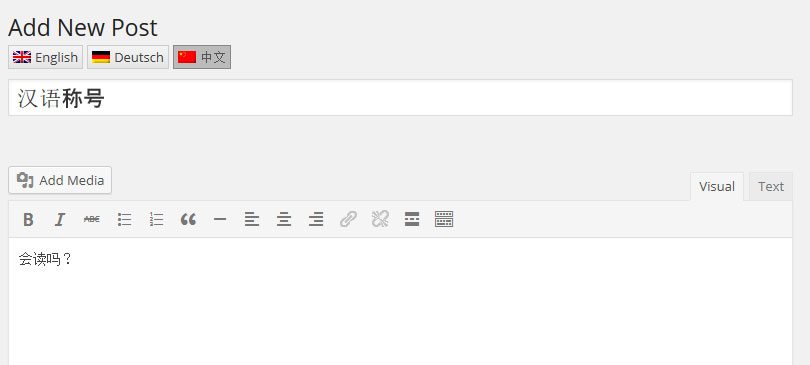
Afterwards I click on another language button to add a translation. Here, I’m going with Chinese.
When I now publish my post, it shows up in two different versions, depending on which url I am using.
Show language switcher in menu
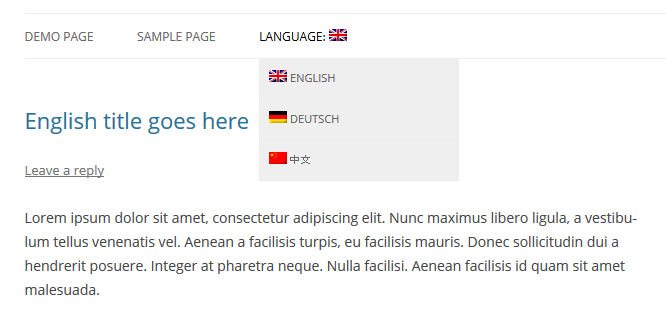
However, I don’t want to have to change my url manually all the time. Therefore, I am going to add a language switcher to my site. This is a little menu that shows all available languages on my website and enables users to choose the version they want to view.
The new version of qTranslate lets you add this as a menu item easily (which is where most of us would want to have it anyway).
In order to do so, merely go to Appearance > Menus. On the bottom left you now find an additional item called Language Switcher.
Click to open, tick the box for Language Menu and choose Add to Menu. After saving, you will find the new language switcher on the frontend of your WordPress site.
Translate menu
And while we are in the menu section, how about we do some translation for our available items here? This is as easy as creating multi-language content in the WordPress editor.
Merely choose your desired language via one of the buttons on top, edit the names of the language items and save the menu. Do this for each language and you are done.
Use shortcodes to translate other content
The only place where localization gets a bit more complicated is when adding content to places that don’t have translation options such as widgets in the sidebar. Here you will have to work with shortcodes.
For example, if you would like to add a text widget with different language versions of its content, you will have to wrap each version in a corresponding shortcode such as [:en]English text[:].
You can also use more than one shortcode in a row, like in this manner: [:en]English text[:de]German text[:]. The plugin will filter your content according to the shortcode and only display the chosen language.
How to enhance qTranslate X
Here are some sensible additional plugins in order to use qTranslate X’s full potential:
qTranslate Slug – Lets you create alternative urls for each language version (important for SEO).
WordPress SEO & qTranslate-X – Makes qTranslate X play nice with WordPress SEO by team Yoast.
All in One SEO Pack & qTranslate-X – Support for another favorite SEO plugin for WordPress.
Google XML Sitemaps v3 for qTranslate – Allows you to set up qTranslate-specific XML sitemaps so Google can understand better what your content is about.
Additional links for integrating qTranslate X with other popular plugins (such as Gravity Forms) can be found on the plugin’s site.
Summing up
qTranslate X is a great resurrection of one the community’s favorite plugins for content translation and localization. It is as easy to use as the original but has been updated to work with the latest version of the WordPress platform.
In the process, the new team behind the plugin also integrated a bunch of very sensible and much needed additions. With growing support for other favorites out there (such as WordPress SEO by Yoast), qTranslate X has the chance to once again become a hit among its users. For anyone looking for a (paid) alternative, there is also WPML.
Have you used the new version of qTranslate? What are your thoughts? Any feature you would like to see? Share in the comments.





7 Comments