Question: Which plugin appears first in Google when you type in “WordPress SEO,” has over one million active installs, a 4.5-star rating in the WordPress directory, and is a regular on the favorite plugins list?
If you just answered “WordPress SEO by Yoast,” you would be correct.
The plugin by team Yoast is one of the best plugins out there. It is powerful, offers tremendous value, is meticulously updated and supported and used by literally hundreds of thousands of users.
That includes me. I have the plugin installed on basically all of my blogs and client websites.
However, with its multitude of settings, it can be overwhelming—especially for beginners. Therefore, in this article we will take an in-depth look at how to use WordPress SEO by Yoast—from set up and configuration to day-to-day use.
Well, we have a lot of ground to cover, so let’s get going.
How to Install and Set Up WordPress SEO By Yoast
The plugin is installed the same way as any other one. Go to Plugins > Add New and type in ‘WordPress SEO’ into the search box. After hitting enter, it usually pops up in first place. Hit Install and activate once the installation finishes. So far so good.
Configuring WordPress SEO by Yoast is a little more work. There are a lot of settings to go through as it lets you control many parts of your site.
Generally, configuration options are divided into two types: global settings that are valid site wide and local settings which are set on a per-page or per-post basis.
We will first go over how to configure the site-wide settings to ensure your site appears correctly in the search results and then move on to local configurations further below.
1. General Settings
If you click on the newly-generated SEO menu in the main menu, you are first taken to the general settings tab. It is further divided into a number of submenus.
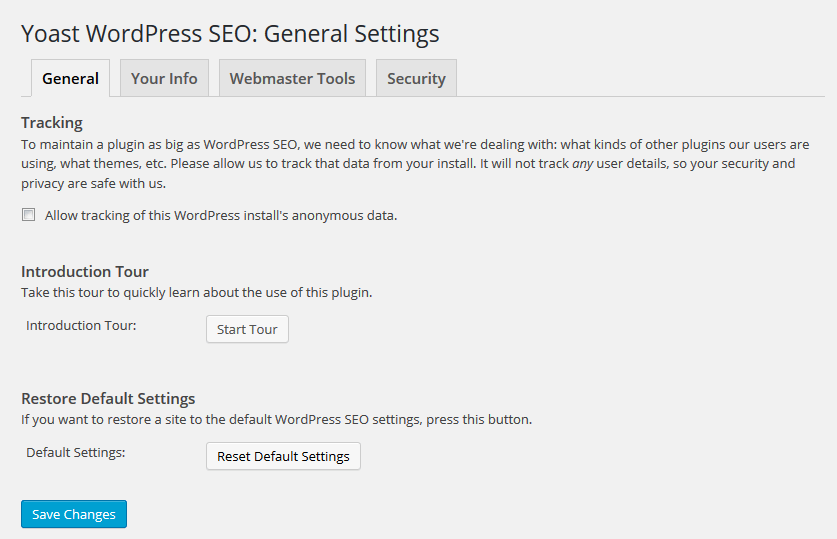
General
- Tracking – In order to support the development of the plugin, you can allow it to send anonymous data to team Yoast which they can use to improve their work. I usually leave this part unchecked.
- Tour – Clicking this button will give you a quick tour of the plugin. You can do this in addition to reading the guide, I won’t mind.
- Restore Default Settings – In case you want to reset the plugin to factory settings, you can do so here.
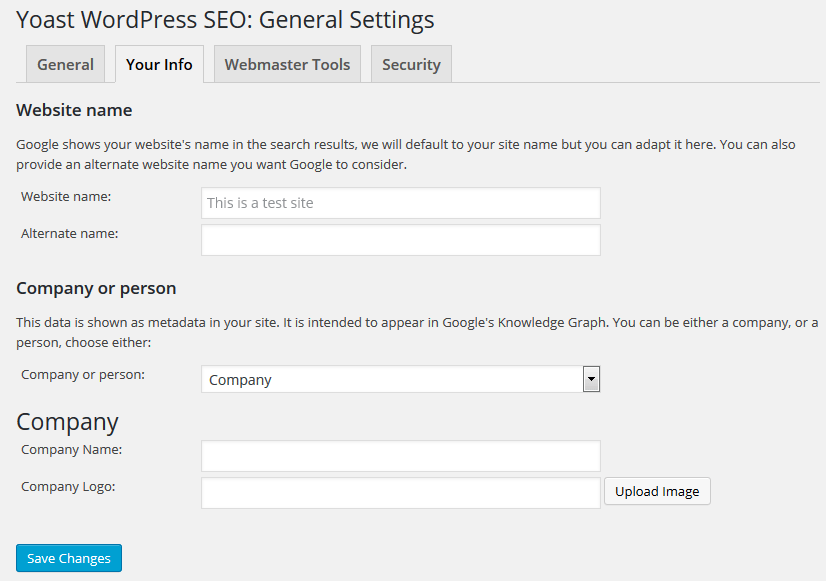
Your Info
- Website name – If you want to provide Google with a different name for your site other than the site title, you can do so here plus one more alternative.
- Company or person – This part is for Google’s Knowledge Graph. By stating whether you are a company or a person and providing an image and/or name, this info will sometimes appear on the side of Google’s search results.
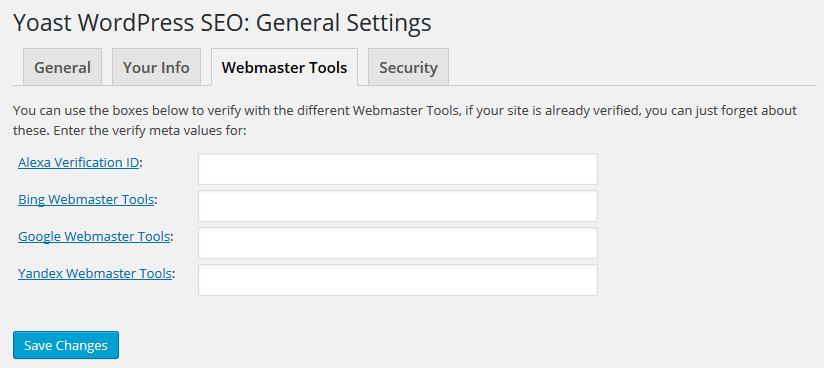
Webmaster Tools
If you are registered with one or more of the different Webmaster Tools (as you should), you can populate the fields here to verify your site. These tools provide you with insights and data on your traffic from the different search engines. Ignore this part if you have completed the verification in a different way.
Security
- Disable the Advanced parts of the WordPress SEO meta box – Checking this setting is recommended for multi-author websites if you don’t want to let others set redirects, canonical URLs, noindex settings, or other advanced options for your posts and pages.
2. Titles and Metas
Alright, now that we are done with General Settings, we will move on to Titles and Metas. Here you will configure how your content will show up in search results.
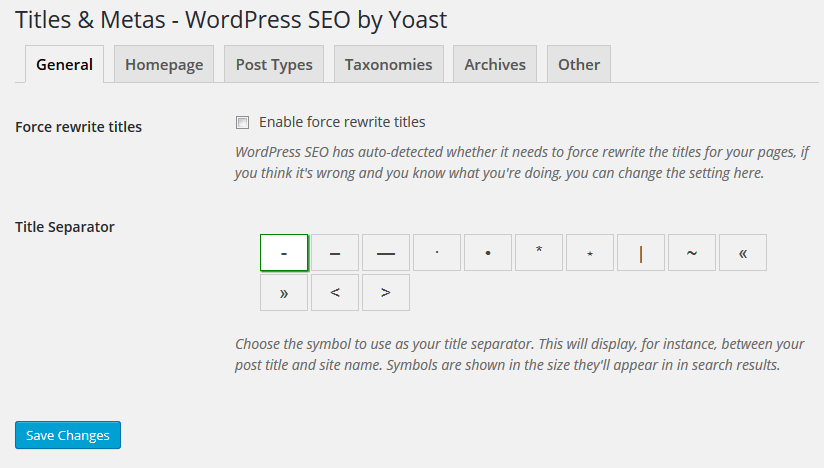
General
- Force Rewrite – In order to display SEO titles for posts and pages (more on the below), the plugin work with the
- Title Separator – Pick a separator for your page title. This is purely cosmetic and therefore completely up to your taste.
Homepage

- Title Template – Sets the format of your homepage title. The standard setting should be fine for most websites, however, you are welcome to change it if you want.
- Meta Description Template – In the same vein, you can also provide a template for the meta description of your homepage. Meta descriptions are the text that appear under the site link within search results. For example, you can automatically use the post excerpt (by inserting %%excerpt%%), however, I prefer to configure this manually in the local settings.
Note: In some themes or older versions of the plugin you might see links that take you to Settings > General in the WordPress settings where you can fill in the same information.
Post Types
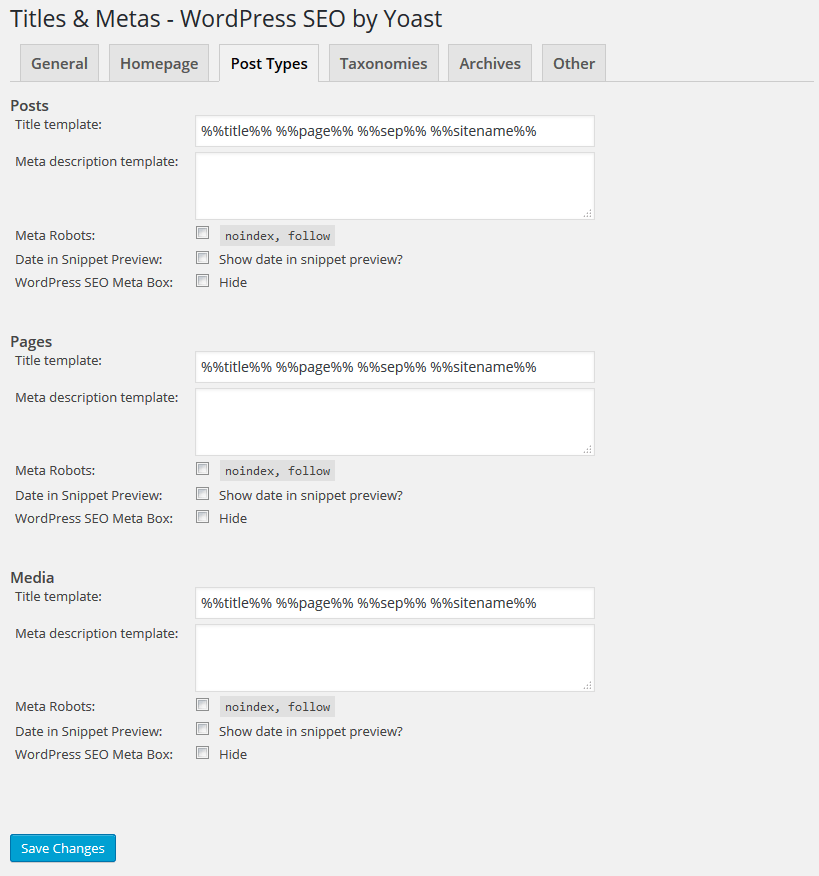
- noindex, follow – By checking this box, you are telling search engines to follow the links but refrain from adding them to their search results. Use it to avoid penalties for duplicate content and to keep content out of SERPs you don’t want to see there.
- Date in Snippet Preview – This setting is disabled by default which makes sense for websites with evergreen content. However, if you are running a news site (or update your content regularly), you should consider checking this box.
- Hide WordPress SEO Meta Box – If you are not going to edit the meta information for any of the post types, you can disable the meta boxes that the plugin will create here for a cleaner UI.
As for how to set up the title templates of your pages, it is a good idea to go with post title first, followed by your site name.
Search engines and human visitors care more about the beginning of your title, so that’s where your article’s topic should appear. Then it is also a good idea to attach your brand name to post so people can start recognizing you in the search results. Yoast’s standard settings are sufficient for most cases.
Furthermore, if there is any content type on this page that you would like to keep from being indexed, you should do so by checking the respective boxes.
Taxonomies
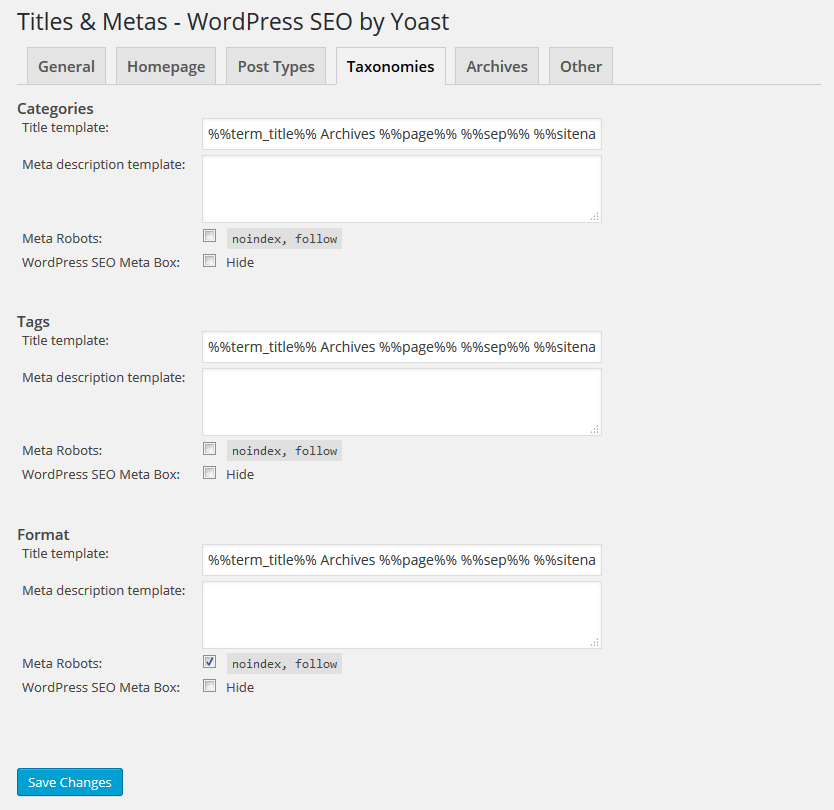
Additionally, I don’t really use tags, so I disable them from being indexed. This is also smart in case you use the same words for tags as you do for categories so as not to run the danger of creating duplicate content.
Archives
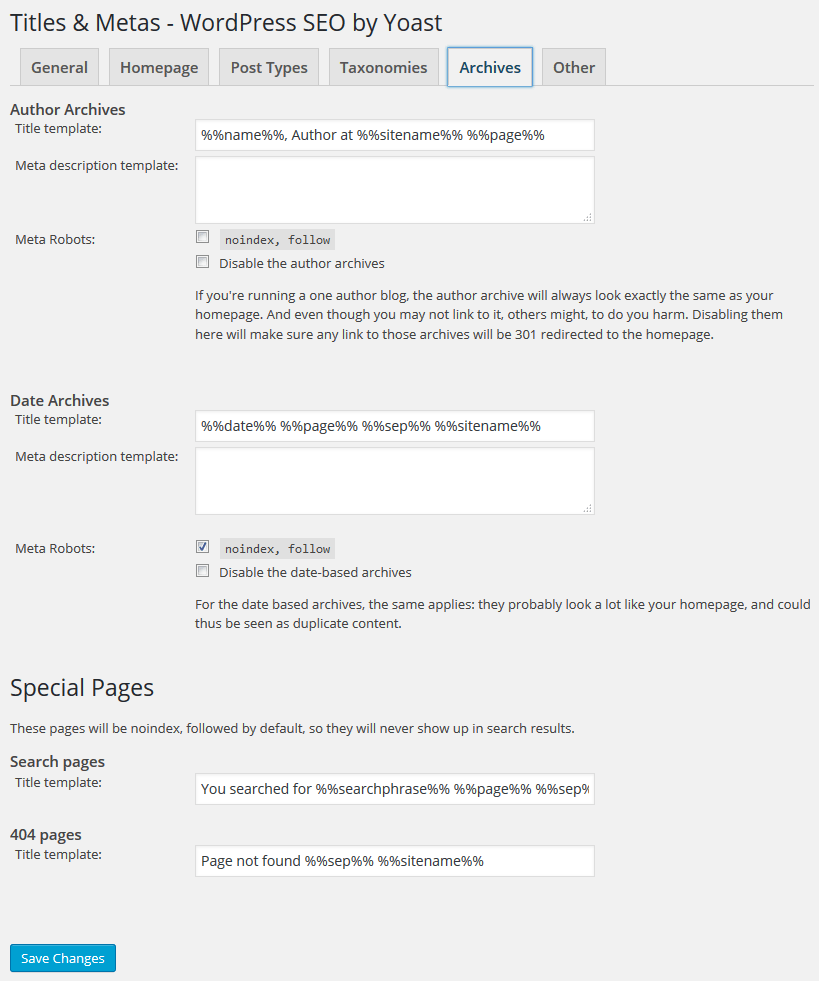
- Author Archive – If you run a single-author blog, the author archive will look exactly like your normal blog page. You should therefore set it to noindex to prevent duplicate content.
- Date Archive – This doesn’t really provide any important info to search engines, so you can leave it as noindex.
- Search Pages, 404 Pages – These pages will not show up in search results by default. Configure the title format here and you are done. (PS: Check out the article on how to build a custom 404 error page for WordPress).
Other
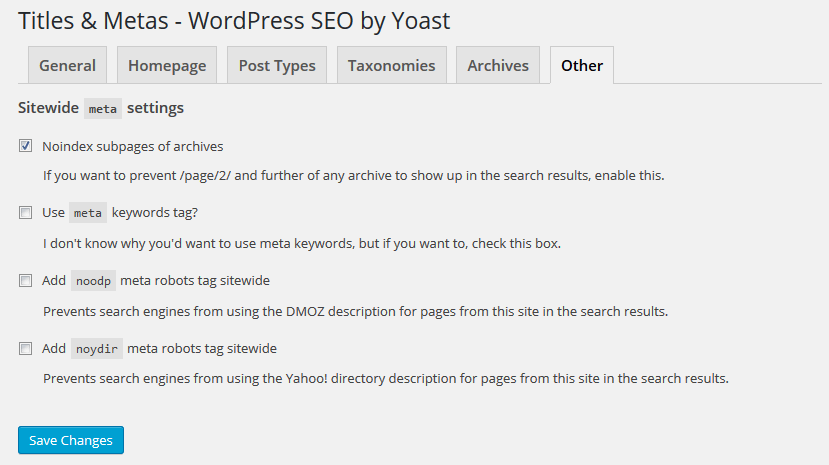
- Noindex of Subpages – Subpages of archives are not that important to search engines. After you check this, Google and company will then crawl these pages but not add them to their SERPs. However, overall this option is relatively unimportant.
- Meta Keywords – Meta keywords don’t really matter anymore, so you can leave this disabled.
- noodp, noydir tag – These two options tell search engines to use your page description and not that of other directories. This is only a valid concern if you have a DMOZ/Yahoo listing. If this doesn’t apply to you, don’t bother.
3. Social
Now we are getting to the options for social media. I probably don’t have to tell you that social platforms are of SEO significance these days. Therefore, there are a bunch of pretty important settings to adjust here.
Accounts
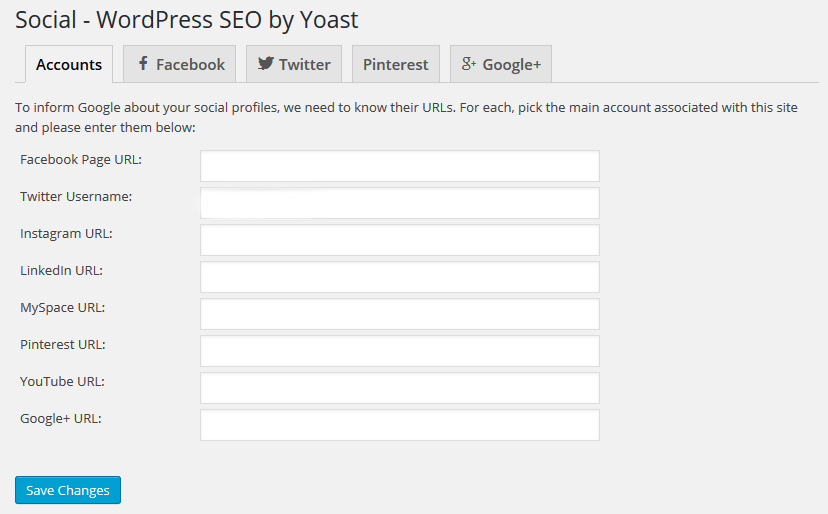
Facebook, Twitter, Pinterest, Google+
These subsections exist mainly to ensure that your content looks its best when showing up on different social platforms.
- Facebook – Check Add Open Graph meta data. This allows you to define your own title, meta description and image for Facebook in the WordPress editor. Further down you can also provide a fallback image that will be used in case the post of page doesn’t come with its own. Should you have a Facebook page you can add your admin here to get insights into how much traffic your page is generating for your website.
- Twitter – Pick which type of Twitter card you want your site to have. I recommend Summary with large image.
- Pinterest – If you want, you can verify your site with Pinterest here by adding the meta tag provided by the platform.
- Google+ – Choose whether you want to have the option to add Google+ specific meta data in the WordPress editor and optionally link to your publisher page. If you choose to do so, make sure you verify your site afterwards.
4. XML-Sitemaps
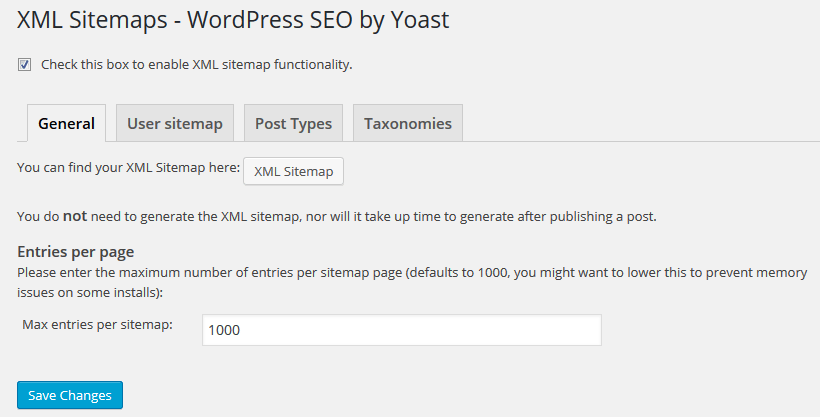
General
Generally there isn’t much to do here. Just make sure that XML-sitemap functionality is enabled and the plugin will do the rest. No need to do anything manually.
What you do have to do, however, is take the url of your sitemap (you can get there by clicking the button with ‘XML Sitemap’ on it) and verify it in your Google Webmaster Tools. Go ahead, do it now. I’ll wait.
By the way, you should also make sure not to have any other plugins enabled that create sitemaps. That would just be confusing the search engines which is the last thing we want to do.
Adjust the remaining settings in the following way:
- User Sitemap – Choose whether or not to include authors in your sitemap. The recommended setting is no and you can usually leave it that way.
- Post Types – Exclude post types that you don’t want in your sitemap. This refers to anything that doesn’t deliver value to your site. Media pages are just one example. You might also have custom post types in this list. A good rule of thumb is to disable anything here which you have set to noindex earlier.
- Taxonomies – In the same vein you should decide which taxonomies, if any, to exclude from your sitemap.
5. Advanced
As the name suggests, this menu contains a bunch of advanced settings. Most of those are optional but still worth understanding.
Breadcrumbs
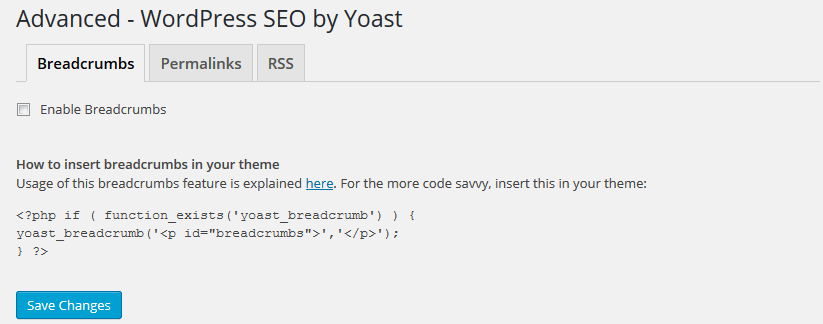
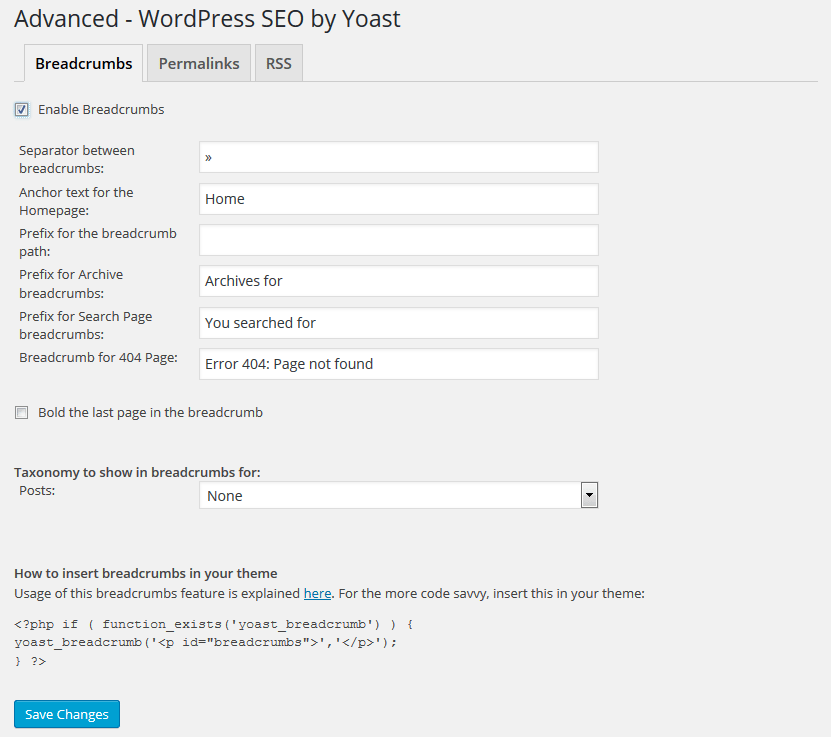
In case you didn’t know, breadcrumbs are links at the top of your page which display the path users have taken to get to the content they are currently viewing.Not only is this very comfortable from a visitor perspective, but breadcrumbs also help search engines to understand the structure of your site better. They will even show up in the search results in place of the usual URL.Enabling breadcrumbs is not a must. Yoast recommends it, however, I think it is also a matter of personal preference. If you do decide to get them on your site, there is a tutorial on Yoast.com. The same menu also lets you configure the design of the breadcrumbs.
Permalinks
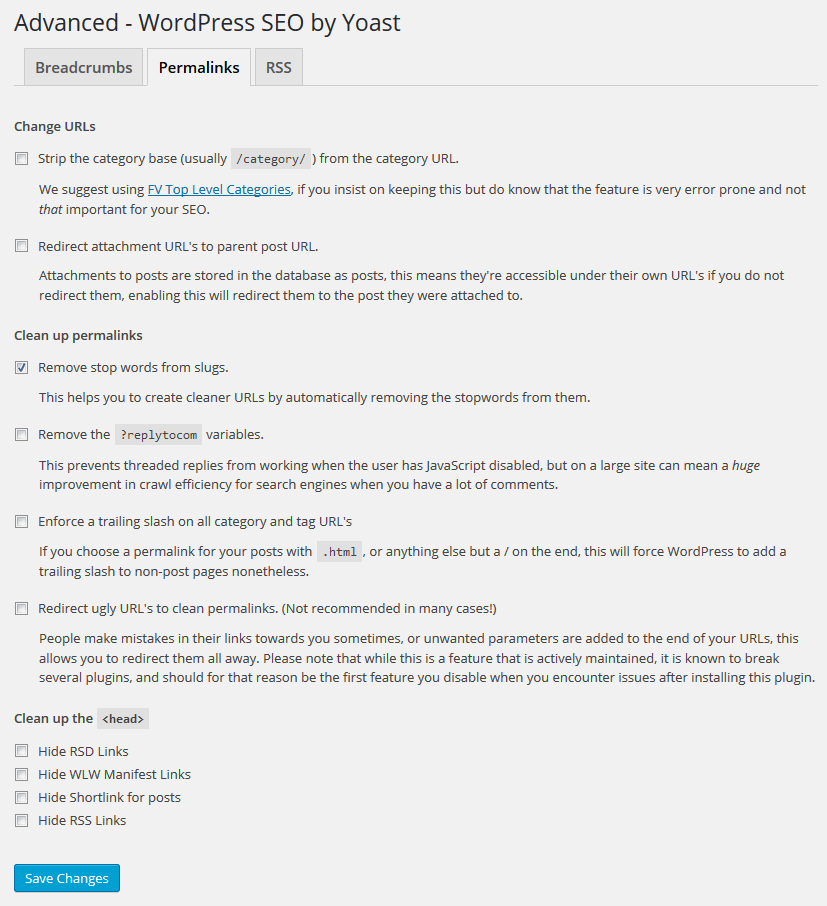
- Strip Category Base – Remove /category/ from your category archive links. I can completely understand why you would want to do that, however, the feature is prone to malfunction and Yoast says it’s not too important for SEO. I believe him and keep my hands off of it.
- Redirect Attachments – When enabled, people who find your images or other attachments via Google will be redirected to the post, not the attachment page. If your website has a lot of images, enable this to prevent having a lot of low-quality content.
- Remove Stop Words from Slugs – This option makes sure your post urls get stripped of words that are ignored by search engines. It is debated whether this is a good idea, however, I enable it since it makes for cleaner slugs and clearer keyword targeting.
- Replytocom Variable – Checking this will remove the ?replytocom variable from comment reply links. Only important if you run a site with lots of comments as it can increase the crawl efficiency of search spiders.
- Trailing Slash – Should you be one of those people, who use .html at the end of their posts, you probably want to select this option.
- Ugly url Redirection – Not needed in many cases. Leave it alone unless you know what you are doing.
- Clean up <head> – You can usually safely check all the boxes here. The only thing you might want to consider is leaving in your RSS links.
RSS
6. Tools
There are a number of tools to make your transition to WordPress SEO by Yoast a bit easier.
- Bulk Editor – Edit post titles and meta descriptions en masse instead of one by one. This is very nice if you are installing the plugin on a site that already has a bunch of content on it.
- File Editor – Directly edit important files such as robots.txt and .htaccess. Both of these files can also be edited via FTP. You should generally stay away from them unless you really know what you are doing. Inputting something wrong here can completely disable your site for search engines.
- Import/Export – Import settings from other SEO plugins (in case you were using a different one before), or export your own if you want to use them in another site. Simply creating a backup for emergencies is also possible.
7. Extensions
This menu item offers a number of premium extensions for WordPress SEO. You can get the advanced version and add-ons for video, news, and local SEO. Knowing Yoast they are well worth the money but beyond the scope of this article.
How to Use the WordPress SEO by Yoast
Now that all the basic settings are configured, we can move on to a more granular level of the plugin. The following chapter will concentrate on the day-to-day usage of the plugin.
Generally speaking, WordPress SEO by Yoast will help you with three things: Keyword research, page analysis, and, most importantly, content creation. We will quickly go over the first two and then move on to the latter, which is really the tofu and potatoes of the plugin.
1. Keyword Research
As you will notice, the plugin adds a couple new items for keyword research to the WordPress admin bar. Namely, you will find links Google’s Keyword Tool, Google Insights, and the SEO Book Keyword Tool. However, WordPress SEO by Yoast will also support you in finding keywords while writing content. More on that below.
2. Page Analysis
With WordPress SEO by Yoast activated, when having a close look at the admin bar on the frontend of your site, you will see that there’s a number of links that let you gain insights into your on-page SEO.
By hovering over SEO in the admin bar and then Analyze this page, you can feed your current address directly into a number of services and check your page for all sorts of important SEO markers:
- Inbound links
- Keyword density
- Google Cache
- Headers
- Rich Snippets
- Facebook Debugger
- Pinterest Validator
- HTML Validator
- CSS Validator
- Google Page Speed
- Modern IE Site Scan (for Internet Explorer)
As you can see, the plugin doesn’t perform page analysis itself, but helps you connect your content directly to a number of services that do. Quite a nice touch, if you ask me.
3. Content Creation
Alright, now we are getting to the part where Yoast’s plugin really shines. After installing it, you will quickly notice an additional box at the bottom of the WordPress editor.
Should you not be able to see this for some reason, check your Screen Option in the upper right corner to see if it has been disabled.
The metabox has several tabs that let you control different parts of your content:
- General
- Page Analysis
- Advanced
- Social
Here you can make important changes to your content that will influence how search engines, users, and social platforms will see and render it. You will also find important information about how well your content is optimized, so take good care that you understand what’s coming next.
General
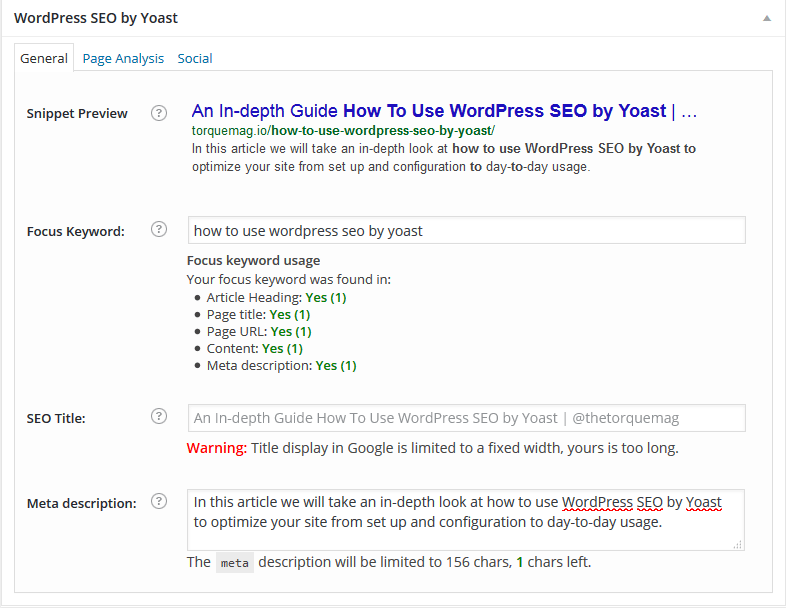
- Snippet Preview – If you have ever used Google, this should look very familiar. WordPress SEO by Yoast will render how your post or page will appear within search results. That way you can see if your title, URL and meta description all fit within the SERPs dimensions.
- Focus Keyword – The focus keyword is what best describes your content and what you ultimately hope to rank for. Providing a focus keyword also allows the plugin to determine how well your article is optimized (as you will see in the page analysis tab), making it one of the most important settings. What’s awesome is that this field is connected to Google’s search suggestion tool, so when you start typing in a keyword, the plugin will offer up phrases that are actually being used by searchers. Cool stuff!
- SEO Title – Here you can set a different blog post title to display for search engines. Very useful if the title you want on your blog is too long or not snappy enough. Be very deliberate about this setting since the title tag is most important for search engines to determine the topic of your content.
- Meta Description – The meta description is the text that appears below your title and URL. You can (and should) provide a custom description here that contains your keyword. Failing to do so, the search engines will pull what they think is relevant text from your content but which might not be the most descriptive at all.
- Meta Keywords – If you have enabled them in the settings, you will find another field for entering meta keywords. However, since they don’t carry any value these days, I never have this switched on.
After setting a focus keyword, the plugin will indicate how well optimized your content is. It will check if and how often your keyword appears in important places such as the heading and title, URL, content and meta description.
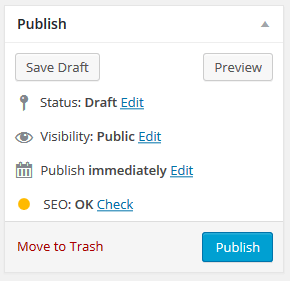
In addition to that, a red, orange, or yellow circle in the Publish meta box will tell you the overall score of your SEO measures. That way you can understand at a glance if further optimization is needed.
What’s very useful about this feature is that it also appears in the list for all your posts and pages. That way you can filter the list by SEO score to quickly find content to be optimized.
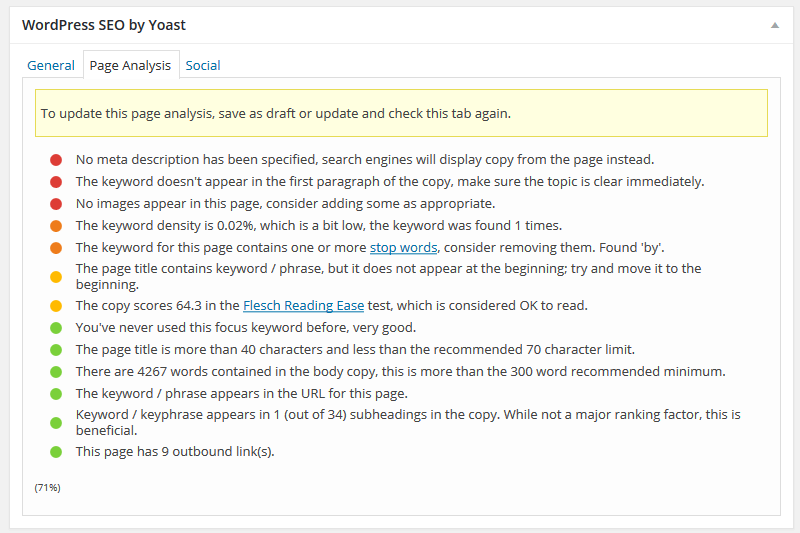
Page Analysis
In the next tab the on-page SEO analysis gets more detailed. The plugin will tell you exactly how well your content is optimized and make suggestions on how to improve it.
Besides checking the keyword locations already mentioned, you will also find information concerning keyword density, readability, and whether the keyword could be placed further at the beginning of the article.
Furthermore, the plugin will check for images (and keywords in the image description and ALT tag) as well as links. Basically, it’s like having an SEO expert look over your shoulder at all times. It is immensely helpful because it eliminates much of the guesswork.
It’s important to not just blindly follow everything you find here. Keep in mind that content should always be written for readers first and search engines second. Don’t sacrifice readability for technicalities.
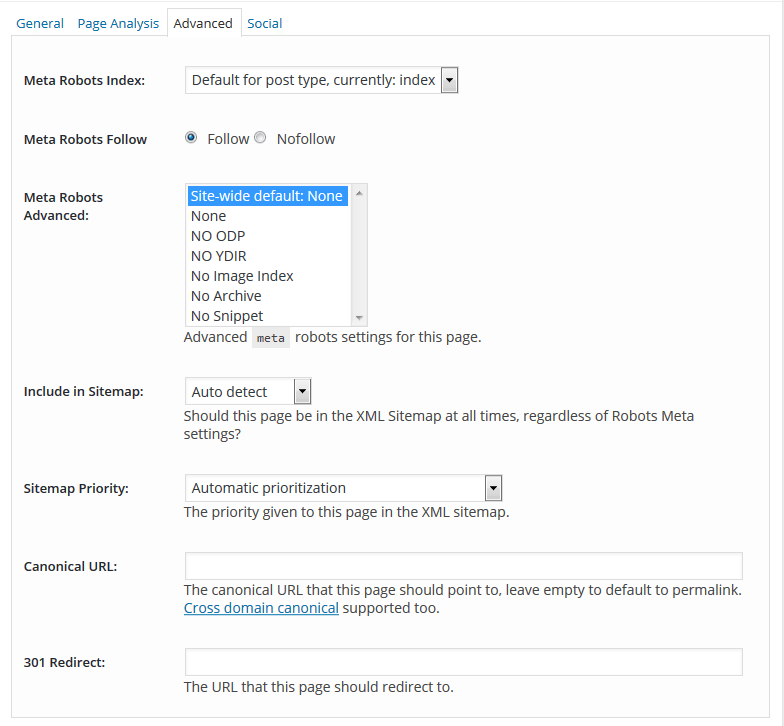
Advanced
The Advanced tab harbors a number of powerful features. Usually you should not have to change anything here since all important settings have already been adjusted site wide. However, for completion’s sake, let’s go over what each setting is for.
- Meta Robots Index – Determine whether the post or page should be indexed by search engines or not.
- Meta Robots Follow – Determine whether or not search engines should follow the links on this page.
- Meta Robots Advanced – A number of meta tags you will probably never use.
- Breadcrumbs Title – Change the title used for this content inside your breadcrumbs (if enabled).
- Include in Sitemap – Override the global settings for including this content into the sitemap.
- Sitemap Priority – Use this to raise or lower the priority of the page. Usually Yoast’s plugin should detect this automatically.
- Canonical URL – This features is very useful if you are reposting content that has already appeared somewhere else on the web. Instead of risking a penalty for duplicate content, you can tell Google where the original article resides.
- 301 Redirect – In case you have moved a page or post to another URL but don’t want to lose the link juice of the old address, you can redirect it here.
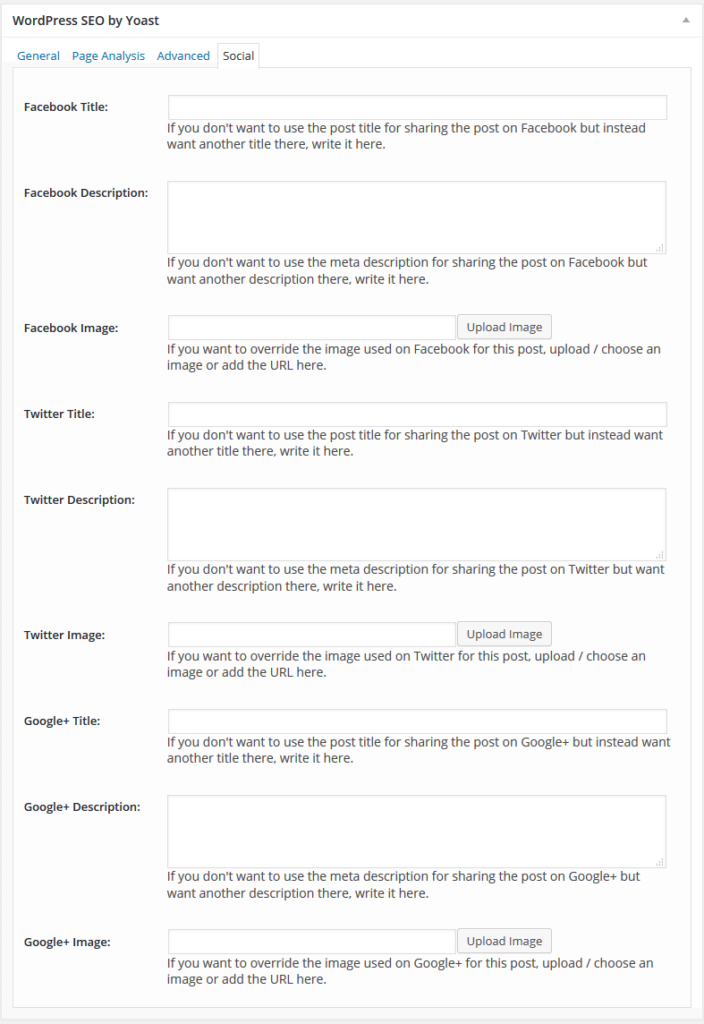
Social
When your content gets posted to Facebook or Twitter, these services will attempt to glean the important information like title, description and images from the rich snippets of your page.
Since not all platforms adhere to the same standards and measurements (that won’t happen until Google buys up the entire Internet), it can sometimes be necessary to adjust the title length or image size of your posts for different services. All of that happens in this tab.
The plugin allows you to specify titles, descriptions, and featured images for Facebook, Twitter and, if enabled, Google+. Images can be either uploaded or provided via a link. If you are confused about ideal image sizes for the different platforms, the Buffer blog has an excellent article on that.
4. Optimizing Categories
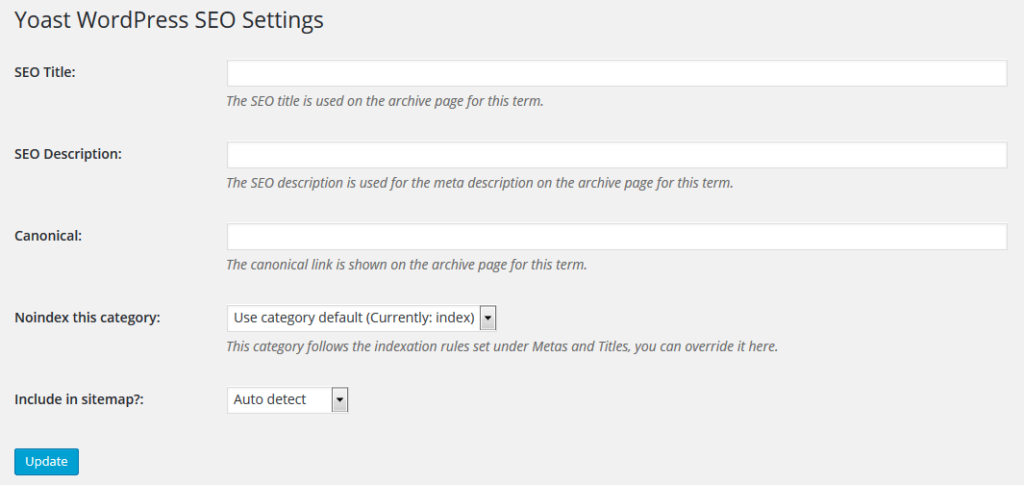
SEO optimization doesn’t stop with posts and pages. You can also adjust different SEO settings for your taxonomy archives such as categories and tags.
If you go to the respective menu and click on one of your tags or categories, you will find a similar field further down the page in the WordPress editor.
Here you can make important adjustments for how your taxonomy archives are presented to search engines. Overall that is a good idea in order to turn your category and tag archives into unique content for extra SEO value.
As you should be able to understand by now, all of these fields can be used to overwrite different global settings. Provide a title and meta description, canonical URLs and include or exclude the archive from being indexed or included in the sitemap.
Summing Up
WordPress SEO by Yoast is a very powerful plugin. It lets you control every important optimization aspect of your WordPress site. From title formats, to indexing rules, to search engine appearance, there is very little you can not change.
At the same time, the plugin provides you with the knowledge to easily create highly optimized content, gives detailed input on how to improve your posts and pages, and even lets you control your content’s appearance on social platforms. WordPress users and website owners looking to increase their traffic will hardly get around this plugin. It takes much of the guess work out of optimizing your site and provides invaluable input for growth.
While WordPress SEO by Yoast won’t shoot you automatically to first place in Google, using it is definitely a step in the right direction. I hope that this guide has helped you understand how the plugin can benefit your site as well.
Do you use Yoast’s SEO plugin? Would you configure it differently? What are you experiences? Tell us in the comments.




24 Comments