Live interaction with users on your site is a great way to add new functionality that is engaging for your visitors. To be truly live, however, the server needs to correspond with the browser or client directly. Luckily there is a new way to do this using WebSockets, a protocol that allows that direct connection. You can use these instant interactions for administrative purposes, like to show how many visitors are currently viewing your site, and what page they are on.
Traditionally, a client communicates with the server by getting or pushing data to it, but what if the server could push without the client? An example of this is live chat. You type and the user(s) on the other end automatically see what you’re writing, without having to refresh the page. I wrote an article on my blog about how to create a live chat using Firebase and the WordPress REST API.
When you use WebSockets, the data should be relevant to the client currently on your site. Instead of creating another text chat plugin, we’re going to create a live tracker for your website. It will use WebSocket technology to automatically locate users as they navigate your site.
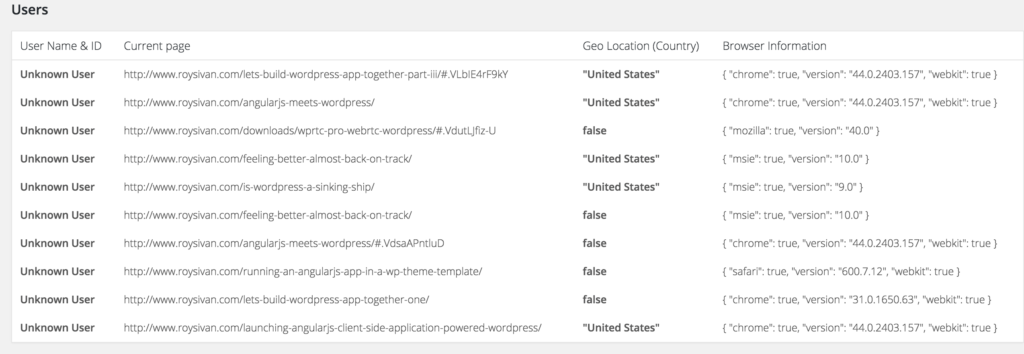
This is what the final product should look like:

Using Existing Technologies
There are some technologies out there that can do this without using any complex code. Let’s take a look at two examples:
Page Refresh – Normal PHP templates parse all HTML on the server and return it to the browser. If we had all the data of users currently on the site available, you would be able to see the table, but in order to get an update, you’d have to refresh the page. Similar to how you won’t see the change on your website’s front end until you hit refresh when editing content in WordPress. You could use JavaScript to force a refresh over a certain interval of time, but that would get annoying.
Ajax – The other way to handle this is to use Ajax. Set an interval to grab the data from the server and refresh the table. But what if nothing has changed? Why should you even bother with that Ajax request? What if you could only update the data when the data has changed? That is easily done with Firebase and AngularJS binding. As data changes in Firebase, the table with user information will automatically update itself.
Step 1: Setup Free Firebase Account
Firebase is an online, real-time database—it’s basically a JSON object that you can easily access and update. It has various uses, but I use it for CodeCavalry so users can instantly engage with each other.
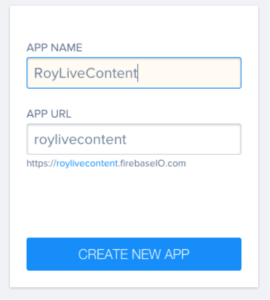
Firebase is easy to use— just create a free account and then create an app. I am going to create an app called RoyLiveContent.
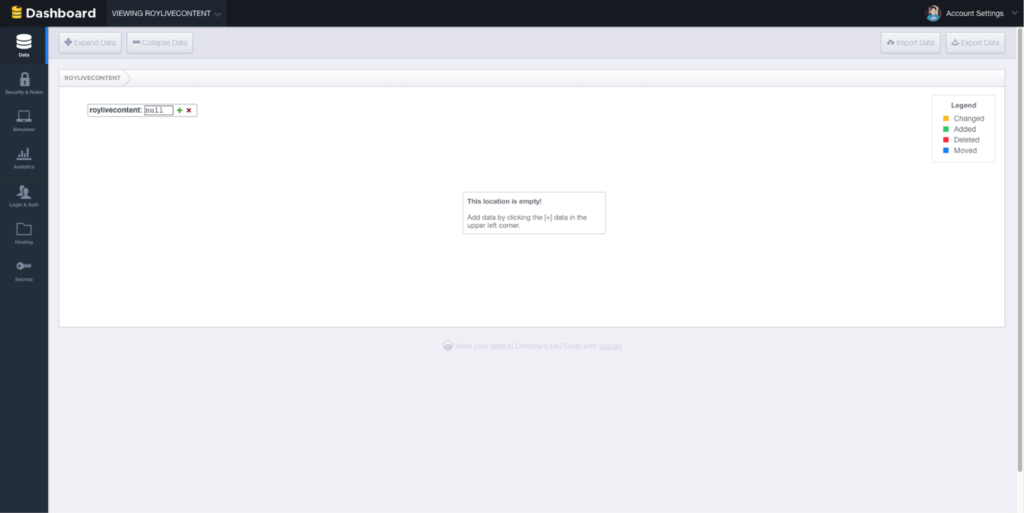
You will need to copy the app url for use later, mine is: http://roylivecontent.firebaseIO.com. Once the app is set up, you should be able to open it and view the data. Your screen should look like this:

Step 2: Create Your Base Plugin
Whether you are using a boilerplate to build off of or starting from scratch, when creating a plugin there are a few things you’ll need:
- A templates directory where you will store html files
- Enqueue Scripts
- Public Scripts – ‘wp_enqueue_script’ action
- Firebase JS library
- available via cdn – //cdn.firebase.com/js/client/2.0.4/firebase.js
- public plugin js file (assets/public/js/wp_livetracker.js)
- Firebase JS library
- Admin Scripts – ‘admin_enqueue_scripts’ action
- Angular
- Firebase
- AngularFire
- admin plugin js file (assets/admin/js/wp_livetracker.js)
- Public Scripts – ‘wp_enqueue_script’ action
Step 3 Admin Menu Page
I prefer to do the admin side first—at least setting up the menu page and being able to save the data you’ll need later. The menu page or submenu page is going to have both a form where we can store and edit the Firebase URL for your app, as well as the live user table.
Let’s skip the table and just do the form. First you’ll need to create a submenu page (or menu page if you prefer a top level menu item). I chose to create my submenu page under the main “Dashboard” menu by using the add_submenu_page() function and using ‘index.php’ for the parent. I titled my page “Live Track Users.”
In the callback function I have a very simple form
[php]echo ‘
<form action="’ . admin_url(‘index.php?page=live-tracker’) . ‘" method="post">’;
echo ‘<table class="form-table">’;
echo ‘<tbody>’;
echo ‘<tr>’;
echo ‘<th><label for="firebase_url">Firebase APP URL</label></th>’;
echo ‘<td><input id="firebase_url" type="text" size="120" value="’ . $firebase_url . ‘" name="__livetracker_firebase" placeholder="https://app.firebase.io" />’;
echo ‘</tr>’;
echo ‘</tbody>’;
echo ‘</table>’;
echo ‘<input type="submit" class="button-primary" value="Save" />’;
echo ‘</form>’;[/php]
Notice how the form action points directly to the same admin page using the admin_url function. This forces the user to return to this page when they hit submit. I also make sure to set the method to ‘post’.
The second part of handling the form data is saving and updating. I’ve seen a few different ways of doing this, including putting the functionality within the same callback function. I prefer to use the admin_init action and create a callback that checks for POST data.
Step 4: Localized Data Object – admin
The last piece of the puzzle for the admin is creating a localized data object. The localized object is going to help feed data into our JavaScript file.
In the admin script enqueue callback create a localized data object using wp_localize_script and pass in an array. By default, the array should contain “admin_template” which will be the plugin’s URL path (which I have defined with a constant to help with enqueueing scripts) and your Firebase app URL which you just created a way to save.
You can test by refreshing the admin and seeing if you have a new globalized object via your console.
Step 5: Localized Data Object – public
Okay, now we are going to work on the public or client facing side of things. We will start with another localized object, but this time in the public wp_enqueue_scripts callback, so we can access this global object while viewing the site.
Within your public script enqueue function, create a localized object that is going to have the following data:
- Firebase URL (site option)
- User ID, Username
- Post ID
User conditional
If the user is logged in, you can use wp_get_current_user to return the current user. If they are, I pass in the ID and username (user_login) to my localized object. Alternatively, I can set the user to false so I can quickly assess via boolean if there is a user or not, this will come in handy later.
Adding Geographic Location
Beside user data and current location, it could be important to have geographic location of the visitor. There are many free and public APIs you can use to get this kind of data based on the IP address of the user. I chose to use http://www.telize.com/geoip, pass in the IP and it should return a JSON object with geographic location.
To get this into our localized object, we do a wp_safe_remote_get. Since the API returns JSON, we will need to wrap the response body in a PHP function called json_decode, which will convert the JSON object into a PHP array.
Step 6 Public side JavaScript – send data to Firebase
Steps 4 and 5 can be swapped, I sometime like to build out the admin interface first and use the data (which I pass into the localized object), and sometimes I like to power through all the public stuff first, then do all the admin related code. I’m going to move forward with that method for now.
The first part of using Firebase is sending data to the JSON object stored on Firebase. AngularJS isn’t needed to send data to Firebase, just their own javascript library. The first thing we do in JavaScript is check if the localized variable for the Firebase URL exists, if not we return because there is no point in continuing. If there is a Firebase URL set, we continue into setting and sending that data.
Setting user defaults for fallback
This is where our localized object is going to help us out. First, we need to create some defaults to send to Firebase. I sent the user_id to a random number between 1,000 and 1,500, and the user_username to 0.
Setting user data
Once those are set we start getting into real data. First check if there is a user based on our localized object, if there is set the user_id and user_username to the corresponding data. Second we will set the geographic location if it exists, or set it to false if there is none. Lastly, we will set the current location and post ID.
Sending data to Firebase
Now comes Firebase, which luckily has some awesome functionality built into handle all of this .First lets handle setting the object when a user is online.
[js]
var userRef = new Firebase( livetracker_data.firebase_url + ‘/presence/’ + user_id );
userRef.set({
online: true,
user: Boolean( livetracker_data.user ),
user_id: parseInt( user_id ),
user_username: user_username,
viewing: current_loc,
browser: $.browser,
geo_location: user_location,
});[/js]
In the code above we are setting the user data, basically the object for that user once they are online. I set online to true, you could skip that because it is safe to assume if the data is there, a user is online, but this always makes for a good check. If you do not want to remove the data when the user disconnects from your site, you can also just change this from true to false so you see the last page and location any given user was on.
Another thing worth pointing out is that we use the Firebase URL with /presence/ so the array of online user objects is stored in a separate location from other data you may want. When I first started using Firebase I created a separate app for each array of objects, but realized you could have it all in one app and each array would be a unique URL.
What if the user disconnects by closing your site or navigating away?
The code for handling the disconnect of a user is pretty easy too
[js]
var amOnline = new Firebase( livetracker_data.firebase_url + ‘/.info/connected’ );
amOnline.on(‘value’, function(snapshot) {
if (snapshot.val()) {
userRef.onDisconnect().remove();
}
});
[/js]
The code removes the user from your data. As mentioned earlier, you could just alter the object so you have some data of their last whereabouts on your site. Another example of this could be storing a “last connected” timestamp, or if you change the user data in Firebase on other actions you could see their “last time active.” I recommend doing this for only logged in users, since one anonymous person (or pre-logged in visitor) may get two unique IDs from our default user_id generator.
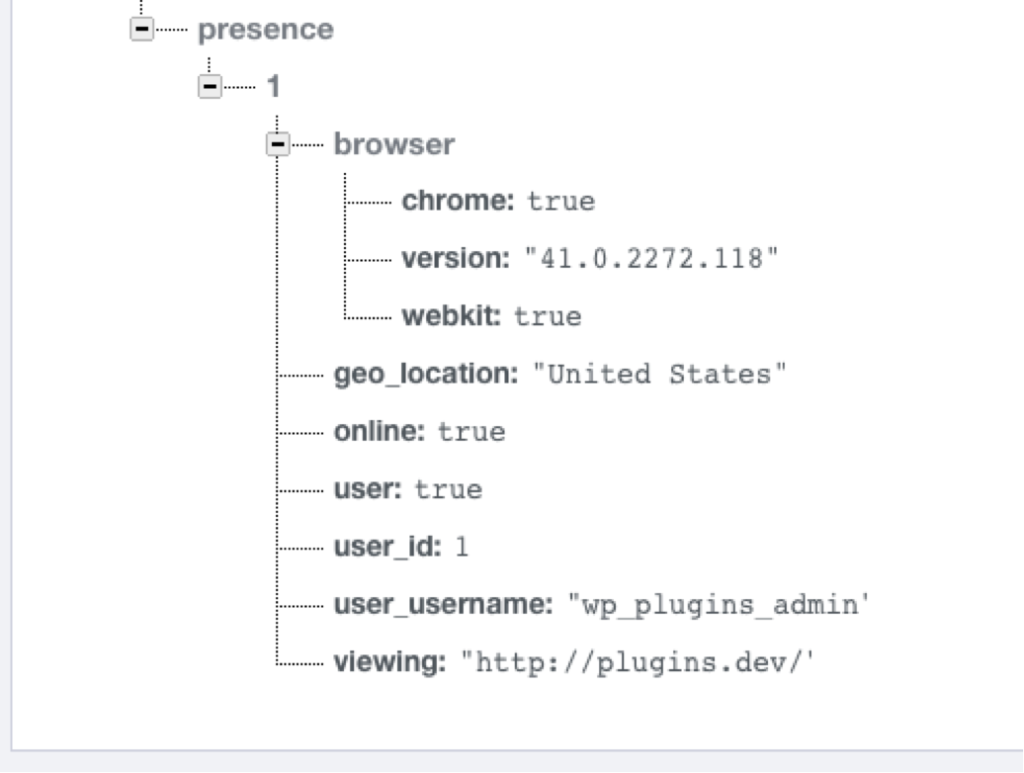
Firebase is now going to get data any time a user connects. To test it, log into your Firebase account and view the app that you have created. Visit any page on your site and as soon as it is done loading, you should see new data within a root level “presence” object that has your user data.
Step 7 AngularJS Directive
AngularJS directives are one its most powerful features. In WordPress terms they are similar to a widget. They are a piece of functionality that can contain their own scope, their own controller, and their own template. Directives can be used over and over in a larger application to modularize certain functional aspects. As the WordPress REST API makes its way into the hands of more developers, these directives will come in handy to create pieces of functionality that utilize the API as standalone widgets that can be placed anywhere.
Let’s open the assets/js/admin/wp_live_tracker.js file and start by creating an angular module, I titled mine wp_livetracker, angularFire also gives us access to an injectable AngularJS variable “firebase” so we will need to inject that into our app so we can use it. Right after defining the app or module, we will create a directive called liveTracker. The way AngularJS directives work is pretty nifty, we can assign the directive to a class, an html attribute, an element, or all of the above. In our case we are going to restrice: ‘E’ which means element. So anytime you use in your code, you should get the output of this new directive.
[js]
angular.module(‘wp_livetracker’, [‘firebase’] )
.directive(‘liveTracker’, function() {
return{
restrict: ‘E’,
scope: {},
controller: function( $scope, $firebaseObject ) {
var ref = new Firebase(livetracker_data.firebase_url + ‘/presence’ );
$scope.users_online = $firebaseObject(ref);
},
templateUrl: livetracker_data.admin_template + ‘/templates/livetracker.html’
};
});
[/js]
The directive has its own controller, into which we inject $scope and $firebaseObject, which is defined by angularFire. We create a new Firebase object by passing in our URL. Remember to include /presence because that is where our online user data is being set. Set $scope.online_users to $firebaseOBject(ref) and just like that there is an instant connection between Firebase and your AngularJS application. This is really the magical bit, because as the Firebase data changes as users connect, move around, and disconnect, the $scope.online_users will change to reflect those changes.
The last bit of the directive is to set the template, an html file. I stored mine within a templates directory in the plugin. We use the localized object’s property of admin_template to grab the URL.
Step 8 AngularJS Template
Since this going into the admin area of the site, we want to make sure it fits in well. I am going to use a table to make life easy.
[php]
<table class="widefat">
<thead>
<tr>
<th style="manage-column">User Name & ID</th>
<th style="manage-column">Current page</th>
<th style="manage-column">Geo Location (Country)</th>
<th style="manage-column">Browser Information</th>
<tr>
</thead>
<tbody>
<tr ng-repeat="user in users_online track by $index">
<td>
<strong ng-if="!user.user">Unknown User</strong>
<strong ng-if="user.user">{{user.user_username}} ({{user.user_id}})</strong>
</td>
<td>
{{user.viewing}}
</td>
<td>
<strong>{{ user.geo_location | json }}</strong>
</td>
<td>
{{ user.browser | json }}
</td>
</tr>
</tbody>
</table>
[/php]
AngularJS ng-repeat and ng-if
I won’t get into AngularJS coding too much here, but a quick note: the attribute ng-repeat is just like a php foreach loop. It already knows what scope we are in, so all we need to do is cycle through the online_users. I set track by $index just in case there are duplicates. We are also using ng-if, which will change what is remedied based on the data.
Step 9 Admin Screen – Putting it all together
Now I am going back to my admin screen, where we had the form to save the Firebase URL, and very easily put in the AngularJS directive we just created. We will need to wrap it with a div that has ng-app so AngularJS knows which app or module the directive is defined in.
I put a check in for firebase_url because there is no point in running all of this fancy AngularJS code if there is Firebase isn’t connected.
Voila, our finished product should be working:
GitHub
You can find my completed plugin working on GitHub: https://github.com/royboy789/Live-Visitor-Tracker.


No Comments