Images are a central to web content. They break up articles to make them more readable, help clear up and underline points inside the text, and overall make written content more visually pleasing.
In short, images make your content even more appealing.
Yet, not only humans look favorably at content that contains images; search engines do, too. Believe it or not, visuals can provide significant SEO benefits and help you climb in the search rankings.
Since this is a neglected topic for many websites and blogs, in the following we will take an in-depth look at how to properly do SEO image optimization in WordPress.
Why Is Image Optimization Important For SEO?
While most people concentrate on creating awesome written content to attract search traffic, search engines index more than just text.
Have you ever used the image search in Google? Then you will know that when you click on one of the images, the search engine redirects you to the website where the it is found.
Therefore, image-based search engines, such as Google, can bring in a ton of direct traffic.
Yet, it goes further than that.
Generally, having an image in your post or page is a sign of high quality in Google’s eyes. Something they and other search engines reward with better rankings.
In addition to that, content that includes images is much more likely to get shared on social platforms, another positive signal for search engines.
So you can see, just having an image is already good for your ranking efforts.
However, by adding a number of SEO markers to your images, they can function as an additional relevancy signal for your content.
That is because, as far as technology has come, the indexing of websites is still mainly text based. Google can not look at a video or image the way you and I do to understand its content.
Therefore, you have to help them figure out what is going on in those parts, how an image relates to the rest of your content and why it is an asset to your article.
That’s where SEO image optimization comes in. It allows you to add a lot of extra information for search engines to an otherwise blind spot on your website.
However, before we get to that, let’s have a quick look at what kind of images should be on your website to begin with.
Choosing The Right Image For Your Content
Your content should always be for the reader first and search engines second.
Therefore, even if adding images is good for your search rankings, don’t merely include them for SEO’s sake.
The visuals you pick should support the message of your article and underline its subject and content. They should integrate well and make your message even stronger.
Therefore, stay away from generic images. Use your own if possible or otherwise make an effort to find unique stock photos.
While Google can’t see if the photo in your post actually has anything to do with your content, it does have other indicators.
If you have a high bounce rate because visitors are put off by your site, Google will notice that something is fishy and punish you for it.
In short: Make images work with your content and don’t merely have them as a tick mark on your SEO checklist, capisce? Good, then let’s move on to the technical details.
How to Do SEO Image Optimization in WordPress
A number of markers are important for SEO-optimized images:
- Image size and loading time
- File name
- Position within content
- ALT and title tag
- Caption
- OpenGraph data
- XML Sitemap
1. Image Size and Loading Time
Ok, so Google doesn’t really check how large your image is and rank your page by that number.
However, what it does take into consideration is your page loading time and the speed at which your content is delivered.
Due to their size, images can play a big role in this.
Consequently, are two ways how you can contribute to speedy loading times: Image compression and choosing the right dimensions.
As for the first part, there are a number of services that allow you to reduce image file size prior to upload:
- ImageOptim (Mac)
- Trimage (Windows)
- RIOT – Radical Image Optimization Tool (Windows)
- Optimizilla (online)
- PunyPNG (online)
Plus, if you use an image editor, you can often find a Save for Web option (Ctrl+Alt+Shift+S in Photoshop) to save images in the smallest size possible.
The file format is also a consideration. JPEG images tend to be much smaller than other file types. The second option is PNG in case you need transparency or some other feature that JPEG doesn’t support.
Another option is to do image compression on the server side. Two WordPress plugins can do that for you:
Both will automatically strip unnecessary data from your images. This will make the files smaller and faster to load without messing up the quality.
Once it’s time to add visual media to your content, it’s important to pick the right version.
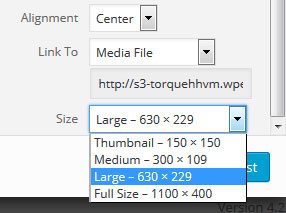
You might not be aware of it, but WordPress saves every image you upload in different dimensions.
That’s why when you click on Add Media and pick an image from the library, it gives you several size options at the bottom of the media settings.
Here it’s important that you pick the appropriate image size.
What I mean by that is that there’s no use choosing an image that is 3000 pixels wide for a content area of 600px.
All that does is force extra waiting time on your visitors. Not a good idea in the age of shortening attention spans.
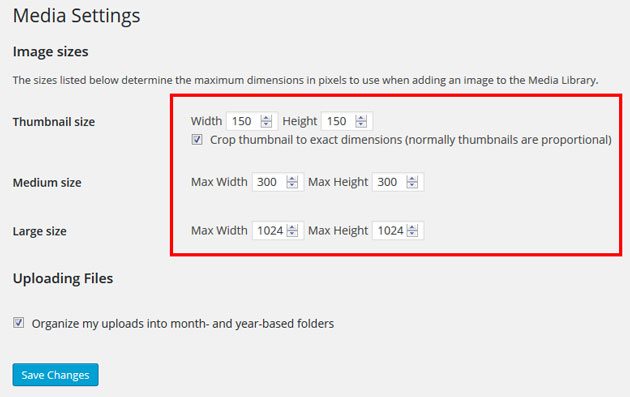
Luckily, WordPress has an easy fix for that. Under Settings > Media you can control the image sizes WordPress will create from your uploads.
If you set one of them to exactly the width of your content area, you never have to worry about the correct image size again.
For those who already have media present on their site, the Regenerate Thumbnails plugin lets you apply your new standard dimensions to existing images in your library.
For further tips on how to speed up your WordPress site and reduce page load time, you can read this article.
2. File Name
Earlier I stated that image optimization is about helping search engines understand the content of your visuals. The first clue they get for that is the file name.
The more information you can provide here, the better. If the file name is a generic sequence of letters and numbers from your camera, Google won’t understand a thing.
Plus, since you are trying to rank your image (and the rest of your content) for a certain keyword, this is also the first place where you should include it.
For example, if my main keyword for this article were “image optimization” I might call an included image file something like image-optimization-wordpress-media-settings.jpg. As you can see, I paid attention to put my main keyword in front and you should, too.
In case you want to rename existing files in your library without the hassle of deleting and re-uploading them, you can use the Media File Renamer plugin.
3. Image Position Within Content
Google and other search engines understand the content of your images not only from the file name, but also from its surroundings. An image will usually rank better if there is related text with additional information and keywords.
Therefore, image placement is another consideration.
Make sure visuals are embedded in a place where they are congruent with the topic of the written content. That’s not just a technical aspect. The goal is actually to ensure your article is user-friendly.
If you add an image somewhere it doesn’t make sense, this will destroy the cohesion of your content and human visitors will be turned off.
The result is an increased bounce rate which Google will pick up on. See how it could affect your ranking?
4. ALT And Title Tag
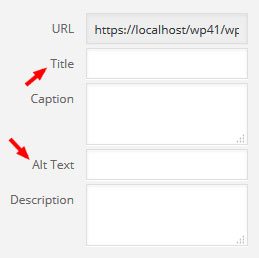
When adding an image from the WordPres library, you will find two fields called Title and Alt Text.
To understand what they are, let’s look at an HTML image tag:
[code]<img src="…/images/wordpress-logo.jpg" alt="The WordPress logo" title="The WordPress logo in black and white on a blue background." />[/code]
As you can see, the title and ALT tag are included in the HTML as additional clues for Google on the content of your image. However, of the two, the ALT tag carries more weight.
The text included as the ALT text is originally meant for situations where the image is not available. This can be for several reasons.
For example, an image doesn’t show up because of a faulty URL or because images have been disabled in the browser.
Another possibility is if a visitor is visually impaired or blind and surfs the web with a screen reader.
In addition to that, some readers, like search spiders, don’t have eyes to begin with.
For those cases, the ALT tag clarifies what should be visible in place of the image and, in the case of search engines, also the topic of the surrounding text.
For that purpose, the Alt tag should:
- Provide a description of the image
- Be keyword rich (no keyword stuffing though!)
- Be short and to the point
Example for a good ALT text:
[code]<img src="image-optimization-wordpress-media-settings.jpg" alt="Image optimization options in the WordPress media settings" />[/code]
The title attribute is similar to the ALT text. In some browsers, it will be displayed as a tooltip when people hover over an image with their mouse. Its purpose is to provide additional, yet non-essential information.
Since the title tag isn’t taken into account for SEO, many people merely copy the ALT tag here or leave it out completely (I’m in the first group).
Vladimir Prelovac has also written a plugin which can automatically insert title and ALT text into your images. However, it hasn’t been updated in a while.
5. Caption
The same place that lets you set all other image options in WordPress also allows you to include a caption.
In most themes, this text will appear in a gray box underneath the text. Lots of websites use it to display image source attributions.
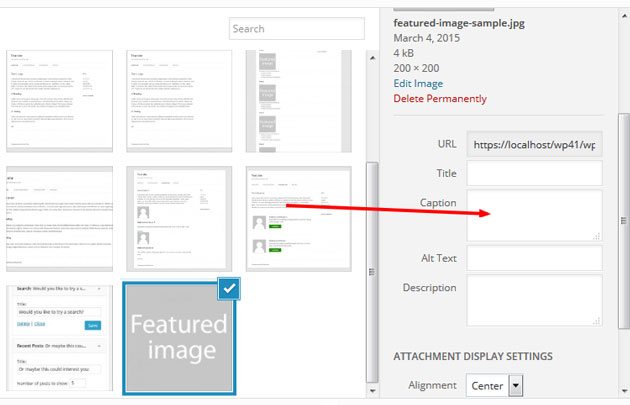
However, the caption is also a great place to include your keyword, since visitors use captions for scanning your content.
If your visitors are happy, Google is too.
Yet, don’t just use captions for SEO purposes. Include them only if they make sense.
Again, think of your human visitors first and don’t sacrifice user experience to please search engines.
6. OpenGraph Data
OpenGraph is a set of data points that allow social networks like Twitter, Facebook and Pinterest to better understand different parts of your content.
For example, they include meta tags that mark the URL, title and description of a blog post.
Wrapping an image in OpenGraph tags will let social networks know to use it when your article gets shared.
Implementing OpenGraph can in theory be done manually (Elegant Themes have an article on that), but it is much easier to use an SEO plugin like Yoast SEO.
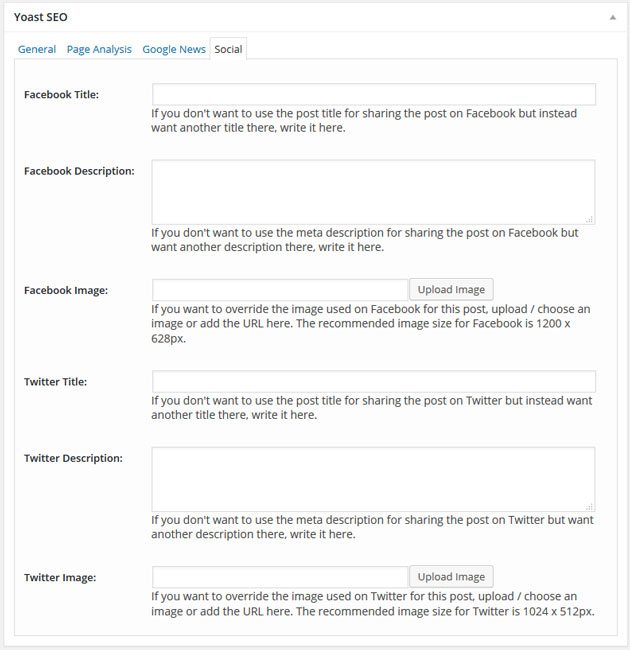
Here, when you click on the Social tab in the meta box underneath your article, you can set different titles and descriptions for different social platforms and set which images to use.
For social settings it might be a good idea to upload higher-quality images and/or include versions in dimensions that are optimized for different social platforms.
If you are not using Yoast SEO or All-in-One SEO Pack, there a number of other plugins for adding OpenGraph information to your images:
While this information isn’t directly of interest to search engines, it might lead to your articles getting shared more often. Since social signals are taken into account for search ranking, this will still help your rankings.
7. XML Image Sitemaps
Finally, there are XML sitemaps.
Generating a sitemap for your website is generally a good idea. Search engines use them to better understand and index your content, including images.
There are several plugins that will help you automatically set up sitemaps:
That way, no search engine will ever be unaware of your visuals.
Conclusion: Image Optimization In WordPress Isn’t Hard
Visual content is vital in web publishing. Images make content much more attractive and than all-text experiences.
While user experience should always come first, SEO image optimization is an important part of improving your search rankings.
As you have seen from the above, a number of elements contribute to perfectly optimized images, from file name and size to context and meta tags.
Thankfully, a combination of features built into WordPress and a few plugins make them very easy to implement.
No excuses, the only thing standing in your way is your own laziness.
But don’t worry, it only takes a little time to make image optimization part of your content workflow.
What do you think? Is image optimization worth the effort? Thoughts, comments? Let us know below.

7 Comments