For the most part, learning WordPress is a steady process. Every day, we learn a little more, discover new plugins and tricks to get things done more efficiently, and push our capabilities in increments.
However, every now and then we discover something big, something that that completely changes our workflow and opens up a world of new possibilities. A game changer.
For me, one of those game changers was the discovery of Firebug.
“You mean, I can directly change any element on my site in real time without any trial and error in my style sheet, reloading or anything? Woah!”
However, today I want to talk about another tool that can be used as another one of those great leaps forward—local development.
Have you ever made changes on your live site, praying to the Internet gods with sweaty hands that your tinkering wouldn’t break anything? Or did you get up really early in the morning so that, if something did break, not many visitors would be around to notice?
Welcome to the club.
The thing is, working on a site directly online is fine as long as nobody has seen it yet.
However, it’s completely different when it comes to making alterations to an established site, especially when the changes are more significant, like theme changes.
The solution: Learn to install WordPress locally. It allows you to test any changes beforehand without the risk of breaking your precious site and is an essential skill for anyone serious about using the WordPress platform.
So, if you want to learn why and how to set up WordPress on your personal computer, just keep reading.
Why Install WordPress Locally?
There are many good reasons to set up a copy of WordPress on your local hard drive. For plugin and theme developers, it’s a must-have to test their work before releasing it into the wild.
Sure, an online staging environment would also do the trick. Yet, in that case, you are still dependent on having a working Internet connection.
With a local install, you can take your sites, themes, and plugins with you wherever you go.
I, for one, have been known to build websites while riding the train. (Internet connection on German trains is surprisingly awful.) However, even for more casual users, knowing how to install WordPress locally offers many advantages.
Most importantly, it allows you to test site changes, themes, and plugins in a safe environment where it won’t have serious consequences for your live site if something goes wrong.
Then, there is the matter of performance. Since everything is on your own hard drive and not on a server, loading times tend to be much quicker, resulting in a more efficient workflow.
Plus, without the need to rent additional online space for a testing environment, it can save you money, too!
Convinced yet? Then let’s move on to the practical part.
Tools You Will Need
As you have probably discovered by now, WordPress is not a standalone application.
(It actually took me longer than I care to admit. I distinctly remember searching for an .exe file after downloading WordPress for the first time.)
Your server usually includes other software needed to run WordPress. In particular, PHP (the programming language WordPress is mainly written in) and MySQL, which powers the database.
Plus, most environments come with a MySQL user interface like phpMyAdmin. (Because who can write MySQL queries? Other people than me, that’s who.)
That means we need to find a way to provide this same environment on our local machine. Luckily, we have several solutions for this at our disposal. For this tutorial, we will be using XAMPP.
This application’s name is an acronym that stands for cross platform, Apache, MySQL, PHP, and Perl.
It is a handy piece of software that includes all components you need to set up a local server for your WordPress installation.
The “cross platform” part also means it will run on Windows, Mac OS, and Linux.
Environment-specific solutions like WAMP and MAMP (which by now you should be able to decipher by yourself) are also available. They are good as well, I simply found XAMPP the most comfortable to use.
So, in order to get started you can go to the Apache Friends website and download XAMPP. I’ll show you how to use it in just a moment.
How To Install XAMPP
For this tutorial, I will be using a PC with Windows 7 to demonstrate the steps. However, the installation process will be very similar on other platforms. You will find some specific advice for Mac OS at the end of this section.
1. Run The Installer
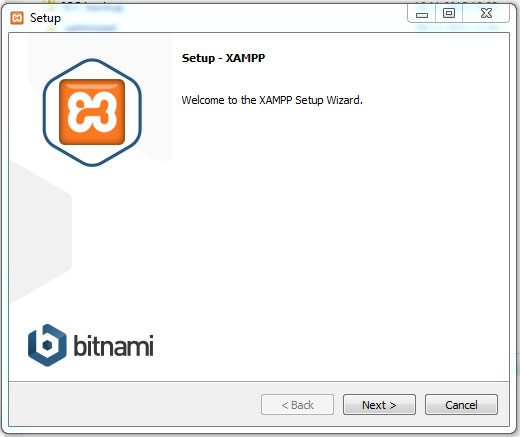
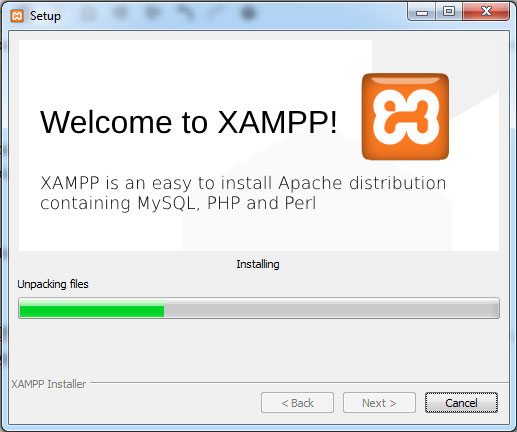
After the download is finished, find the XAMPP installer file and run it. Windows might warn you about using software from an unknown source and you need to allow it to continue.
After that, the setup wizard will start to guide you through the installation of XAMPP.
2. Complete The Setup
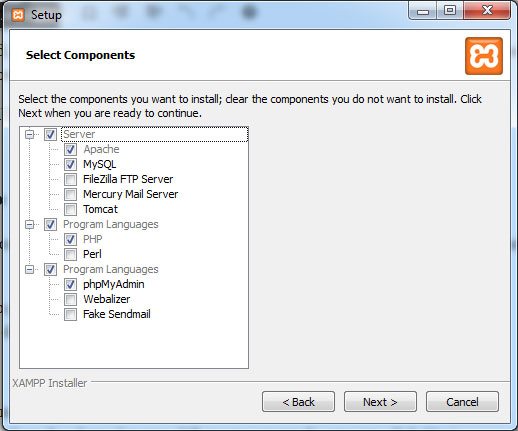
First, you need to choose the components you would like to install. The Apache server environment and PHP are activated by default.
To run WordPress we are also going to need MySQL. Plus, you probably want to bring along phpMyAdmin for convenient database operations, so check the respective boxes.
XAMPP has a few more optional components such as a virtual FTP server you can access via FileZilla. However, we don’t need more than the above for now. When you are ready, you can click Next.
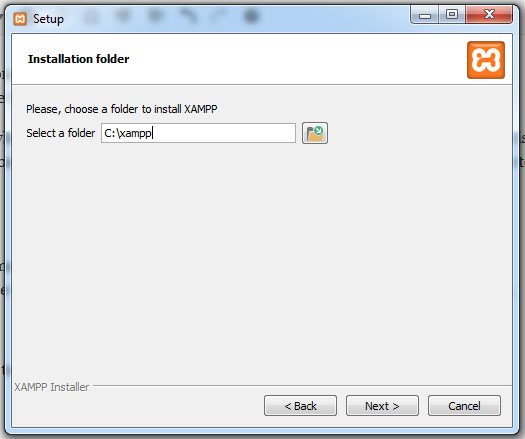
After that you will be asked where to install XAMPP. When choosing a location, keep in mind that this is also the place where your websites will be stored. Don’t bury it in too many subfolders or you will have to do a lot of clicking.
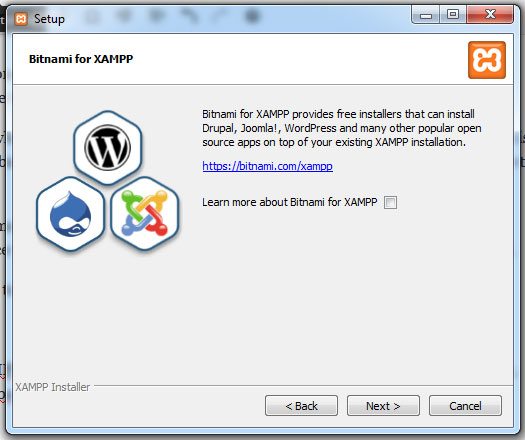
The next step includes a promotional message for Bitnami, which is a tool that enables you to install WordPress very quickly (as well as other applications). You can uncheck the box and move on.
The application is now ready to install. One more click and it will start copying the necessary files.
Nice job! You now have XAMPP installed on your local machine. To start the control panel right away, you can leave the final checkbox active and hit Finish.
3. Configure XAMPP
If you didn’t check the box in the last step of the setup, now it’s time to start XAMPP from the start menu or the application’s directory.
Before it can start, you might receive a Windows Firewall warning. If you do, be sure to enable XAMPP on private networks, since it won’t work otherwise.
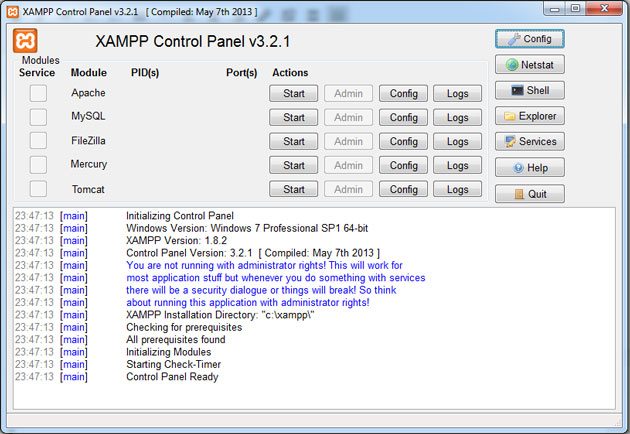
After that, you should be confronted with the control panel for the first time. You can start both Apache and MySQL by clicking on the Start buttons.
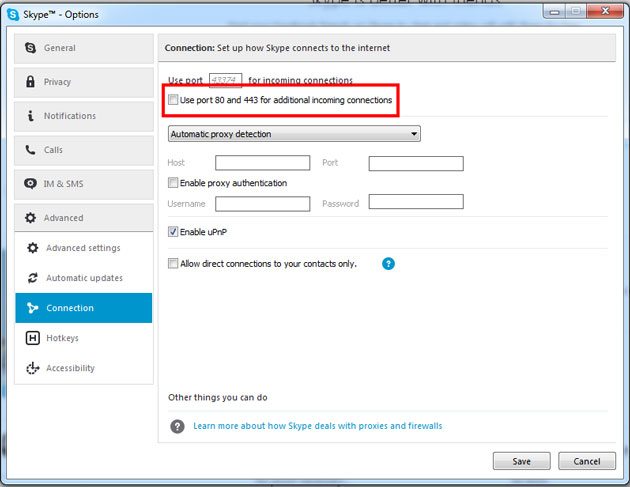
Usually this should go off without a hitch. Yet, in some cases there will be conflicts with applications which are using the same ports as XAMPP, such as Skype.
In that case, you need to quit those applications and restart the blocked XAMPP components.
To permanently solve the Skype problem, open it and go to Tools > Options > Advanced > Connection. Here, uncheck the point that says Use port 80 and 443 for additional incoming connections.
Save, restart Skype and you are done with this nuisance forever.
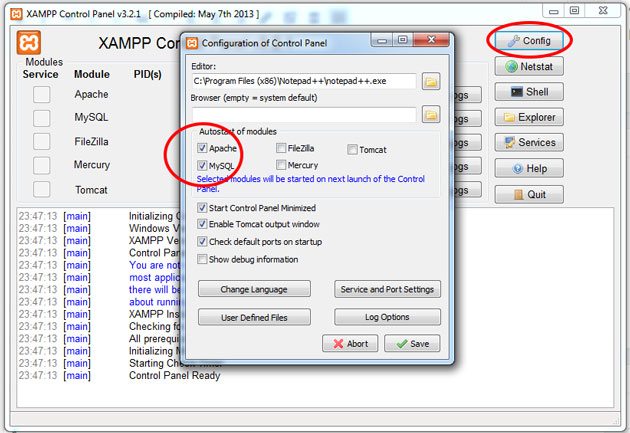
XAMPP also has an option to run required modules automatically when starting XAMPP. It can be found under Config in the upper right corner.
If you check Apache and MySQL here, all you need to do is fire up the control panel and you are good to go within seconds.
With both components running, it’s now time to check whether your local server is functioning properly.
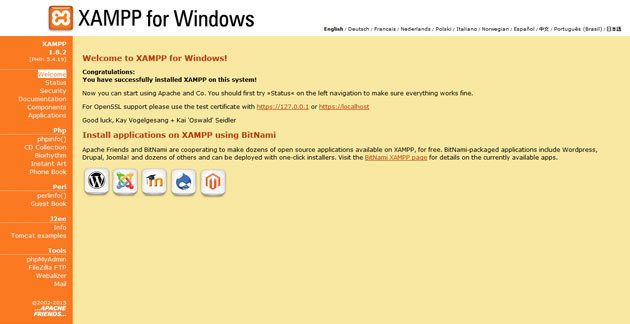
There is an easy test for that. Open the browser of your choice and visit http://localhost/. If everything is fine, you should be greeted by the screen below.
You did it! XAMPP is now properly installed and working on your PC.
How To Install XAMPP On Mac OS
Installing a local development environment with XAMPP in Mac OS is even easier than on a PC.
All you need to do is download the .dmg file, open it, and either double click on the XAMPP icon or drag it to your application folder to install the program.
That’s it.
After that, you can start XAMPP and activate the same components as mentioned above. Easy peasy.
Creating A MySQL Database In XAMPP
Just like on a normal web server, in order to install WordPress we first need a MySQL database.
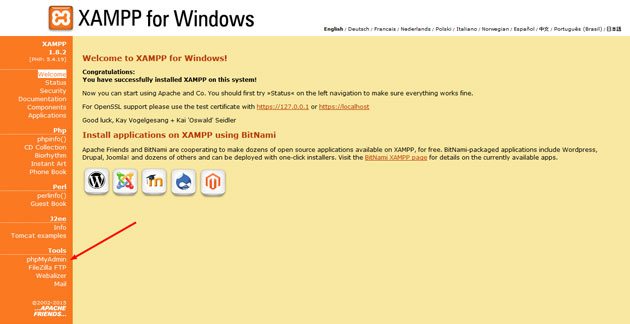
To create one, go to the XAMPP home screen (http://localhost/, remember?) and find the phpMyAdmin link in the lower part of the left sidebar. A click here will bring you to the database administration.
You can also get there via two alternative routes. One is to access http://localhost/phpmyadmin/ directly, the other is clicking on the Admin button for MySQL in the XAMPP control panel.
Setting up a database for a local WordPress install is not very different than setting one up for a live site. However, there are a few important points to keep in mind.
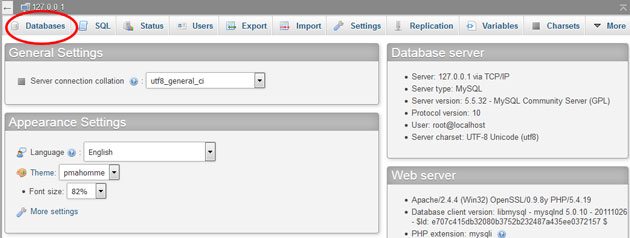
To get started, click Databases in the top menu bar.
In the next screen, enter a name for your WordPress database under Create a database and pick the appropriate collation via the dropdown menu. Usually, this will be utf8_your_language or utf8mb4_general_ci if your language doesn’t exist. Then hit Create.
That is enough for a local installation. You don’t need to set up a username and password like on a web server.
However, there are good reasons to do it anyway, for example when you want to migrate your local site to a live environment later. In that case, using the same database name, user, and password as on your server can make things a little easier down the line.
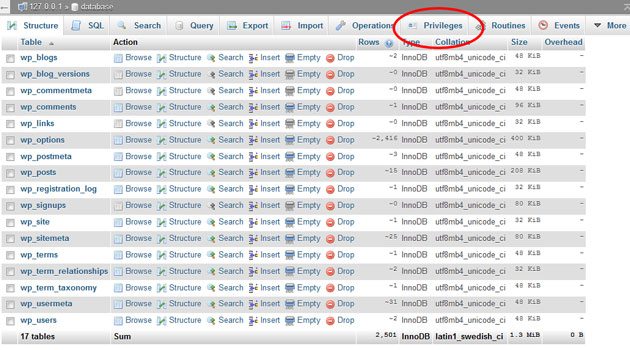
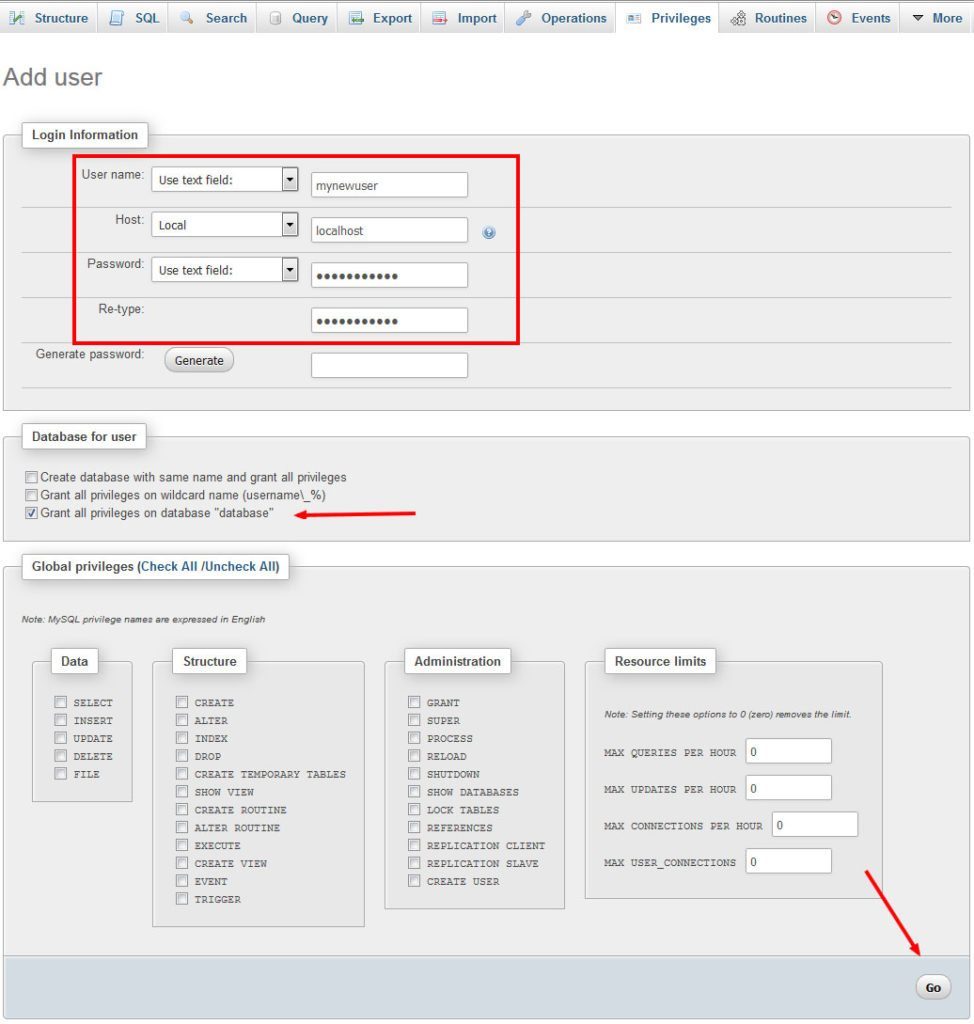
If you choose to set up a user, you need to give him or her full permissions for the database. The easiest way to do this is by clicking on your new database and then finding Privileges in the menu on top.
At the bottom of the next screen, choose Add user.
After that you will be asked to provide a user name, host, and password. Choose Local for Host and note down the other information plus your database name. You will need it soon.
Before you hit Go at the very bottom of the screen to create your user, make sure the checkbox for Grant all privileges on database “[your database name]” is checked.
That’s it. Now we are ready for WordPress.
Installing WordPress On Your Local XAMPP Server
Setting up a local WordPress installation works pretty much the same as installing WordPress on a web server.
The only exception is that instead of dialing up an FTP connection, you put the files in a particular location on your hard drive, namely the htdocs folder inside your XAMPP directory.
Create a new folder here as the future home of your local website. When you do, make sure to give it a name you can remember, as you need it to access the site from your browser.
After that, download the latest version of WordPress, unzip the file, and open the unzipped directory. Then, mark all the files and folders and copy them to the directory that is to become your local install.
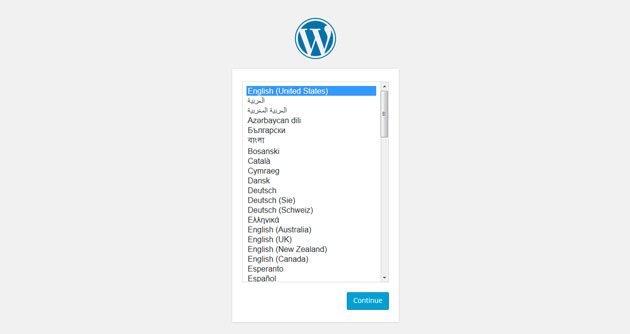
Good job! When you now open your browser window and type in http://localhost/yourdirectoryname you should be met with this screen:
All that’s left now is to go through the famous WordPress 5-Minute install. You know how to do that, right?
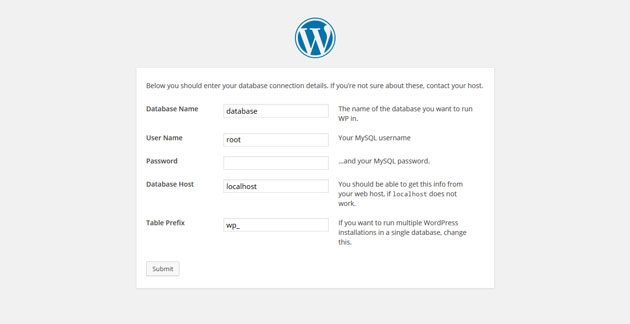
The only special consideration here is when you haven’t created a MySQL username and password. In that case, you need to type in “root” for the user and leave the password field blank.
If you did create a user and password earlier, you can just put in the required information as usual.
In the next step you will be asked for a website title, username, password, and email address. Fill this out however you want.
Whether you check the box to allow search engines to index your site is not important. Since the WordPress installation is on your local hard drive, not even Google will be able to access it.
Just be sure to make your site indexable after moving it to your web server. Otherwise, you might be disappointed by the sight of your Google Analytics.
Hit Install WordPress and that’s it. Good job, sparky! You now have a fully functional WordPress website running on your computer.
One Last Thing…
Of course, you can also cut the installation process short by inputting your database information before running the install.
For that, just rename the file wp-config-sample.php inside your WordPress folder to wp-config.php and open it with the editor of your choice (I like Notepad++). Find the following lines:
[code]/** The name of the database for WordPress */
define(‘DB_NAME’, ‘database_name_here’);
/** MySQL database username */
define(‘DB_USER’, ‘username_here’);
/** MySQL database password */
define(‘DB_PASSWORD’, ‘password_here’);[/code]
Replace database_name_here with the name of your database, username_here with the MySQL user, and password_here with the password. If you didn’t set a user name and password, go with root and leave the password_here field blank.
Save and browse to your local website’s address. You should now start with the installation’s second step right away.
What’s Next?
Your local WordPress site allows you to do anything you could also do on a live site:
- Installing themes and plugins
- Editing style.css
- Modifying theme files
- Setting up a WordPress multisite
- and more…
The only difference is that all operations you would usually perform via FTP are now done on your hard drive.
Also, whenever you want to work on your site, you need to make sure your local server is running. Otherwise your browser won’t be able to find it.
Therefore, it might be a good idea to create a shortcut for the XAMPP control panel in your dock or Windows toolbar.
The only question that remains is how to migrate sites between your local and live server. However, that demands an entire article all by itself.
In Short…
Knowing how to set up a local working environment is a crucial skill for any WordPress user to take their skill to the next level.
It enables you to set up a risk-free testing environment, makes you independent from web servers and Internet connections, offers improved performance, and has many more benefits.
XAMPP offers a free, easy-to-use, and intuitive tool to set up a local server in just minutes where you can create a WordPress site by following the usual steps.
If you have made it this far, it’s time to congratulate yourself. You just made a giant leap in your personal WordPress development. Happy experimenting and keep learning!
Have you used XAMPP for local development? Any additional tips or thoughts? Let us know in the comments!


31 Comments