WordPress custom fields are essential for many developers.
They allow you to add customized information to post and pages and build tailored solutions for content creation on different types of websites.
For example, custom fields can be used to include a dedicated menu in the WordPress editor that allows users to add ratings to movie reviews.
Setting an expiration date for your blog posts is another option that can be implemented with their help.
However, because this feature is as complex as it is powerful, many non-developers shy away from it and improvise other solutions instead.
Thankfully, the plugin Advanced Custom Fields makes custom fields available to everyday users and in this tutorial, you will learn all about it.
Not only does the article provide you with an overview of WordPress custom fields and their capabilities, it will also show you in detail how to use the Advanced Custom Fields plugin to get the best out of them for your site.
Sound good? Then let’s get going, we have a lot to cover.
Table of Contents
- What Are WordPress Custom Fields?
- Examples of WordPress Custom Fields
- Advantages of WordPress Custom Fields
- How to Manually Add Custom Fields in WordPress
- Why Should You Use Advanced Custom Fields
- How to Install Advanced Custom Fields Plugin
- How to Use the Advanced Custom Fields Plugin
- How to Display Custom Fields In Your WordPress Theme
- How Are You Going to Use Advanced Custom Fields?
What Are WordPress Custom Fields?
In short, custom fields are a form of meta data that can be used to extend posts and pages.
In that, they are very similar to stuff like publishing date, author, category, tag and other data that’s common for many WordPress content types.
While that sounds a bit underwhelming, custom fields are actually the single most powerful feature for extending WordPress posts and pages.
You will soon see why.
Examples Of WordPress Custom Fields
So, basically, custom fields allow you to include additional information of any kind to your content.
While not spectacular in the abstract, it gets more exciting when you look at concrete examples of custom fields in action.
I already mentioned some use cases in the introduction. Metadata from custom fields can, for example, take the form of
- A scoring system to a movie post type
- Start and end times for events (like in the Event Organiser plugin)
- Prices for products or color variations and sizes
- Additional meta boxes in the WordPress editor like the content analysis tool in Yoast SEO
Yep, all of these are done with custom fields. Now do you start to see why this feature is so powerful?
Advantages Of WordPress Custom Fields
In theory, you can add a lot of this information to your content in other ways.
Movie scoring can, for example, be directly added to the post. If that is the case, what do you need custom fields for?
The advantage of using custom fields to add recurring data is that they make it easy to change things site wide.
For example, if you decided to move the movie scores to another location inside your posts, your can just do so for all reviews by changing one template.
If you saved the information inside the posts, you would have to edit every single one to implement the same change on your entire site.
Sounds a lot more complicated, doesn’t it?
Apart from that, using custom fields often makes for a much better user experience.
As you will see below, they allow you to include metafields in the WordPress editor and other places from where the filled-in information is automatically added to your finished content in the right place.
This makes things much more comfortable and, if you are developing websites for other people, professional looking.
What sounds better: Giving your client a customized admin interface that does exactly what they want or telling them to write everything into the post and format it by hand?
I rest my case.
How To Manually Add Custom Fields In WordPress
While this tutorial will teach you how to use the Advanced Custom Fields plugin, it should be said that you don’t necessarily need the plugin to take advantage of this WordPress feature.
That’s because the ability to add custom fields is natively built into WordPress (besides the possibility to code it manually that is).
As you will see later on, Advanced Custom Fields makes the process much easier, yet, for completion’s sake I will quickly show you the alternative way.
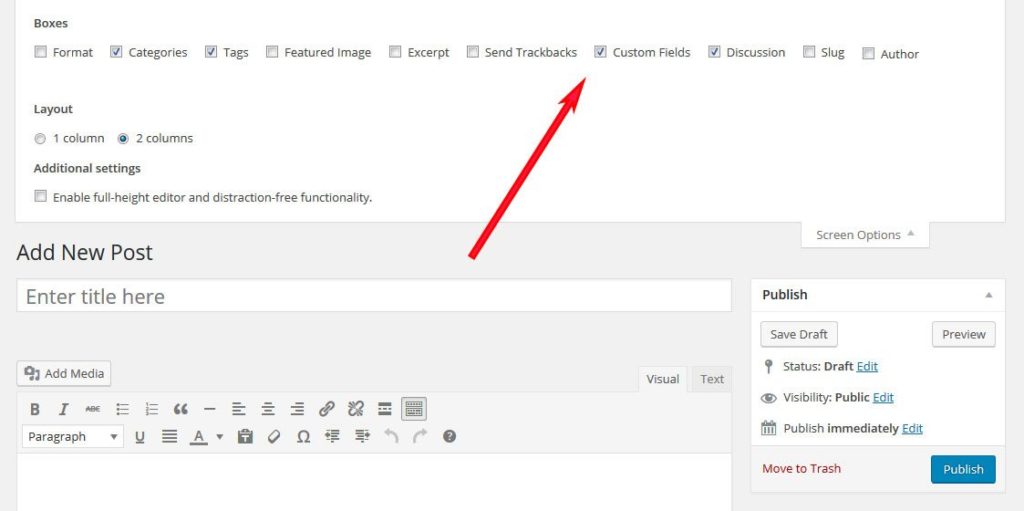
You might not be aware of it but there is actually a custom field metabox available in the WordPress editor. However, since version 3.1 it is hidden by default and you need to use the screen options at the top to see it.
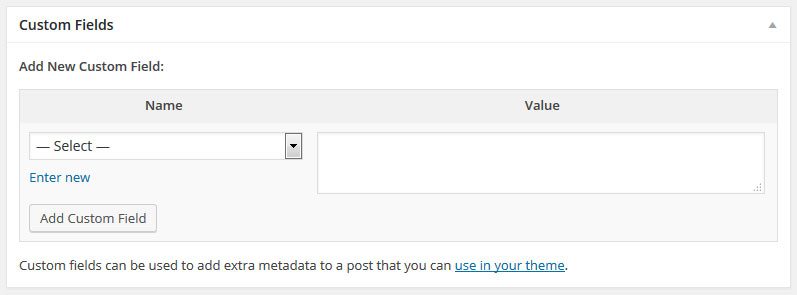
After that, the box appears at the bottom of the editor screen.
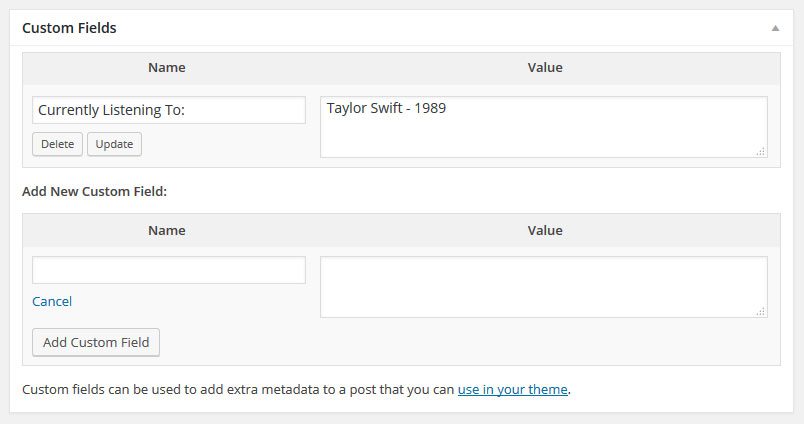
Here, you can easily add any custom field you like. All you need to do is give it a name and a value.
For example, to let people know which music was in your headphones while writing your post, you can add a custom field called Currently Listening To: plus the tune that’s running at the moment.
(Is it Taylor Swift for you too? I don’t blame you.)
When you add this data, it will be saved in the database and can be output on your site.
The key (here: Currently Listening To:) will also be reusable in other posts in the future and can be picked from a drop-down menu.
Now all that’s left is adding some code to whichever template you want this field to show up in. We will dive into this topic in more detail below.
Why Should You Use Advanced Custom Fields Plugin?
If this can be done by WordPress by default or by hand, why the need for a plugin?
I mean, a full five-star rating in the WordPress directory at more than a million active installs, means it has to have something going for it, right?
Well, it does. The plugin basically provides an advanced user interface for adding custom fields to WordPress.
Its main advantage is that Advanced Custom Fields has over 20 different presets for custom fields built in, which makes creating them much faster and easier.
The presets include:
- Text — Single-line text field with optional HTML support and character limit
- Text Area — Same as Text but with multiple lines
- Number — Number field that can have optional min/max values
- Email — Custom field for email input including validation
- Password — Password input with text masking
- WYSIWYG Editor — WordPress editor input with options for media insertion and editor buttons
- Image — Upload an image or select one from the media library. Returns an object, URL or ID.
- File — Same as image but for files in general
- Select — Drop-down menu with support for multiple selections
- Checkbox — Checkbox field for single or multiple items
- Radio Button — Pick a single item via radio button
- True / False — Basic true or false selector
- Page Link — Returns the URL of any post or page. Can be limited to specific post types.
- Post Object — Returns a WordPress object of any post or page, post type or taxonomy
- Relationship — Same as post object but with an advanced interface and reordering via drag and drop
- Taxonomy — Returns an object or ID for one or more taxonomies. Can be limited to tags, categories or custom taxonomy terms.
- User — Select one or more users. Option to limit choice by user role.
- Google Map — Set a center, zoom level and width
- Date Picker — Select a calendar date and return a formatted date string
- Color Picker — Select a hexadecimal color
- Message — Leave a message
- Tab — Combine fields into a tabbed interface
Besides these handy presets, the plugin also lets you define rules to determine where they will show up inside the WordPress admin.
That way you can only show custom fields in certain post categories and otherwise keep the admin area free.
A number of available extensions add even more functionality. Some of them are free like:
- Advanced Custom Fields: Nav Menu Field — Adds a field for setting custom menus for posts and pages.
- ACF: Sidebar Selector — Allows the selection of a registered WordPress sidebar.
Others are premium solutions:
- Repeater Field — Allows users to create complex layouts with any number of fields.
- Gallery Field — Provides an interface for managing a collection of images.
- Options Page — Create a custom options page for the WordPress dashboard, good for collecting site-wide data.
- Flexible Content — Set up multiple layouts with several fields that can be used in any order on the page.
In short, WordPress Advanced Custom Fields makes extending your content with custom meta data as easy as filling out a form and gives you complete control over how it is used in the WordPress admin area.
If the above has made you curious, you are in luck. We will now take an in-depth look at how to install and use the plugin to implement WordPress custom fields on your WordPress site.
How To Install Advanced Custom Fields Plugin
Advanced Custom Fields plugin is installed like any other plugin. Go to Plugins > Add New and search for Advanced Custom Fields, then press enter.
The plugin should show up on first place and you can get it onto your site via Install Now. When the installation is done, don’t forget to activate.
Alternatively, it’s also possible to download Advanced Custom Fields from the WordPress directory and then upload it to your site via FTP.
In any case, a new Custom Fields menu should now show up in your WordPress admin area.

How To Use The Advanced Custom Fields Plugin
Now the real work begins. However, as you will soon see, it’s no real work at all. Creating custom fields with this plugin is a piece of cake.
To make the process easier to understand, I have come up with a concrete use case for the demonstration.
For this tutorial, I will create a group of custom fields for a post type called books that I use for — drumroll — book reviews.
(By the way, if you are a bit hazy about what custom post types are and how to create and use them, head on over to our tutorial on that very topic.)
In particular, I want to add the following data:
- Release year of the book
- The book’s author
- Book rating (out of ten)
Let’s get started.
1. Create A New Field Group
A Field Group is exactly what it sounds like — a group of custom fields that topically belong together.
For example, all the information I want to add to my book reviews logically correlate and can therefore all go in one group.
Creating field groups is the main function of Advanced Custom Fields. Of course, a group can also only contain one field but that is the terminology they have chosen.
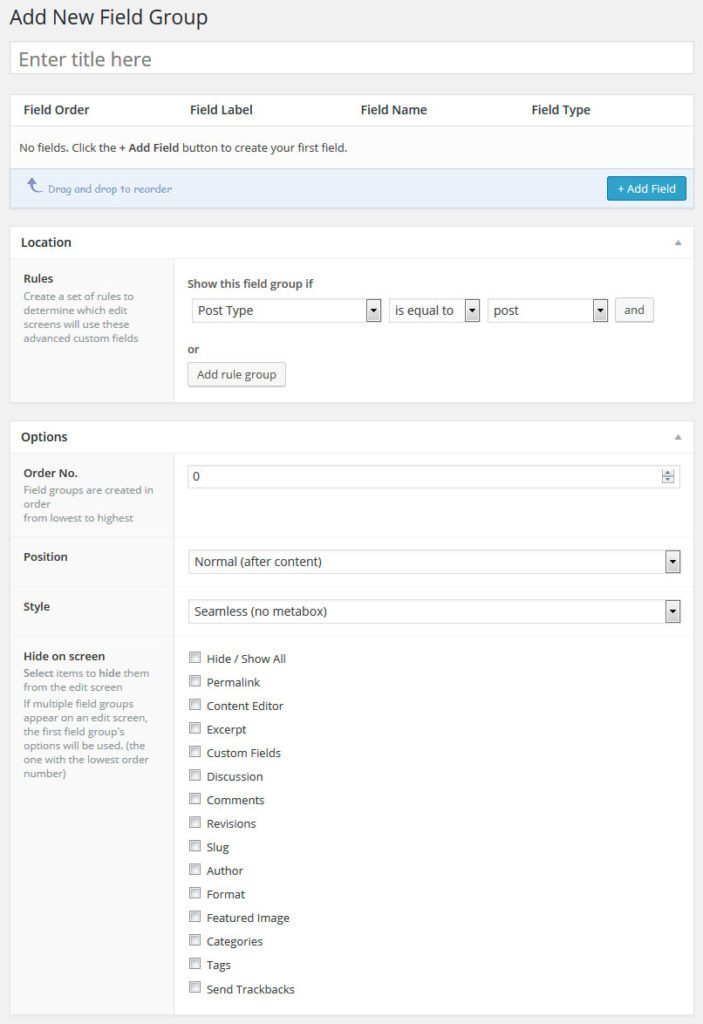
To create one, click Custom Fields in the WordPress admin area. The menu you are being taken to shows all the field groups you have created.
For now, it will be completely empty. To change that, find the Add New button at the top and click it. This will bring you to the following screen:
Don’t worry if it looks a little overwhelming, as soon as you have gone through the process once, you’ll understand everything on there.
For now, however, just enter a name for your field group at the top. Me, I am going with Book Metadata. After that, we can move on to adding fields to the group.
2. Add And Configure Fields
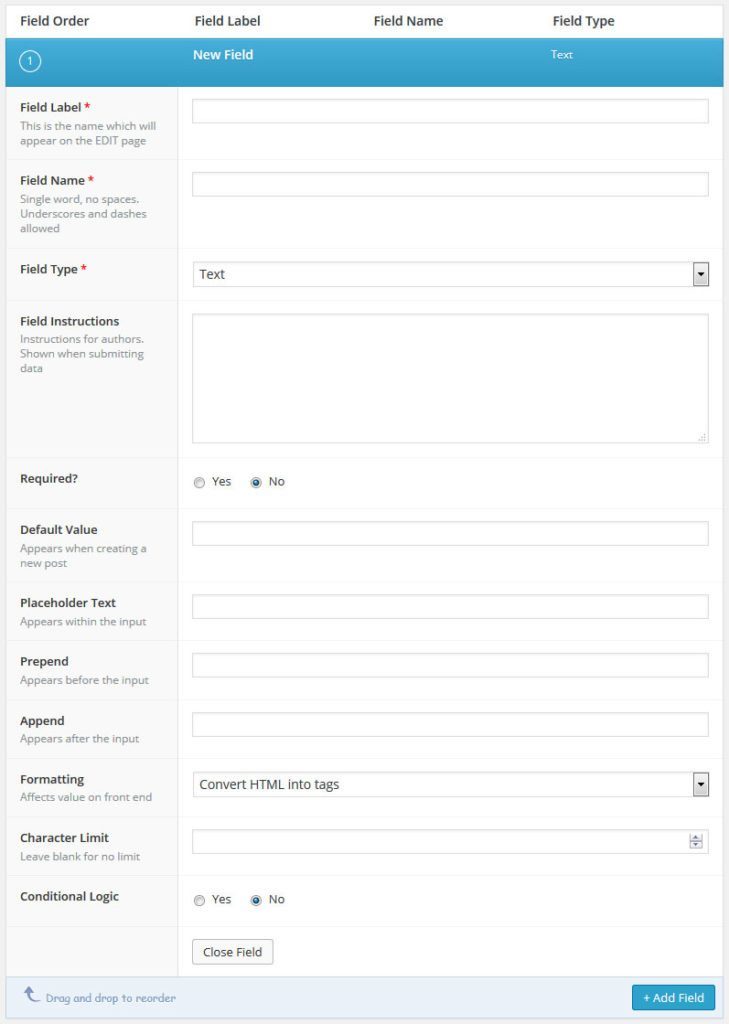
To start adding fields to your group, just click the big blue Add Field button at the bottom (who would have thought?). It will open this form:
Here’s what each of the fields in the form means and is used for:
- Field Label — The name that appears inside the advanced custom fields menu
- Field Name — Name used inside templates and code. Should automatically be populated with the label. No spaces allowed between words, only hyphens, and underscores.
- Field Instructions — Leave instructions for using the field later
- Required — Determine whether or not this field is mandatory to fill in. If yes, authors won’t be able to save posts or pages associated with the custom field unless contains something.
- Default Value — This value will automatically populate the field when creating a post
- Placeholder Text — Appears within input fields on the editor screen
- Prepend & Append — Defines what appears before and after the input text
- Formatting — Check whether or not HTML input into a text field will be rendered on screen
- Character Limit — Optionally put a limit on how many characters can be typed in
- Conditional Logic — Rules for when fields are visible
- Minimum & Maximum Value — Minimum and maximum number allowed inside a field
- Step Size — Defines the step by which to reduce or increase a number when clicking on the arrows
- Close Field — Close the currently viewed field to configure others (field group, remember?).
Be aware that not all of these options may show up. For example, minimum and maximum value as well as step size are only available for fields that contain numbers.
There are also additional options available for other field types but we won’t go into them at this point.
My own setup ends up looking like this:
- Field Label: Release Year
- Field Name: release_year
- Field Type: Number
- Field Instructions: Input the year of the book’s release here.
- Required: Yes
I make this field required because I definitely want authors to fill this in (and myself as well).
- Field Label: Author
- Field Name: author
- Field Type: Text
- Field Instructions: Please use the first and last name without any commas, e.g. “Stephen King, J.K. Rowling”.
- Required: Yes
- Formatting: No Formatting
As you can see, I give clear instructions on how to use this field. The “no formatting” setting is to keep anyone from adding HTML here that would mess with my layout.
- Field Label: Book Rating
- Field Name: book_rating
- Field Type: Number
- Field Instructions: Rate the quality of the book on a scale of one to ten.
- Required: Yes
- Minimum Value: 1
- Maximum Value: 10
- Step Size: 1
Since the rating scale is one to ten, it makes sense to limit the field to these numbers so nobody can input anything else.
One you are done, you can close the fields to see the entire group. This also allows you to change the order of the items via drag and drop.
For example, I decided I want to put the author to the top even though it’s not the first field I have created and I can easily do so.
3. Configure Custom Field Location And Options
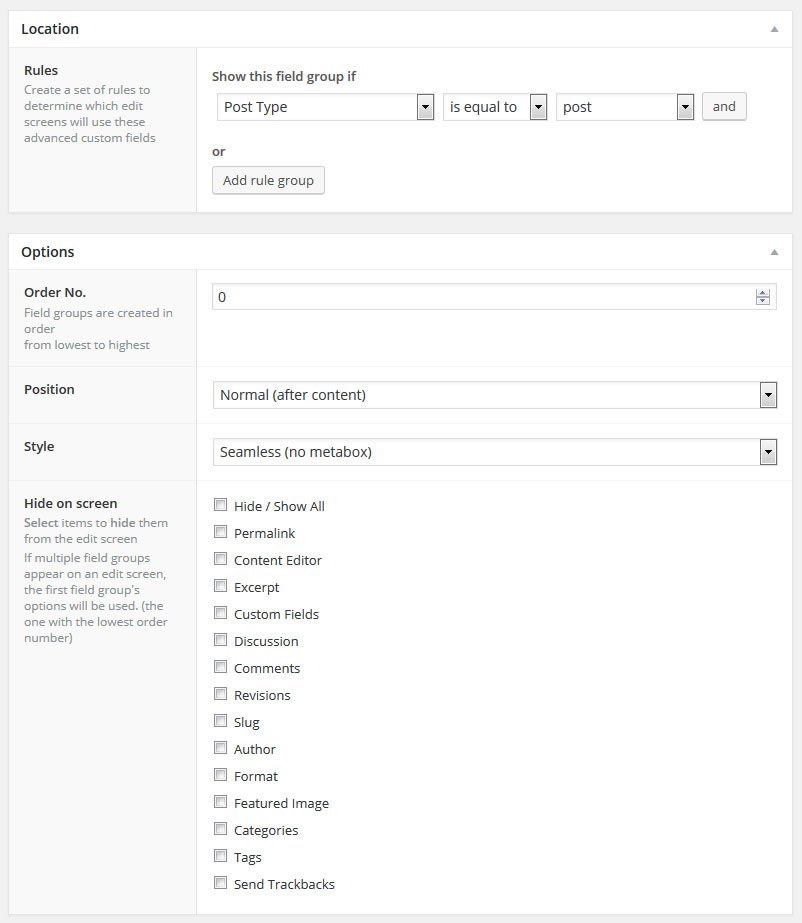
Before we are done here, we need to configure where and how the newly created custom fields will show up and we do so with the Location and Options panel.
Under Location, you can add rules that determine under which circumstances the fields will be displayed.
They can be included and excluded depending on:
- post type
- user type
- exact post
- post category
- post format
- post status
- post taxonomy
- exact page
- page type
- page parent
- page template
- attachment
- taxonomy term
- user
In my case, I want to limit my field group to my book post type, so will choose Post type > is equal to > books.
After that, it’s on to Options. Here’s what each setting means:
- Order No — The order this field group will take if there are several on the same screen
- Position
- Normal — Below content editor
- High — Below title
- Side — On the side of the editor
- Style
- Seamless — Without a WordPress metabox
- Standard — Placed inside a metabox
- Hide on screen — Checkboxes that allow you to hide other panels you are not going to need like tags, categories, comments and more
Pick whatever is right for your case. I go with:
- Position: Side
- Style: Standard
I leave the rest as is for now. When done, hit Publish.
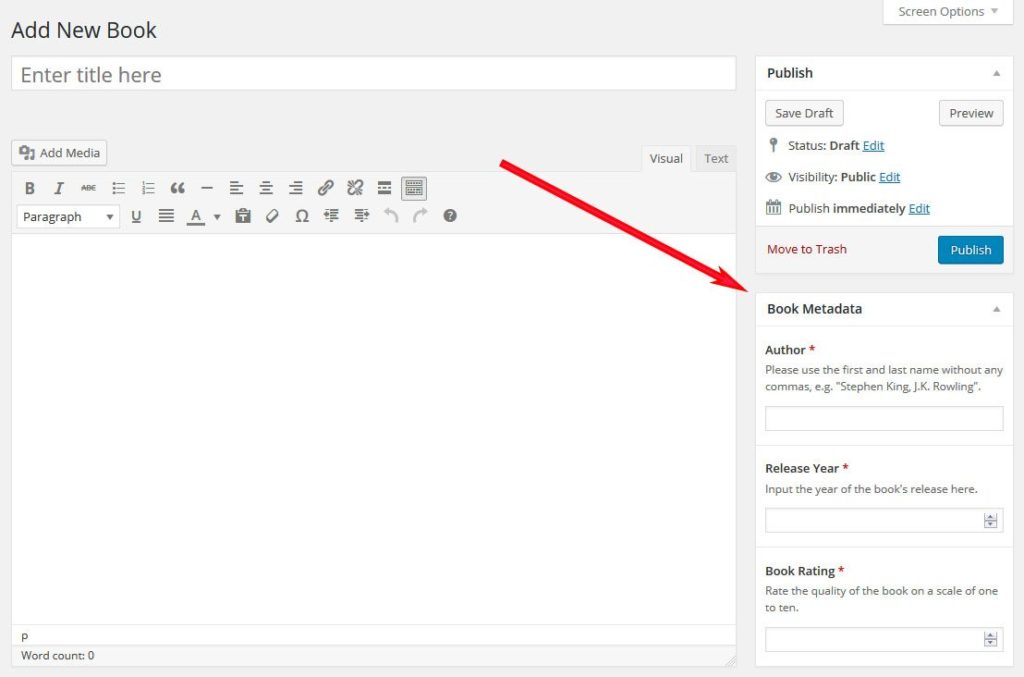
After that, you can head on over to your custom post type to see if the new meta fields show up. In my case, they do.
Alright, now all that’s left is to make your custom fields show up on your page. In order to do so, add a bit of test data and publish your post — it’s time to edit some theme files.
How To Display Custom Fields In Your WordPress Theme
In order to display custom fields on your site, you need to call them in a template file.
Therefore, in most cases the first order of the day is to copy the template for single posts, which is usually single.php.
Check the WordPress template hierarchy if you are not sure which is the right one for you.
The hierarchy also tells me that in order to make a custom template for a single post type, I can rename the file to single-postname.php.
Therefore, I will copy the template file and save it as single-books.php in my child theme folder.
After that, it’s time to call our new post meta data, which can be done via get_post_meta() but it is recommended to use ACF’s own functions.
In this case, I will use the_field() which allows me to display custom fields for the current post.
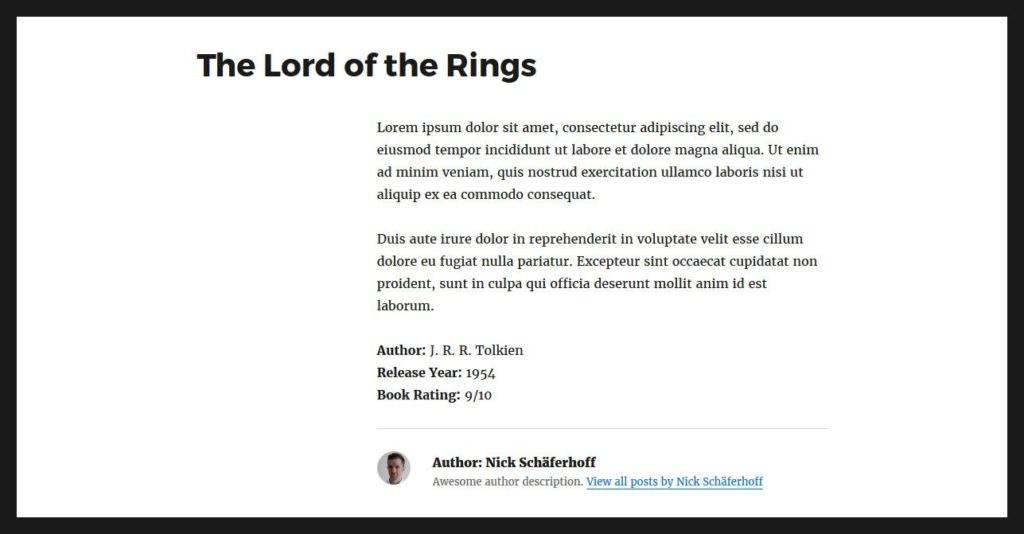
When I wrap it in its own div and add some markup, the code comes out like this:
<div class="book-meta">
	<ul>
		<li><strong>Author:</strong> <?php the_field('author'); ?></li>
		<li><strong>Release Year:</strong> <?php the_field('release_year'); ?></li>
		<li><strong>Book Rating:</strong> <?php the_field('book_rating'); ?>/10</li>
	</ul>
</div>
Now I only need to input it into my newly created post template where I want it to show up, add a little styling to my stylesheet, and voilá.
Not so hard now, was it? Told you it would be a piece of cake.
How Are You Going To Use Advanced Custom Fields?
Custom fields make it really easy to extend your content in any way possible.
In combination with custom post types, they allow you to build exactly the site you need with exactly the data you want to display.
While it can be an overwhelming topic, plugins like Advanced Custom Fields allow even beginners to use this powerful feature on their site and make it no harder than filling in a form.
While there are other plugins out there with similar functionality, like Types and Pods, Advanced Custom Fields is a favorite among developers and for good reason.
If you want to start working with custom fields, the information above is more than enough to get you started and let you customize your own and your clients’ websites in new and powerful ways.
I can’t wait to hear what you are planning to do with it.
Are you using Advanced Custom Fields? What for? Let us know in the comments section below!



64 Comments