
In this tutorial, we are taking a close look at WooCommerce, which is the most well-known and by far most popular WordPress ecommerce plugin. Not only does it have a 4.5 star rating at more than five million active installs, it also made waves when Automattic acquired its parent company WooThemes in 2015.
The acquisition was definitely a good move. Back then WooCommerce already powered 30 percent of all online shops and was an overall clear favorite in the WordPress community. It has only grown more popular since then, and is the go-to choice for many ecommerce sites.
So, for those who are not familiar with the plugin yet, it’s about high time we took a closer look, don’t you think? That’s exactly what we will do. In this beginner tutorial, you will learn more about WooCommerce, how to use it and what it can do for your online shop.
Why Use WooCommerce?
What makes WooCommerce such a popular option? Surely there must be a reason why more than five million sites trust it to power their online shop! In order to understand that, let’s look at a quick history of the plugin and how it became a titan in the ecommerce industry.
WooThemes, the makers of WooCommerce, was founded in 2008. Their flagship ecommerce plugin that we know today originally started off as a fork of Jigoshop and quickly became the cornerstone of their business. Download numbers continued to grow every year. By now, the plugin has over 150 million total downloads.
Automattic spent somewhere around $30 million to bring WooThemes into the fold, and since then, the company has only become more profitable. In 2020 they pulled in over $20 billion in sales, double the numbers as in 2019. It also makes up 29% of the top 1 million ecommerce sites, and there are currently 4 million live WooCommerce websites.
Pretty impressive for one plugin, right? So, what makes WooCommerce so successful?
The Benefits of WooCommerce
Here are a few things to like about WooCommerce:
- It enables users to create and have complete control over an entire online shop and it does so in style.
- WooCommerce is capable of selling both physical and digital goods, as well as handling affiliate commerce.
- It sports highly configurable shipping options ranging from worldwide to single countries and is capable of dealing with dropshipping.
- Payment options include credit cards, PayPal, bank transfers, and cash and it works with payment gateways like Stripe, Authorize.net and Amazon Payments.
- Detailed reporting keeps you up to date on your venture.
- It works with most WordPress themes, or you can use the official WooCommerce starter theme Storefront or one if its many child themes.
- Thousands of plugins are available on the WordPress repository, WooCommerce extensions store, and all across the Internet.
- It’s designed to be highly extendable for developers; WooCommerce has its own REST API for easy integrations.
By now, it should be apparent why the plugin is so popular. Let’s move on to the WooCommerce tutorial then, shall we?
How to Set Up WooCommerce
Just like any other plugin, you can download and install WooCommerce via the Add New button in the Plugins menu.
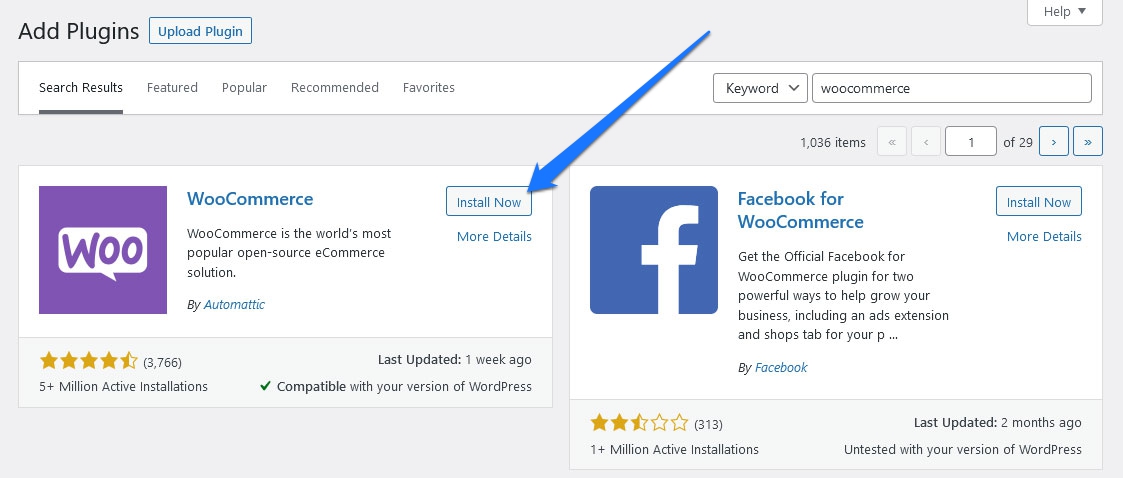
Search for “WooCommerce,” hit Install Now and activate the plugin after it has been downloaded.
Go Through the Configuration Wizard
As soon as WooCommerce is active, it should start the configuration wizard.
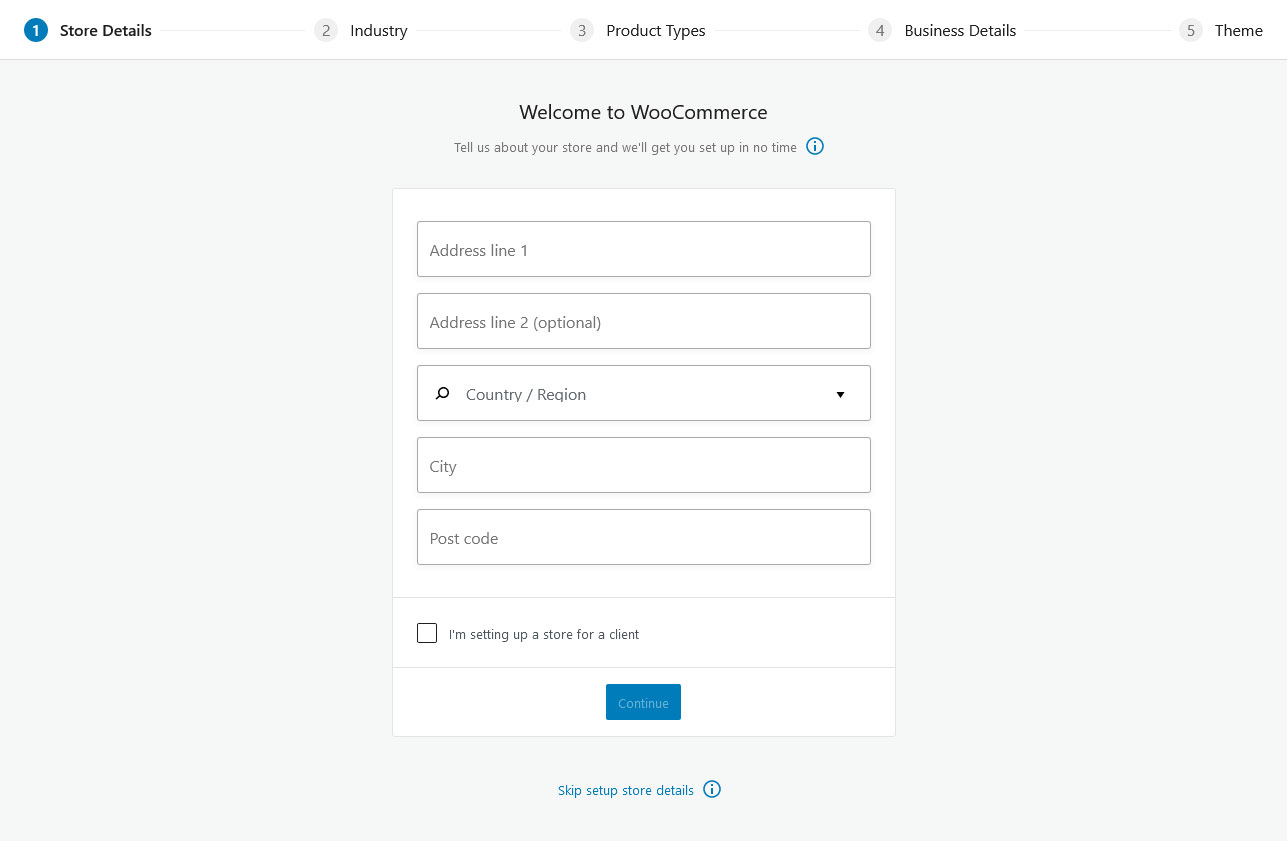
Here, you’ll be asked to fill in information about your store, like:
- Store Details — Fill in info about your address and country of residence to automatically set up currency and shipping settings. There’s also the option to indicate if this is a client site. As you click Continue, the plugin will ask you to share anonymous usage data with the developers, so choose whether you want tracking on or off.
- Industry — Choose your store’s industry, or pick Other and type in your own if none fit.
- Product Types — By default, you can choose Physical products or Downloads for free, and WooCommerce will help you set these up. You can also pick Subscriptions, Memberships, Bookings, Bundles, and Customizable products, but these will require a subscription to official WooCommerce extensions. There are many third-party extensions that offer these features, but these official addons integrate well with the default plugin.
- Business Details — Now fill in info about your business, how many products you want to add and if you’re selling in-person or on another digital platform. WooCommerce will also prompt you to install several free plugins to add features like credit card transactions and email marketing. We’ll leave these off for now, but feel free to try them out.
- Theme — Finally, it’s time to pick your theme. You can just choose Continue with my active theme, or you can browse the variety of free and paid WooCommerce themes and choose one more suitable for online selling.
With that, your store is all set up and you’re ready to start doing the important stuff like adding products and payment gateways! That’s the next step in our tutorial on WooCommerce.
Getting Familiar with WooCommerce
Once the configuration wizard is done, you’ll notice that you have a new set of menus in the left bar: WooCommerce, Products, Analytics, and Marketing.
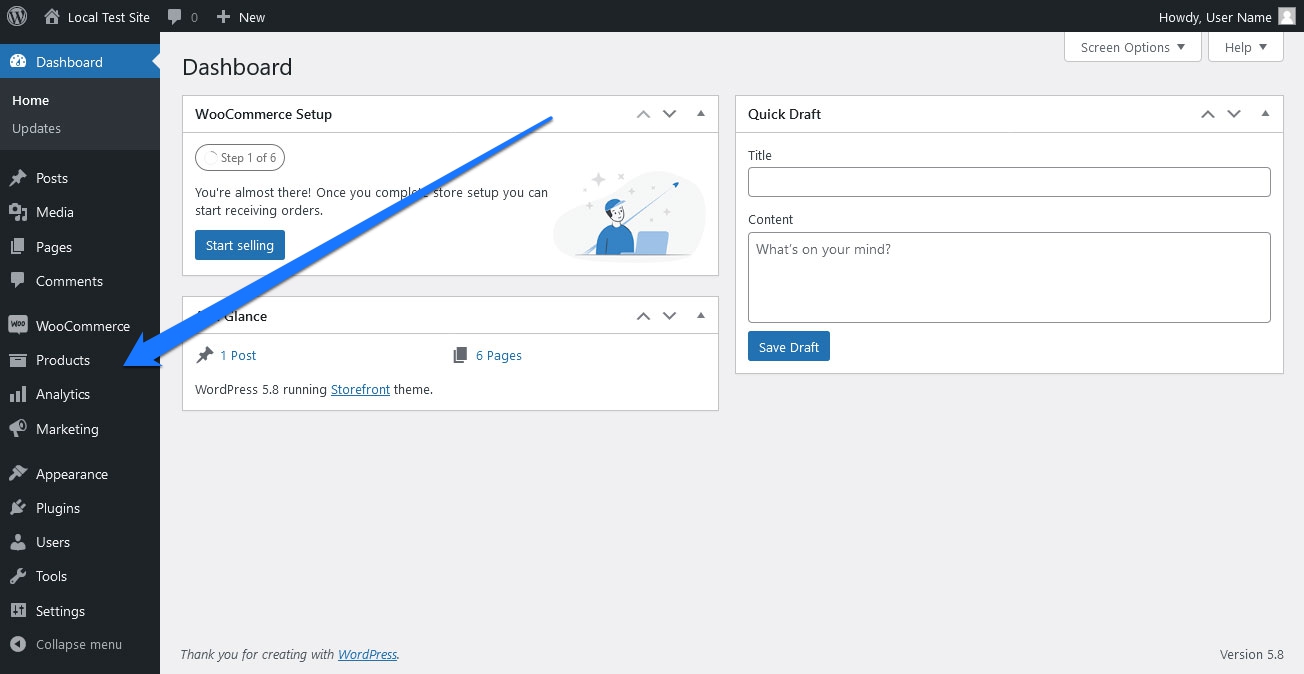
You can explore any of these as you wish, but the best thing to do is to follow the setup checklist you can find either on the Dashboard screen or in WooCommerce > Home.
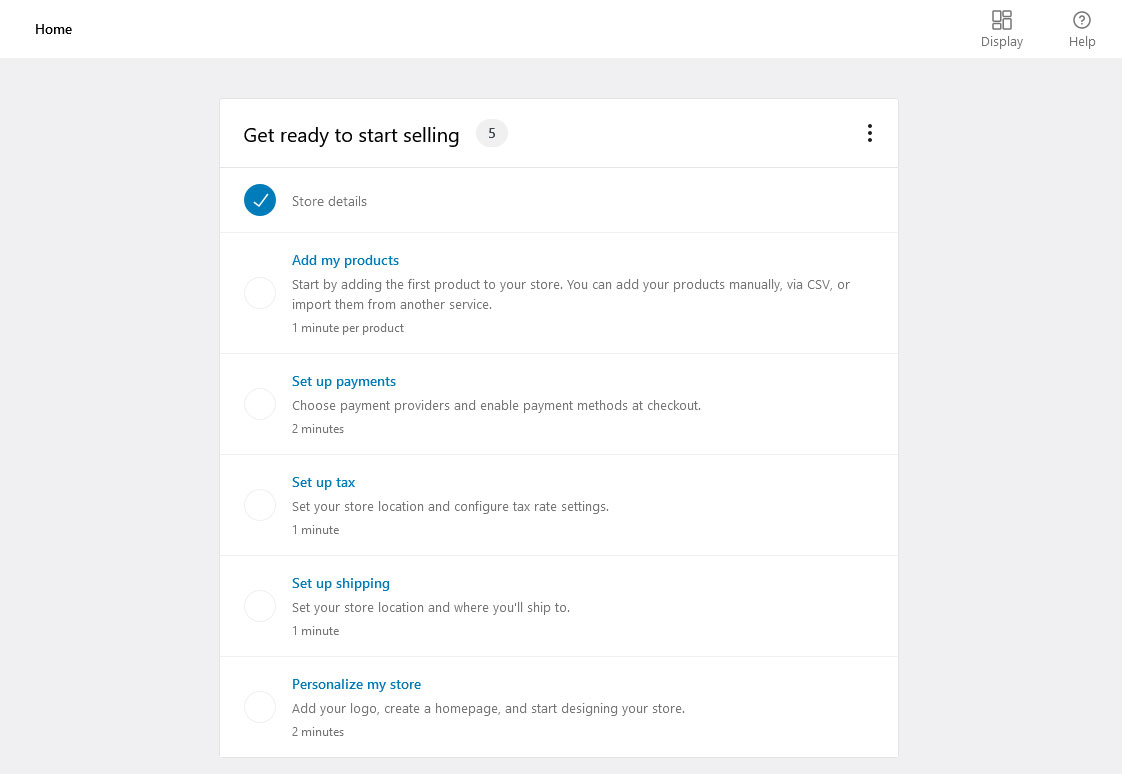
Let’s run through it in order.
1. Add Products
First step: Adding products to your store. No WooCommerce tutorial would be complete without it. While you can go right to Products > Add New, clicking Add my products will give you a simpler and less immediately overwhelming interface.
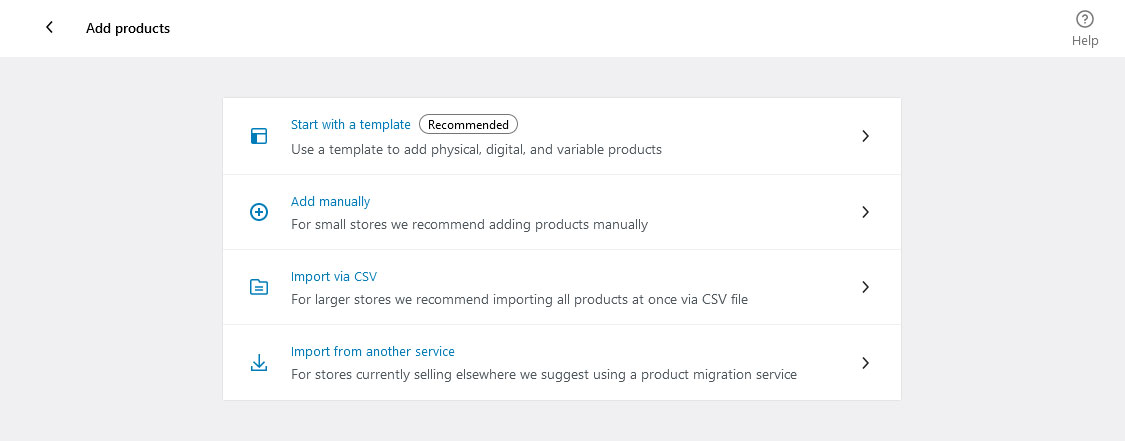
You have four options: Start with a template, Add manually, Import via CSV, and Import from another service. The latter requires a subscription to the Cart2Cart extension.
If you have a CSV file, choose this to import your products. If you want to dive right into the creation screen, choose the manual option. Otherwise, click Start with a template and select whether you’re making a physical, digital, or variable product.
The following screen should look very familiar. It’s basically the Classic WordPress editor with a number of additional options.
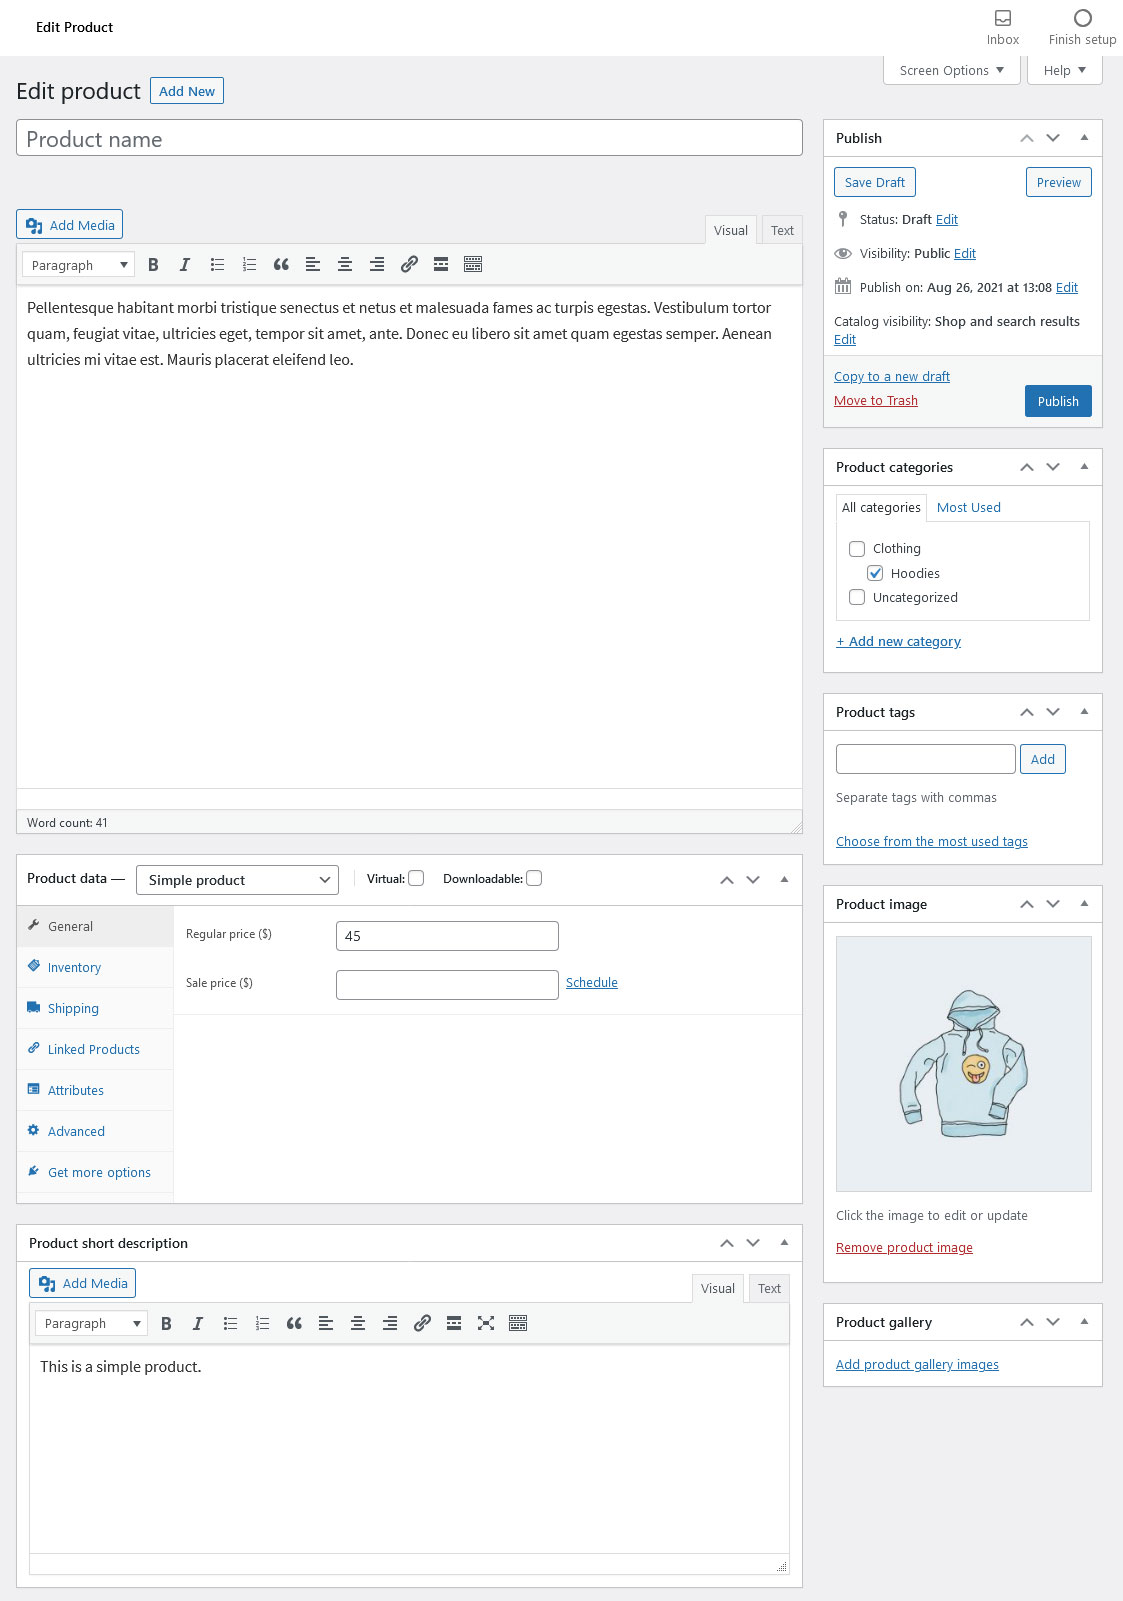
Much of the information should already be present, so you can edit what’s there and make it yours.
Basic Product Information
At the top of the screen you can give your product a title and add a description like in a normal post. The description may include images and other media. All information here will appear on the main product page.
There are also a few other options that are very similar to what you might know from creating posts and pages:
- Categories — Set up and assign categories and subcategories to order your products and make them easier to browse.
- Tags — Distinguish products even further with tags.
- Image — Works like a featured image. Whatever you upload here will automatically appear on the product and shop page.
- Gallery — In addition to the product image you can also add an image gallery, for example to show product variations, different angles and more.
Advanced Product Data
So far so easy, however, the product creation screen has additional important options under Product data.
First, you need to choose whether you’re selling a simple, grouped, variable, or external/affiliate product. Depending on what you pick, the configuration options will change. You should also tick the Virtual and Downloadable checkboxes if they apply, which will add their own additional settings.
Overall, you can configure these options:
- General — Give your product a price and sales price (if applicable) as well as the date range for any upcoming sales, and provide product URLs and button text for affiliate products.
- Inventory — Set your product’s SKU (Stock Keeping Unit). Determine whether it’s in stock and — if it’s a physical product — note down the quantity available and whether you accept backorders.
- Shipping — Weight, dimensions and shipping classes are what you can set up here.
- Linked Products — In this menu you can include related products that will appear as upsells or cross-sells. You can also create product groups.
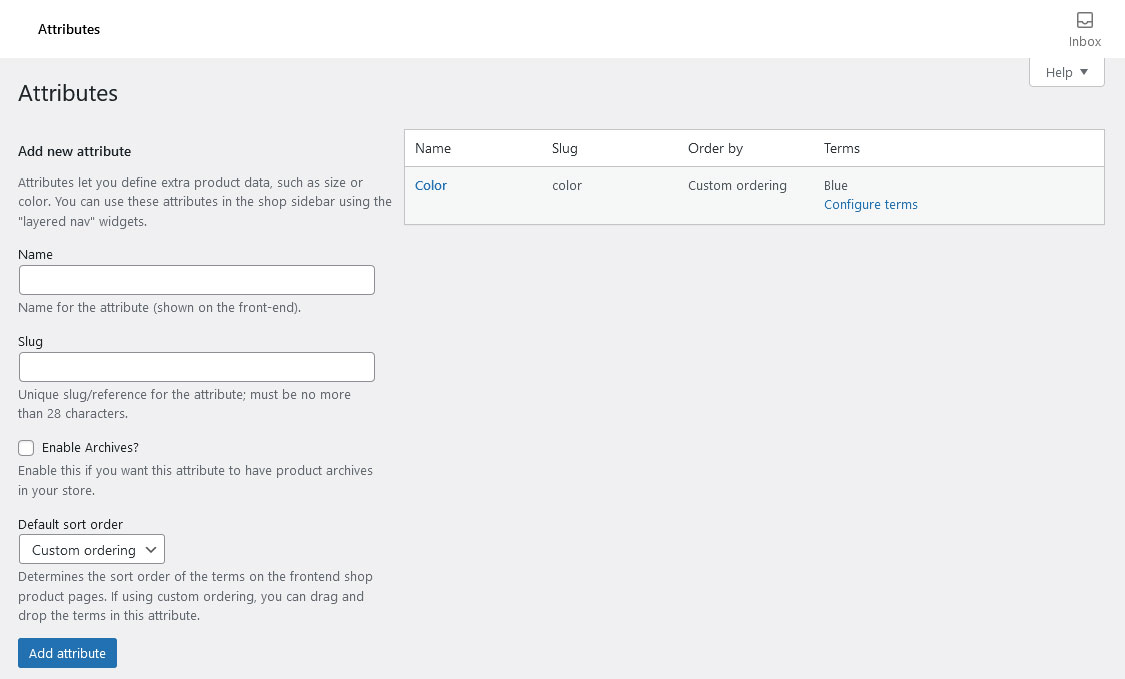
- Attributes — This is where you define custom attributes like color, size, etc.
- Variations — When you’ve set up attributes, this menu allows you to offer variations of your goods. Select Variable product from the dropdown menu if you don’t see this option.
- Advanced — Here you can add a custom note that will be sent to customers after purchase. You are also able to change the product order inside the menu and determine whether to allow reviews.
The final step is to fill in the short description at the bottom of the screen. The content entered here will show up under the product title.
When you’re finished, look to the Publish menu on the right. Change any catalog visibility settings you want and then click to make your product public.
Congratulations, you created your first product with WooCommerce and can now access it from the Products menu.
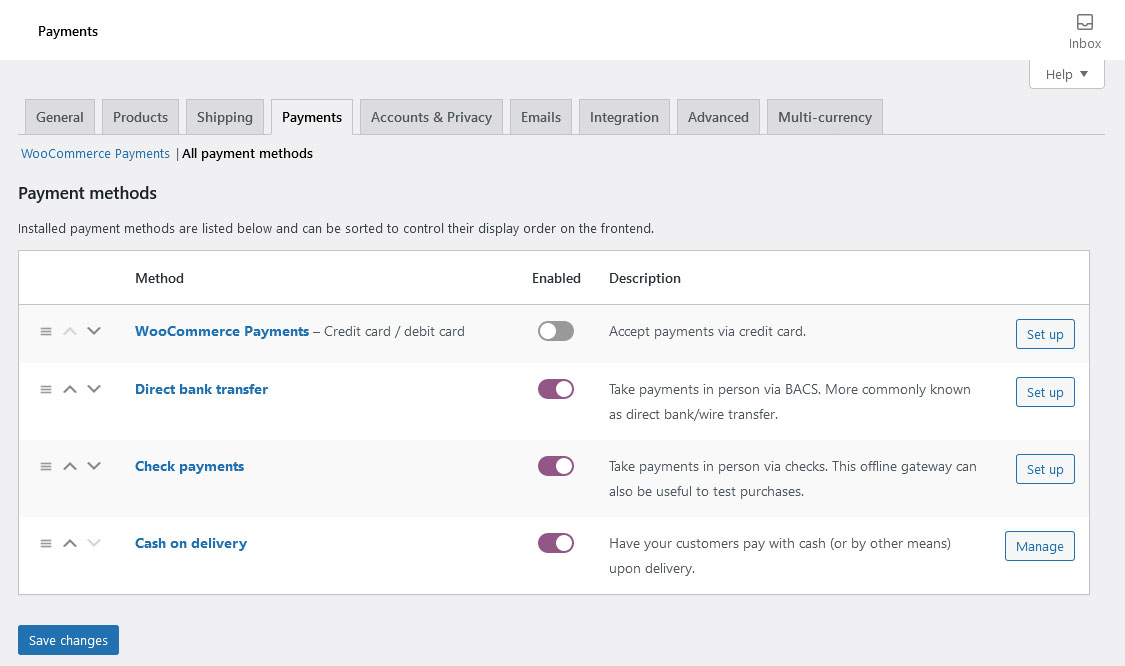
2. Set Up Payments
The hardest part is over; now it’s time to choose payment providers. Return to WooCommerce > Home to continue the setup process.
The plugin will ask you use the WooCommerce Payments addon, which makes accepting various credit and debit cards easy.
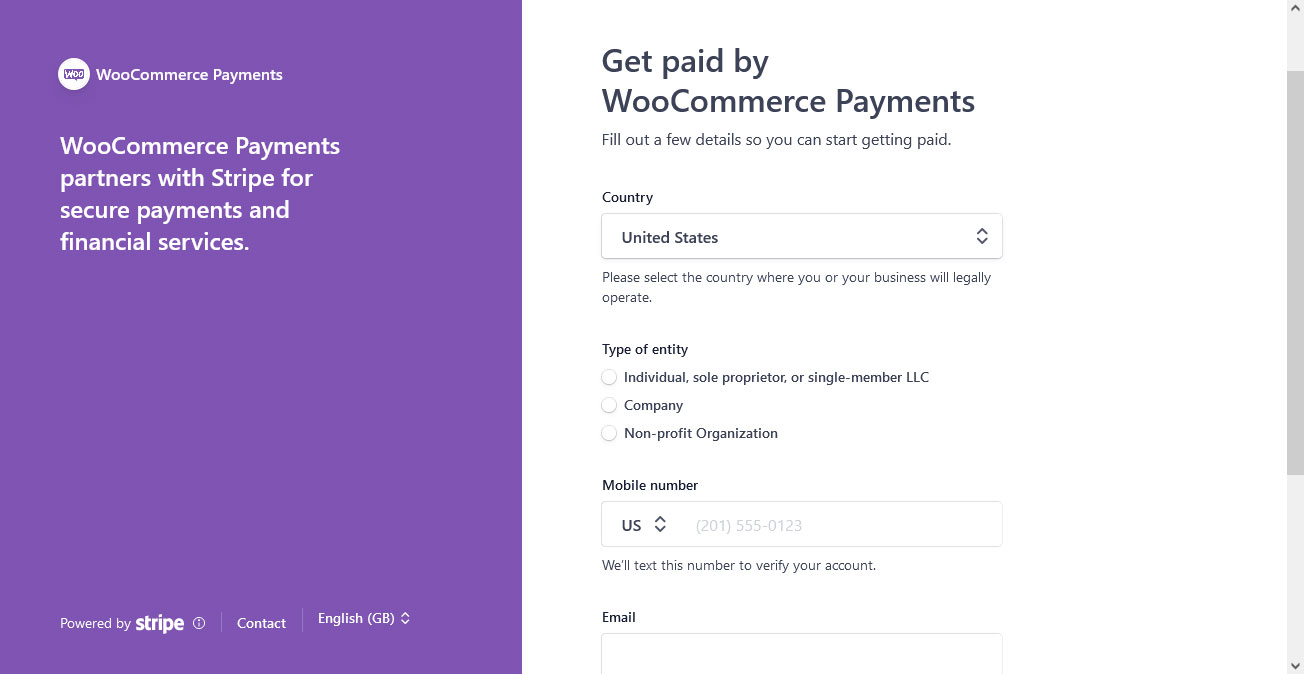
You can also choose to manually set up Stripe, PayPal, cash on delivery, direct bank transfer, or Square. People in certain regions may see other options as well.
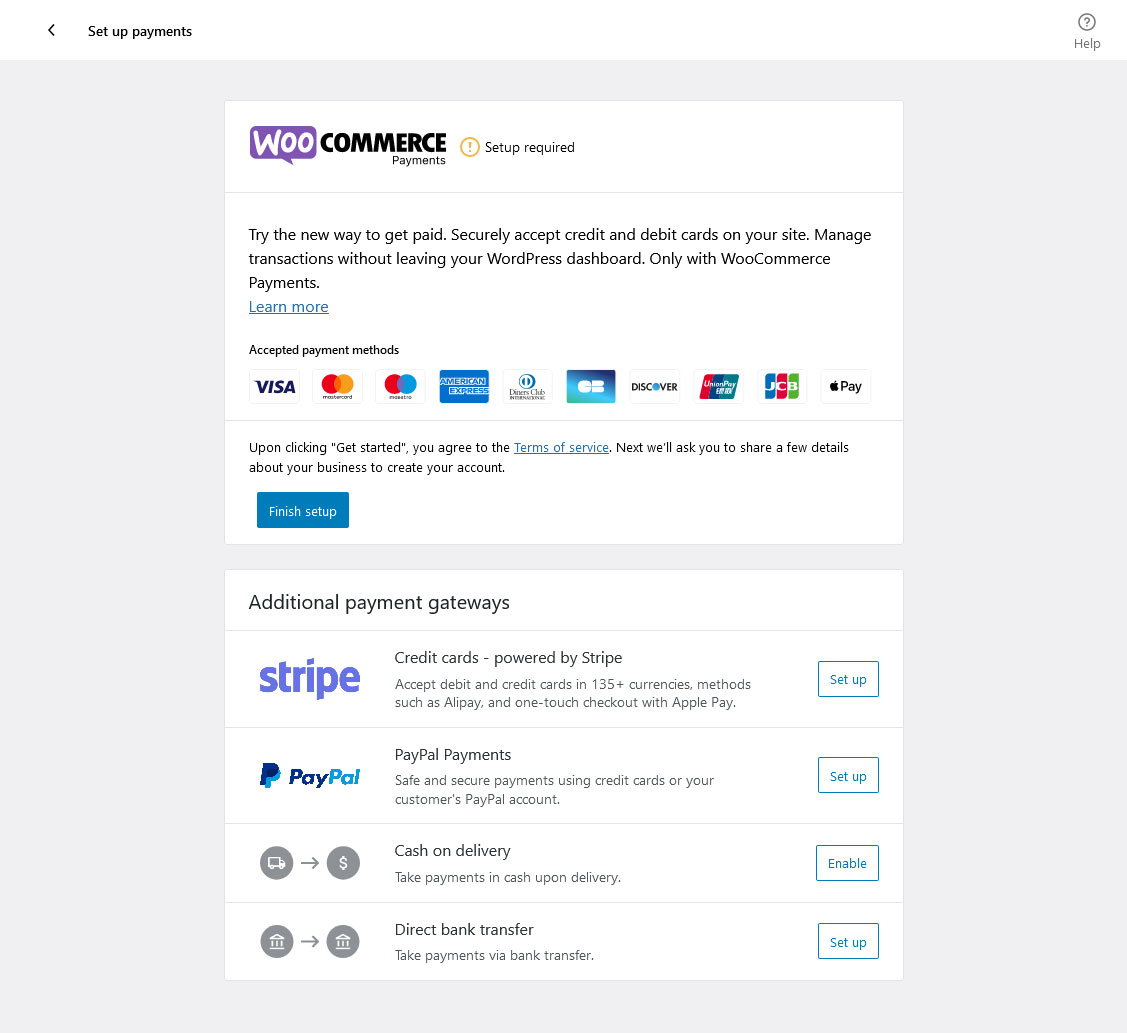
Choose whichever suits your store best and follow the on-screen instructions to enter your payment info.
3. Configure Taxes
WooCommerce is able to handle automated tax calculations, but you’ll need to install Jetpack and WooCommerce Tax. Click Install & enable on the tax rates screen and then connect your store to WordPress.com, and this will be handled for you.
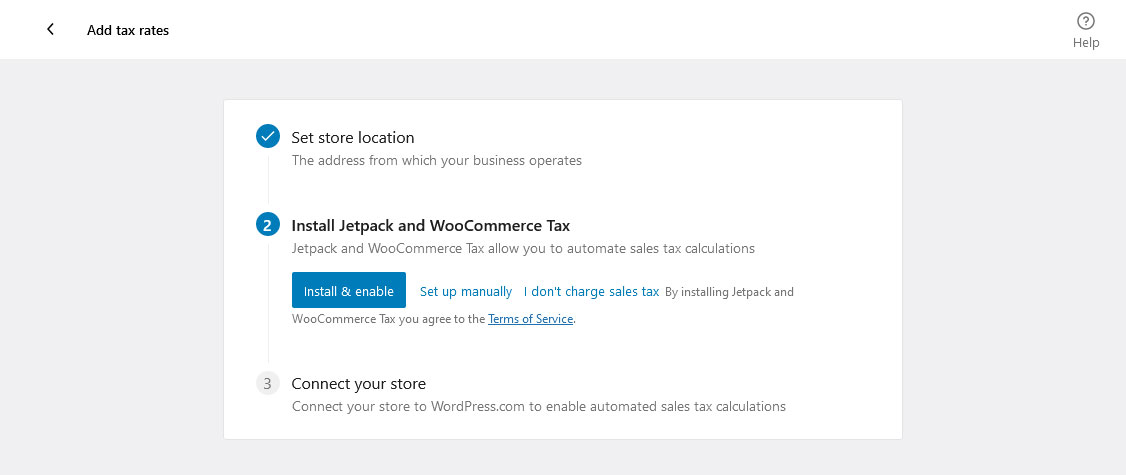
If you don’t want to do this, you can either find a different tax calculation plugin, or you can set up taxes manually in the settings later.
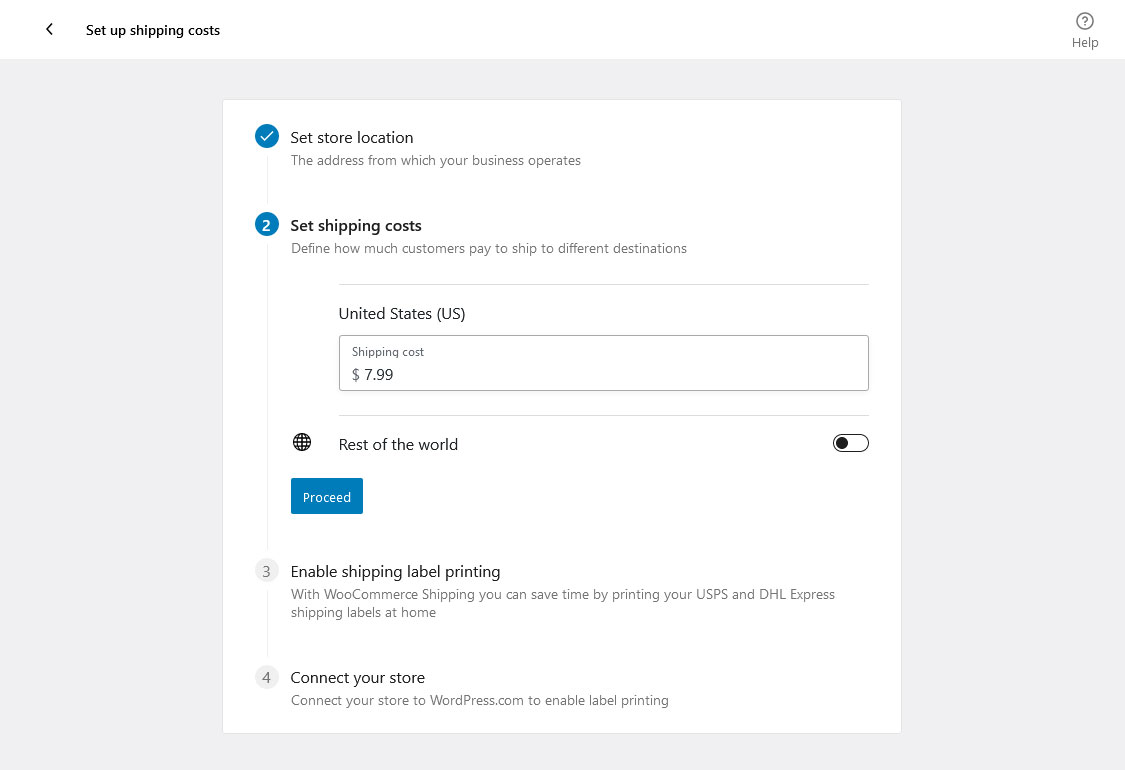
4. Deal With Shipping
Now it’s time to set your shipping costs. This step should only take a minute. You’ll find a prompt to install the WooCommerce Shipping plugin to enable label printing but you can skip through if you want.
6. Personalize Your Store
The final step is to add a few touches to your store. Create a custom homepage to suit your new product line and customize it if you wish, upload a logo, and set up a store notice which will display in a banner at the top of the screen.

With that done, you’re all ready to start selling! But there’s still plenty of WooCommerce left to explore. Let’s look through all the settings and make sure you’ve got the plugin down.
How to Manage WooCommerce Products
We’ve gone over how to add WooCommerce products, but let’s take a look at the other product screens. These are pretty straightforward.
You can see a list of your products in Products > All Products. This is very similar to the All Posts/Pages screen.
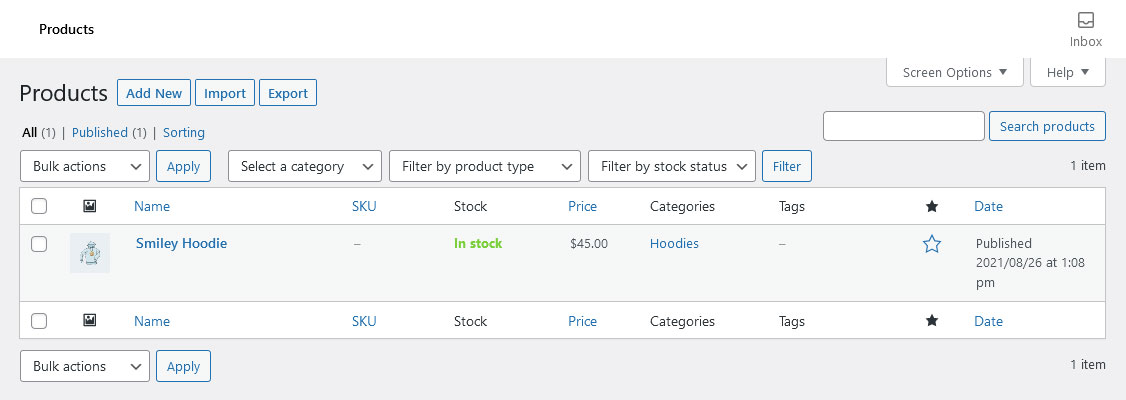
From here you can also import or export products with the buttons at the top of the screen, and perform actions like quick editing or duplicating by hovering a product.
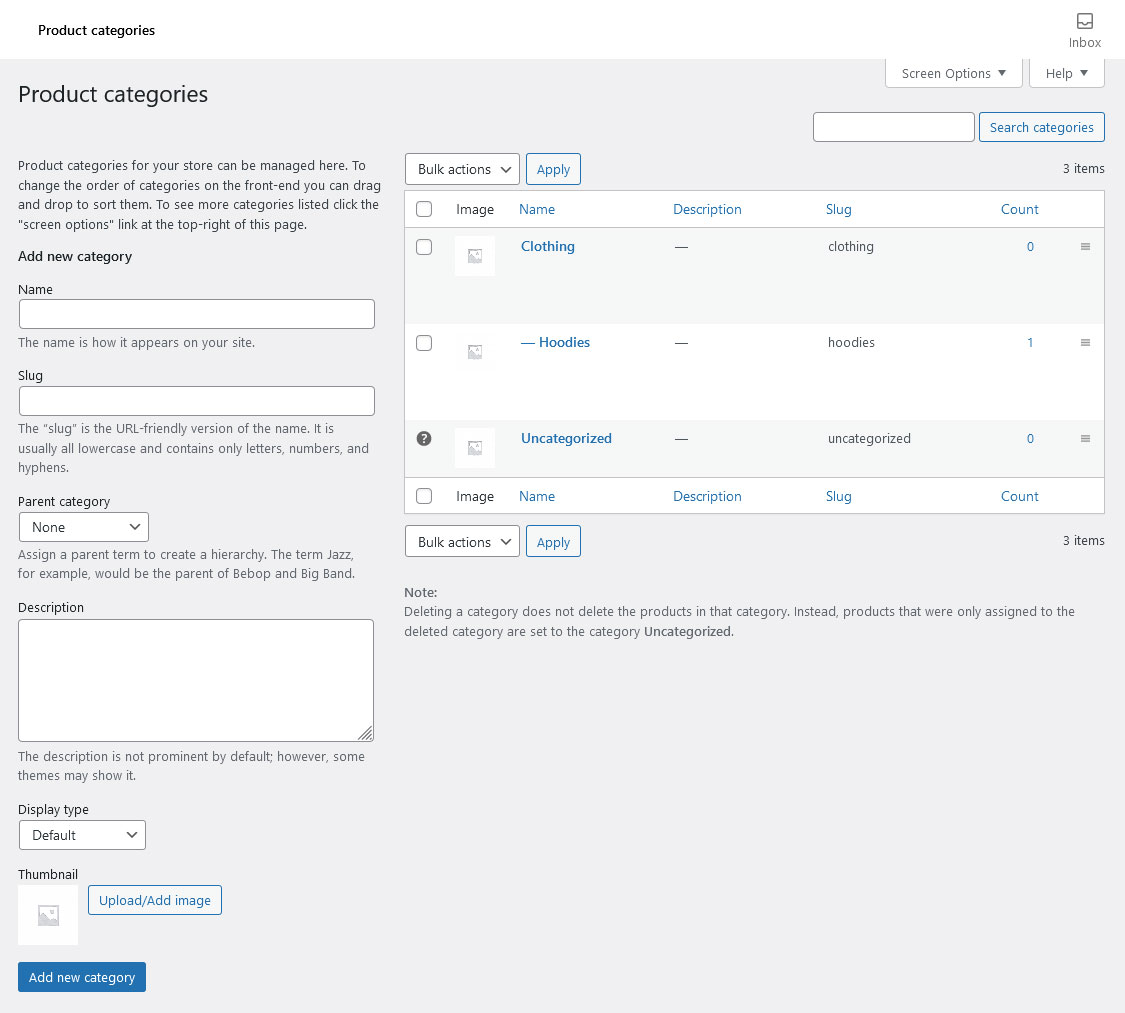
There’s also Categories and Tags. If you have used WordPress before, these should be second nature to you. The only difference worth mentioning is that in WooCommerce you can add thumbnail images to product categories.
Finally, we have Attributes. We already mentioned product attributes above and in this menu you may create sizes, colors and other characteristics that you can add to products as variations.
All clear so far? Then let’s move on to managing orders.
Handling Orders in WooCommerce
Curious how to deal with customer orders? It’s all centralized in one place: WooCommerce > Orders.
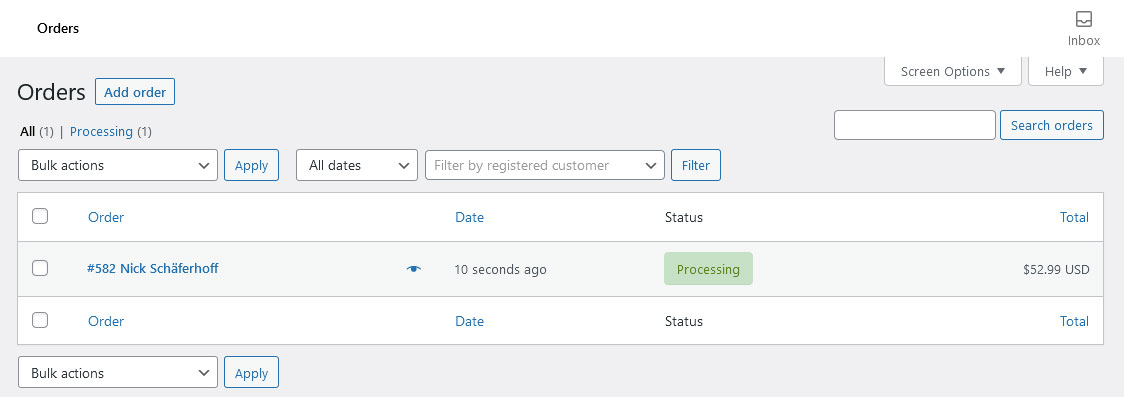
If you are strictly dealing in digital products there isn’t much to see here except for how many products you are currently slinging and who bought what. Virtual products are automatically marked as complete.
Physical goods, on the other hand, you can send on to shipping and change their order status (pending payment, on hold, refunded, failed, etc.). You can also modify billing or shipping addresses, resend order emails, add notes, change the content of the order and more.
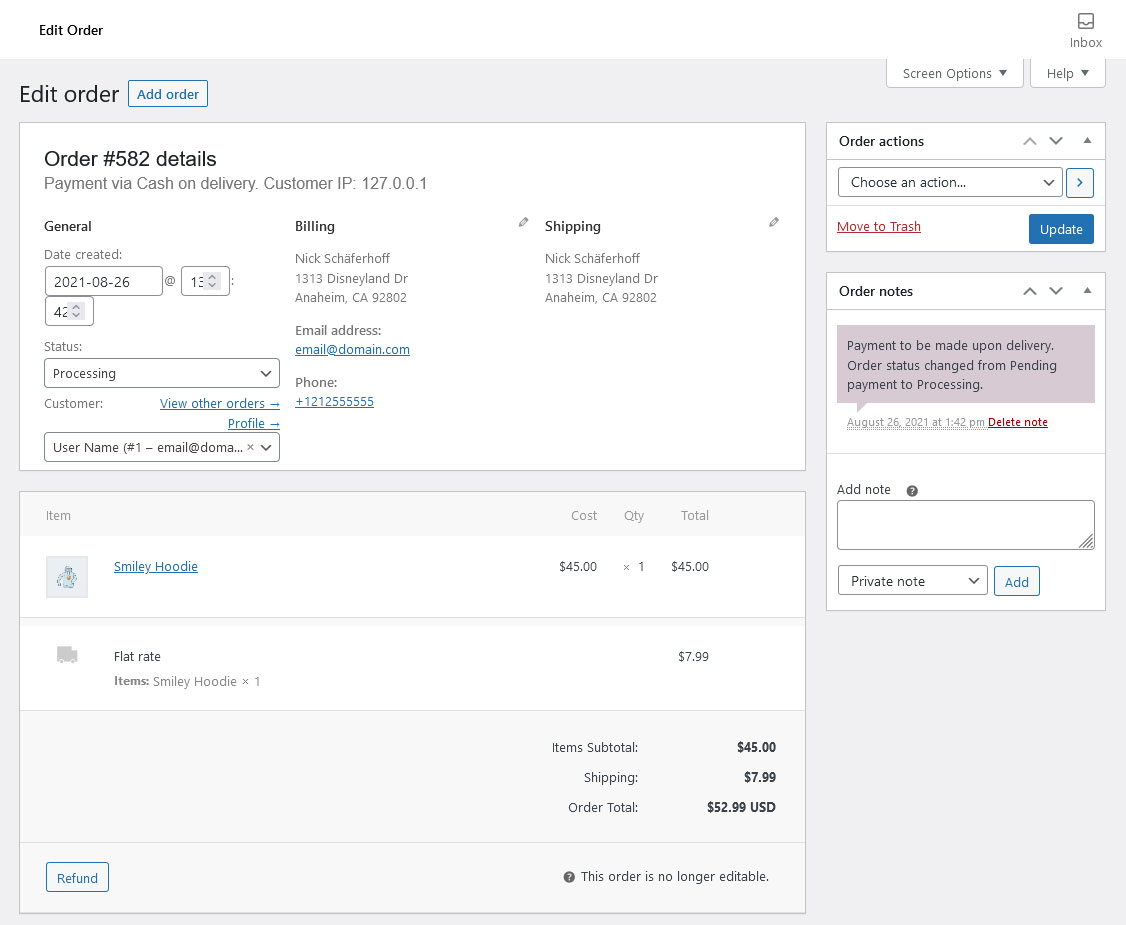
Here’s a list of what is possible in each box:
- Details — Set the order date, change or add a billing/shipping address, modify the payment status, and update which customer bought the item.
- Item — Add or remove products from the order, and apply a coupon if needed.
- Custom Field — Add metadata to your post.
- Downloadable product permissions — Change whether this order includes access to downloadable products.
- Order actions — Send an invoice or order details to the customer, resend an order notification, or regenerate download permissions.
- Order notes — Add a note to the order. You can keep this private or make it visible to the customer.
Marketing and Coupons
This part should also be a familiar concept. Under Coupons you may create and manage discount codes.
If you used WooCommerce in the past, the coupons page has moved from WooCommerce > Coupons to Marketing > Coupons.
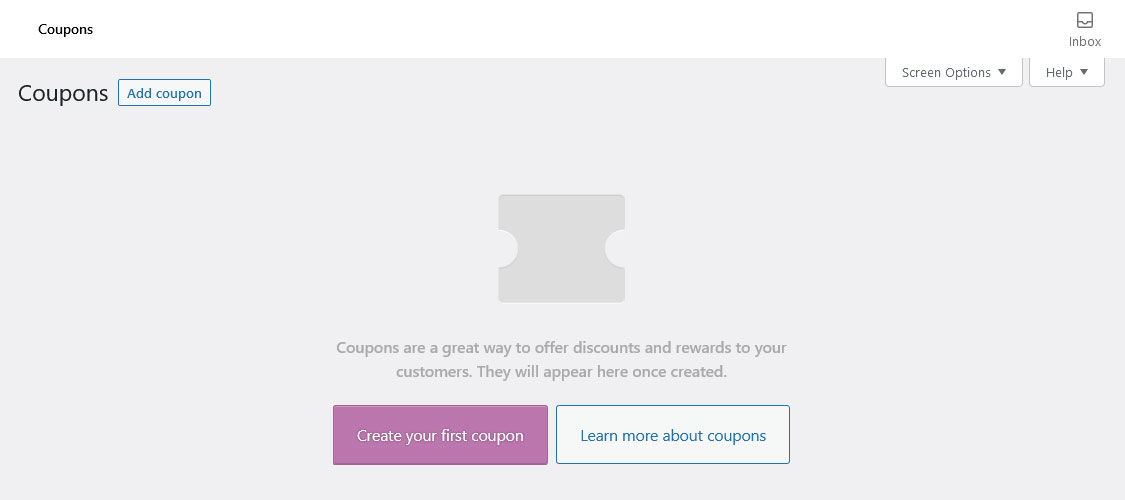
Visiting this page, you can get started right away by clicking Create your first coupon. This first part is easy: Set the coupon code name or click Generate coupon code, and include a description.
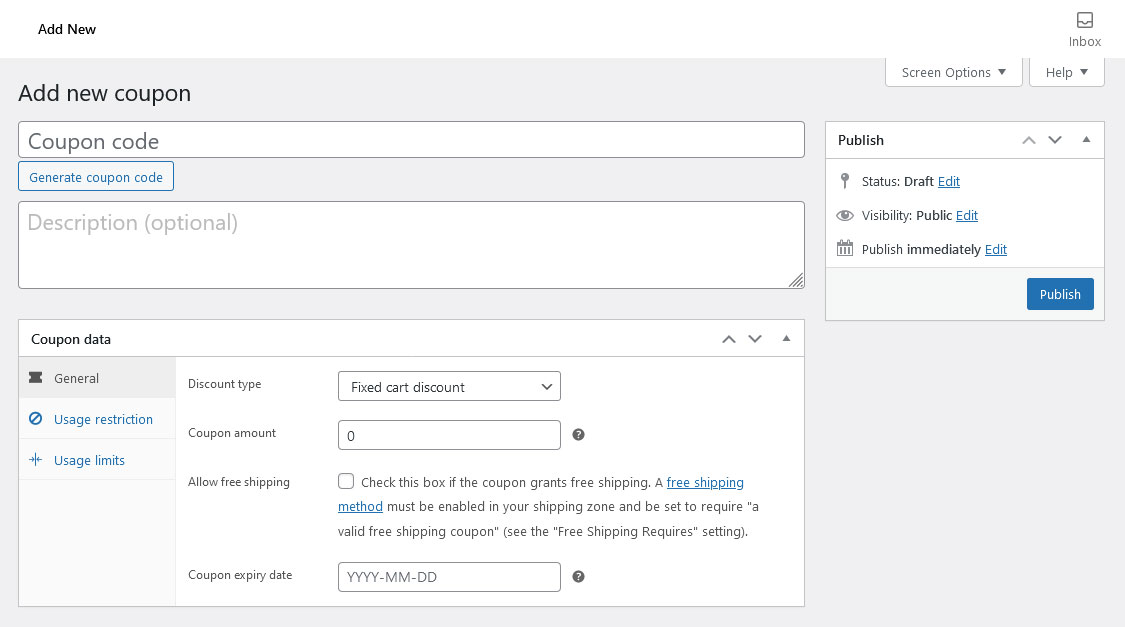
Next you’ll need to edit Coupon data.
- General — Set the discount type (percentage discount, cart discount, or product discount), change the coupon reduction amount, enable free shipping, and add an expiry date.
- Usage restriction — Set a minimum or maximum spend limit, allow combining coupons, exclude sale items, change which products and categories are allowed or excluded, and allow only certain email addresses.
- Usage limits — Set how many times this coupon can be used on a global and user-based level.
Easy peasy.
All About Analytics
Here’s where it gets really interesting. In my personal opinion, analytics is one of the highlights of WooCommerce, so they definitely had to be a part of this tutorial. As you will see, the plugin automatically creates detailed summaries on every aspect of your shop.
Visit Analytics > Overview to get a good look at what’s going on in your store.
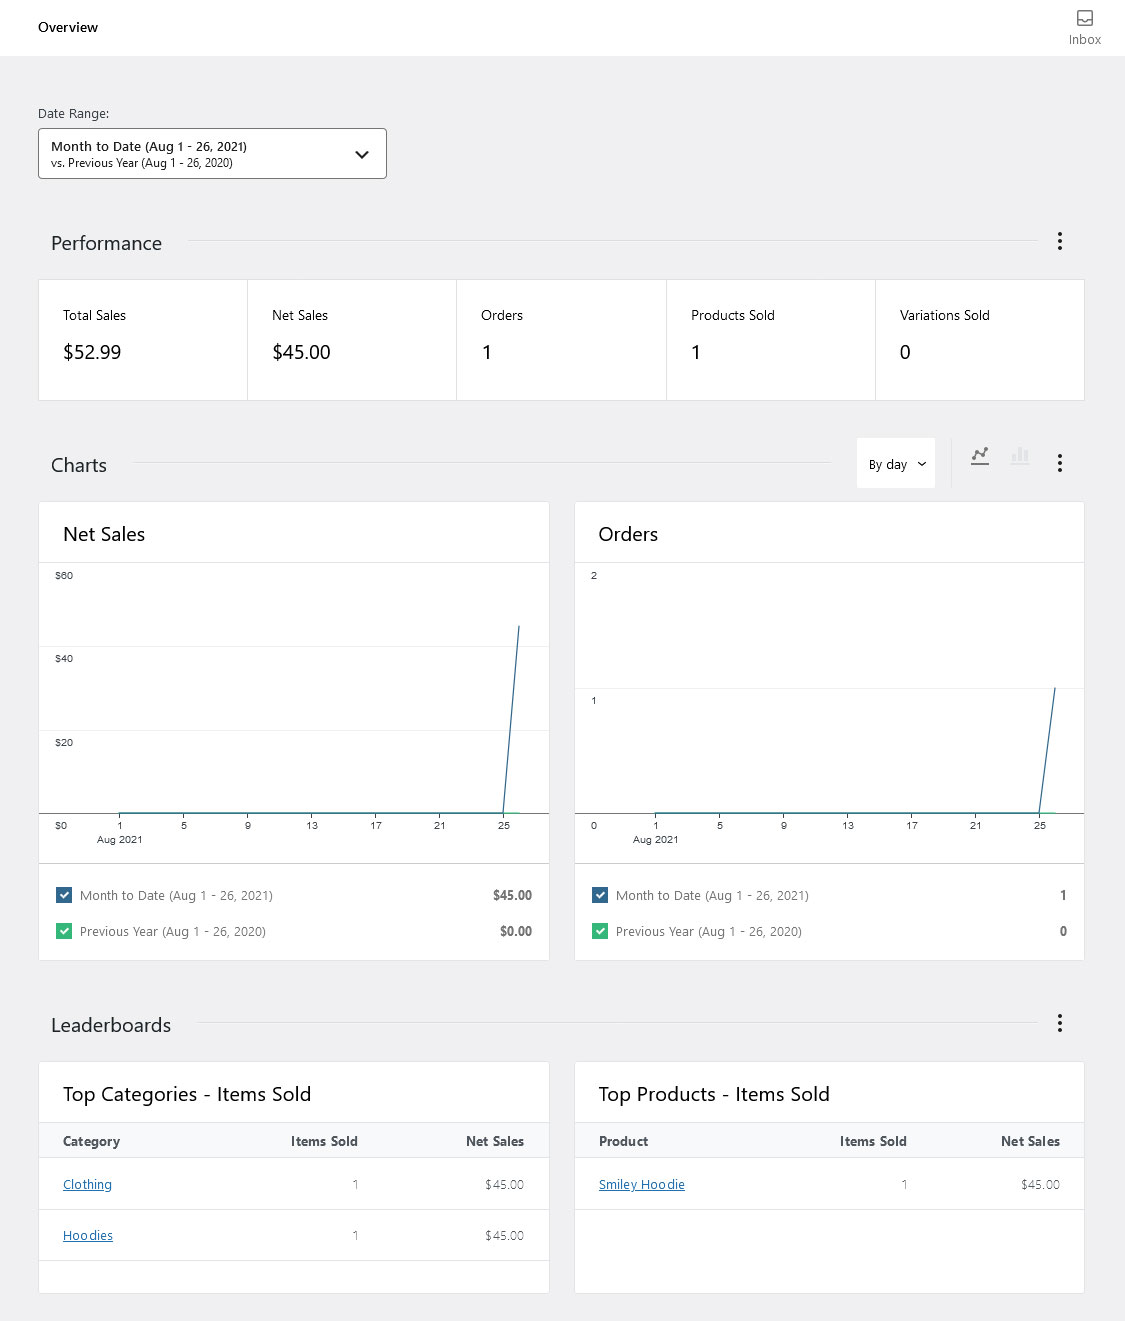
Check net sales, view orders placed, see top products and categories — all at a glance. You can also change the date range and compare it to other time frames.
In addition, click the menu icon above any of the sections to add and remove statistics as you wish.
Yet, it doesn’t stop there. The stats are also broken down in just about every way you can imagine, showing detailed views of your products, variations, categories, taxes, and more.

Finally, on the settings page you can change some defaults to make the analytics screens more comfortable for you, and also import historical store data.

Settings and Status
You’ve mostly got the hang of WooCommerce now. Let’s configure a few final settings in WooCommerce > Settings.
This section is where you control quite literally every aspect of your online store. The plugin offers loads of configuration options and this tutorial will go over them briefly to give you a good understanding of WooCommerce’s customization capabilities.
General
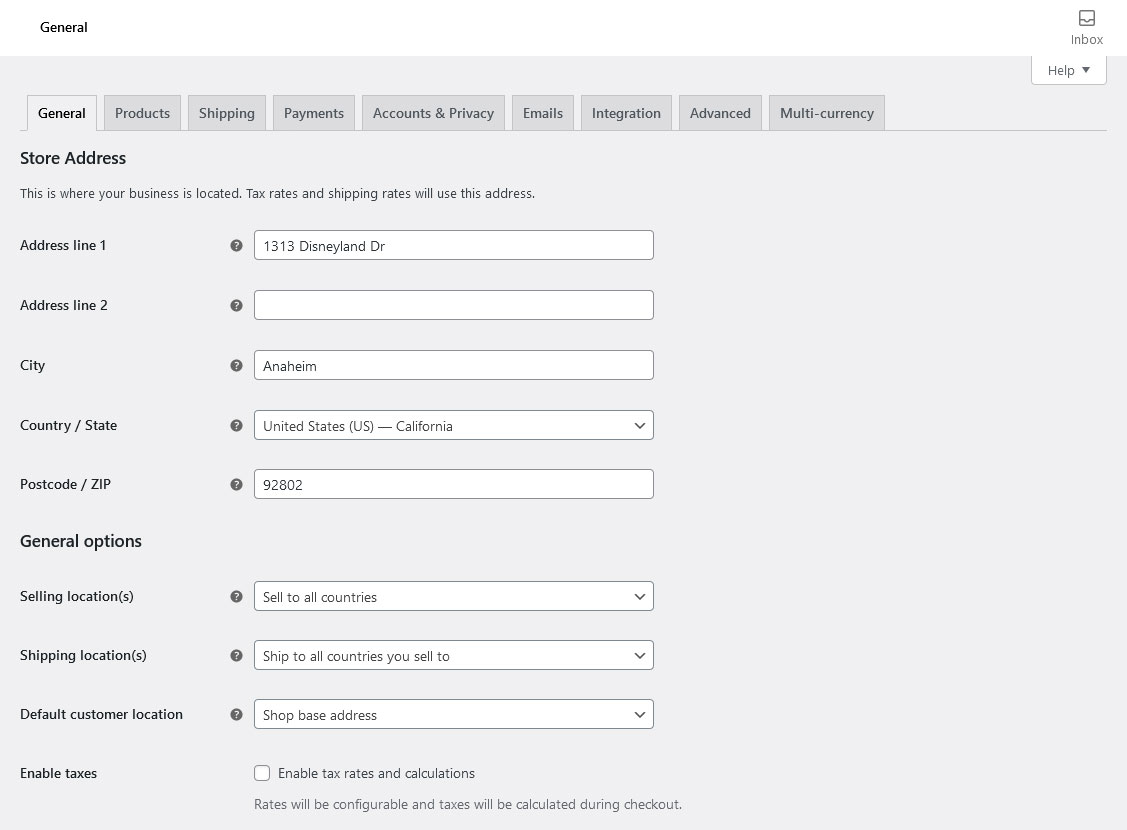
- Store Address — Control the base location of your store.
- General Options — Choose the countries you sell to or exclude certain countries, pick what countries you ship to or disable shipping options. You can also turn on geolocation, and enable taxes and coupons.
- Currency Options — Set the currency you will be paid in, change the currency format, thousand separator, decimal separator and how many decimals to display after the comma.
Products
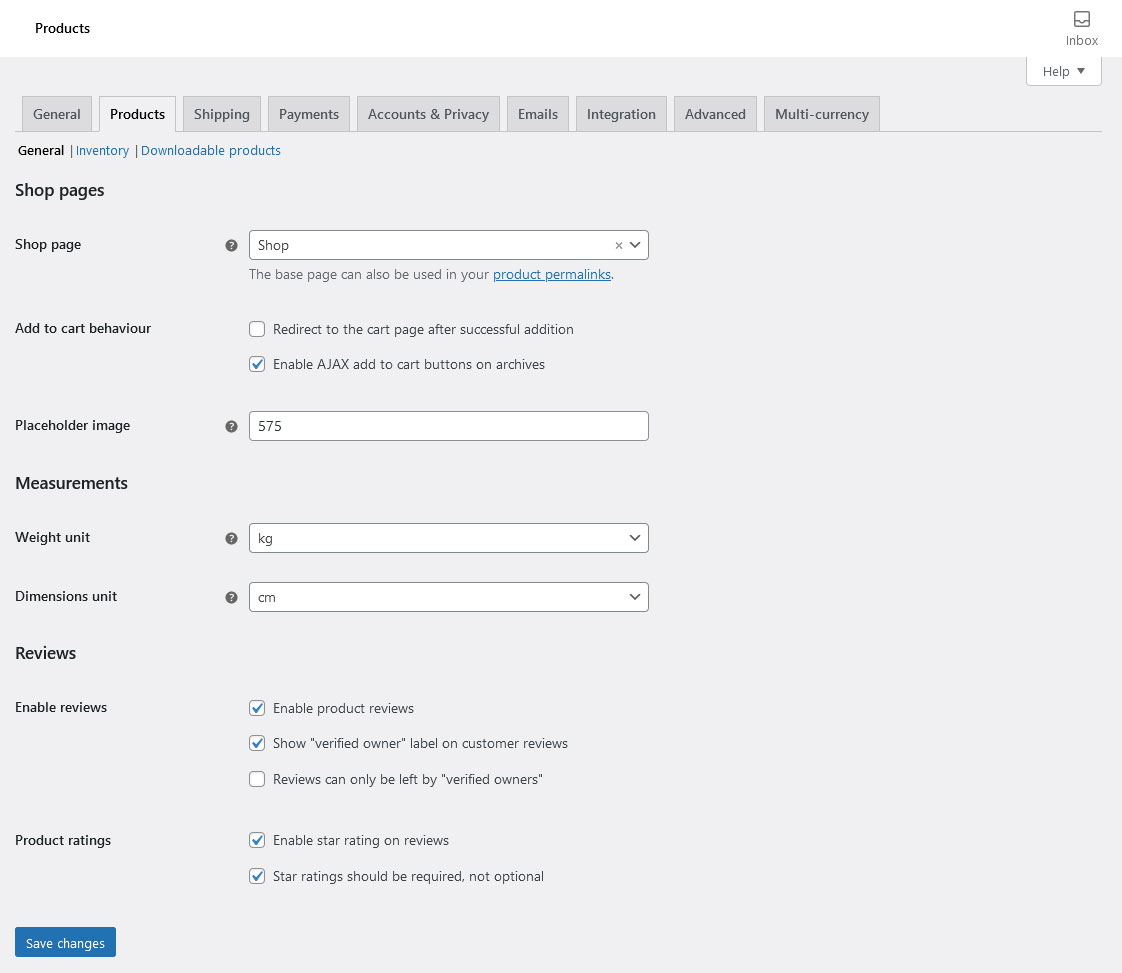
- General — Pick your shop page, change cart functionality, set measurements, and enable reviews or ratings.
- Inventory — Enable or disable stock management, how long to hold unpaid orders, notifications for low-running stock and their recipients as well as stock thresholds and inventory display on page.
- Downloadable Products — Handle file download delivery method and access restriction for virtual products.
Shipping

- Zones — Add regions where certain shipping options are available.
- Options — Define how to calculate shipping costs and default shipping destination. You can also enable debug mode for testing.
- Classes — Group products by class and provide different shipping rates to certain products.
Payments
Here you can manage and set up any payment methods you want to accept.
Accounts & Privacy
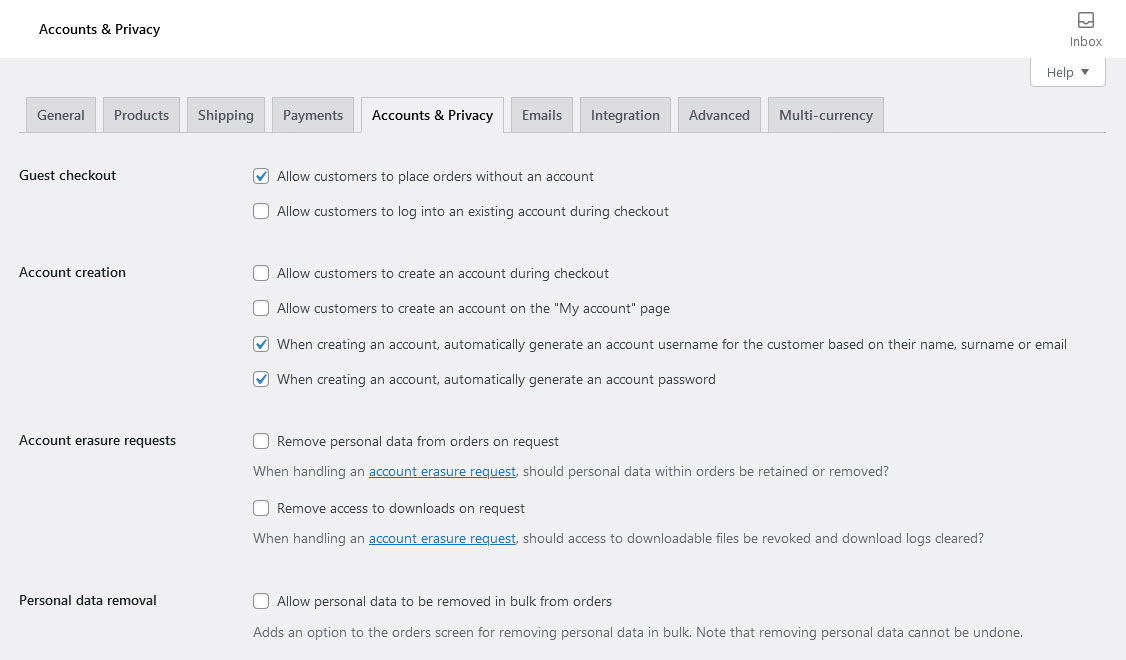
Allow, disable, or require guest checkout and user accounts, handle data removal and account deletion, choose how long to retain data, and set a privacy policy. These settings can be helpful for GDPR compliance.
Emails
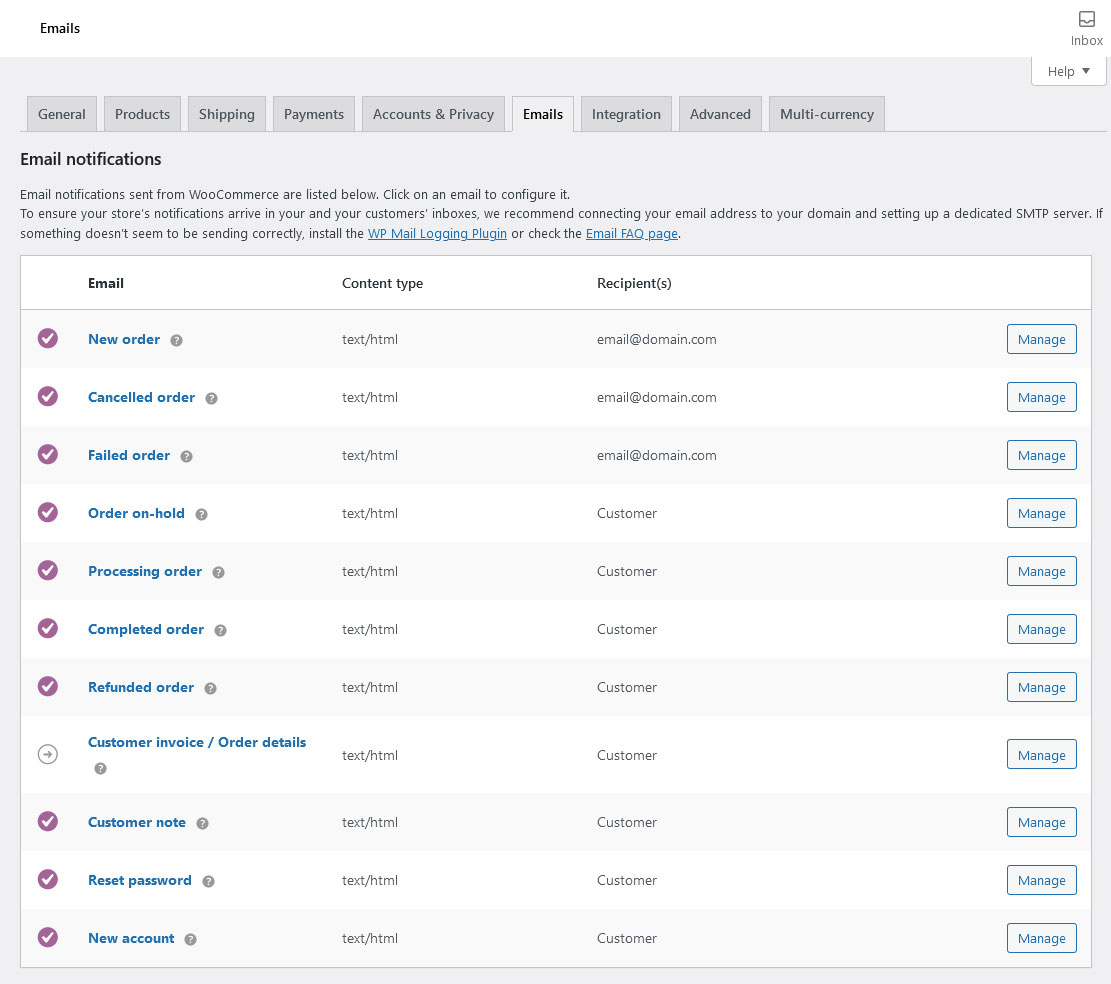
Determine the recipients and content of different important checkout email notifications, sender names and email addresses. You can also configure your email template (including header image, footer text and color scheme).
Integration

This page deals with any plugin or service integrations you may have set up. This will populate as you install new extensions that deal with such things.
Advanced
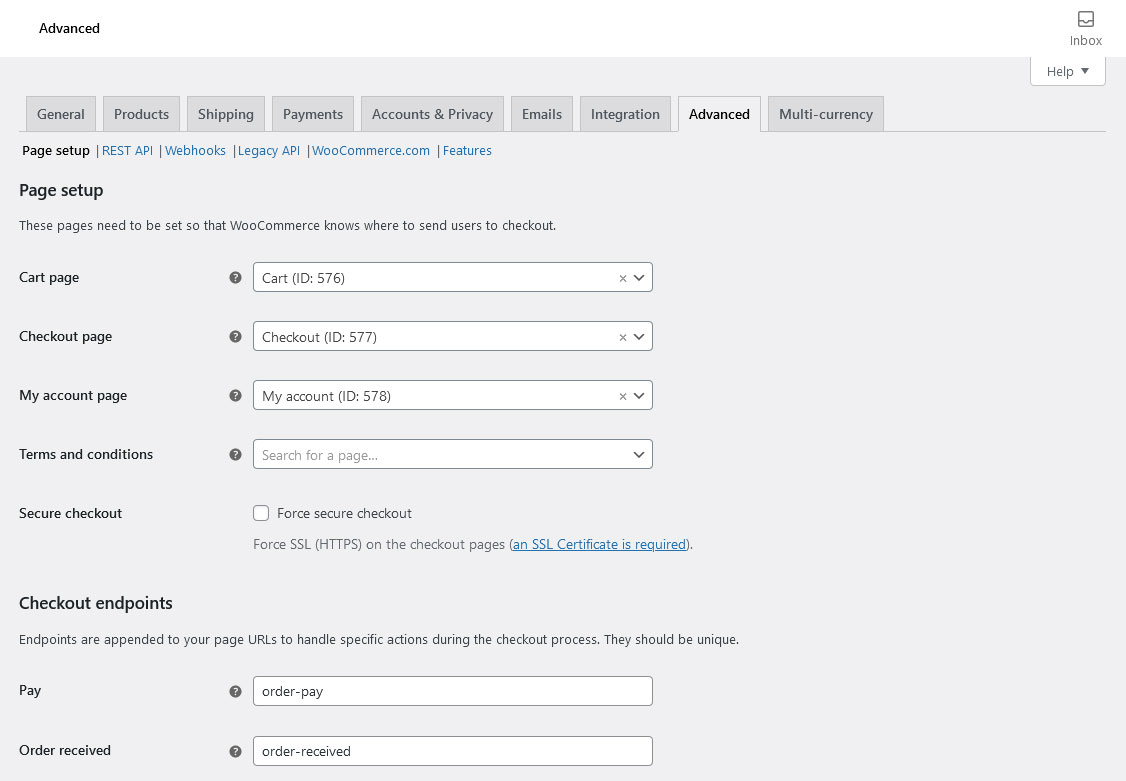
Handle this section with care, as it can be easy to make a mistake and cause problems with your store.
- Page setup — Modify key pages such as the cart and checkout page, as well as changing URL endpoints.
- REST API — Enable/disable the WooCommerce REST API, set up endpoints and permissions for external applications to access your shop data and create event notifications for integrating third-party services. You can enable the Legacy API as well if something isn’t working right.
- Webhooks — Similar to the API, you can use these to integrate with third-party services.
- WooCommerce.com — Enable or disable using tracking, or turn off the extension suggestions if you don’t need them.
- Features — Try out new experimental features.
Status Pages
Almost done! There are just a few other important screens you’ll be spending a lot of time on we need to take a look at.
First: You’ll also notice some new metaboxes on your Dashboard page, like the Status box. When you first log in to WordPress, this gives a good at-a-glance overview at how your store’s been doing.
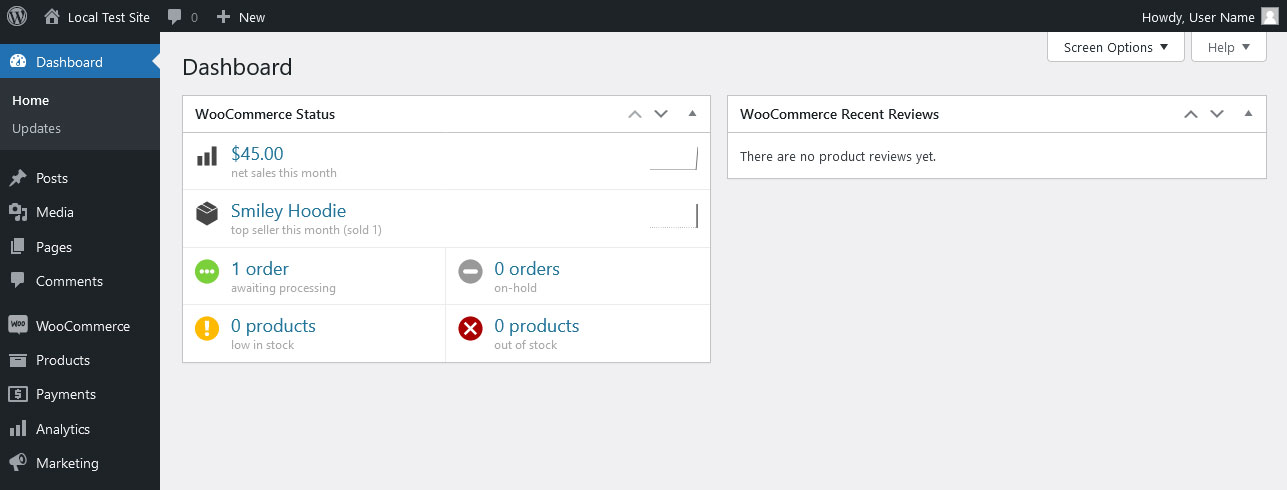
You should look at your home screen from time to time for some more detailed stats and direct links to store management pages. Notifications will also show here, and can be cleaned up by clicking the Dismiss button.
Last, we have the Status page. You may not spend much time here, but it’s packed full of valuable, technical information about your shop.
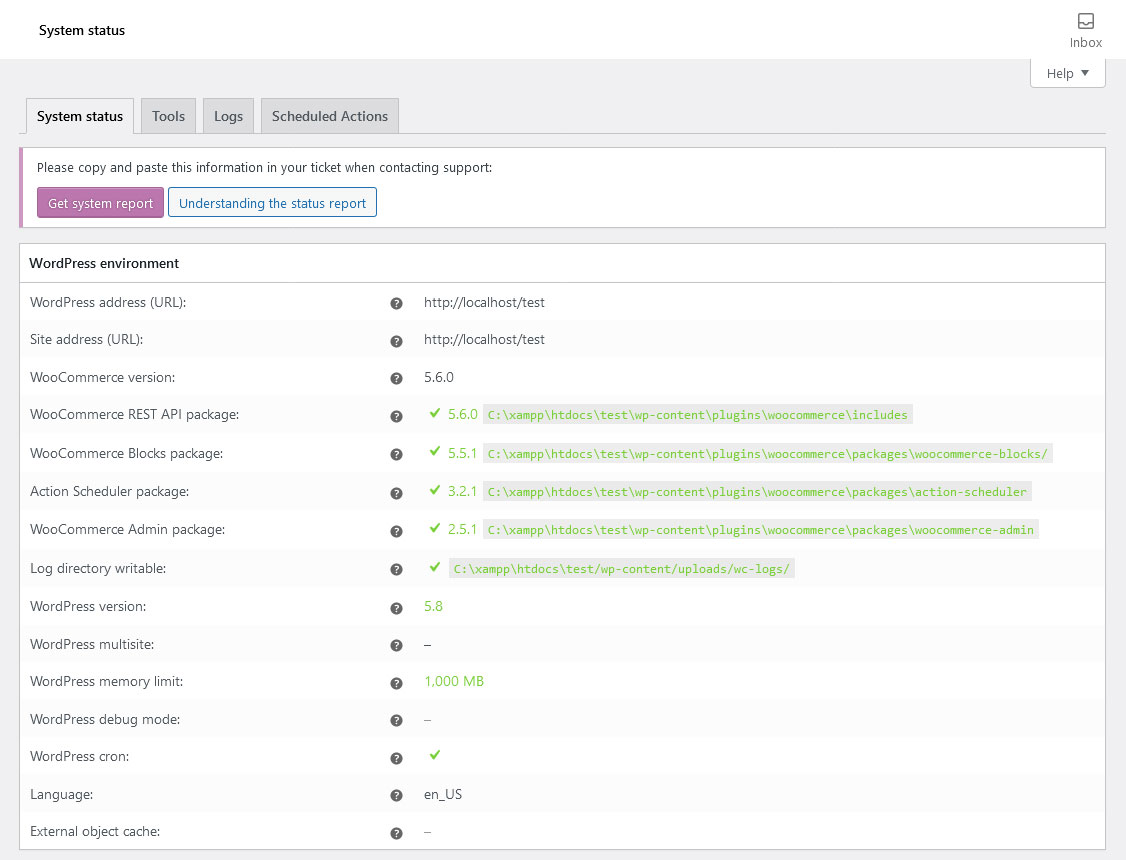
If you ever notice any bugs or need to get the status of your store, this is the place to go.
- System status — Here you get an overview over the health and performance of your online shop. You can also download a system report in case you need to get in touch with the WooCommerce support.
- Tools — Various debug tools allow you to clear your cache or reset certain settings. Only press these buttons if you know what you’re doing!
- Logs — View logged reports for your shop.
- Scheduled Actions — Manage various cron jobs and see ones that have been completed.
How to Install WooCommerce Themes and Extensions
If you have been following along with our tutorial, you’re all done setting up WooCommerce! You should have a good understanding now of how to run your store. Now you’re ready to make use of WooCommerce’s rich ecosystem of third-party extensions and themes.
Chances are, the default plugin will get your shop running, but leave you missing a few features that would really complete the job. Extensions are the solution to making your store truly unique.
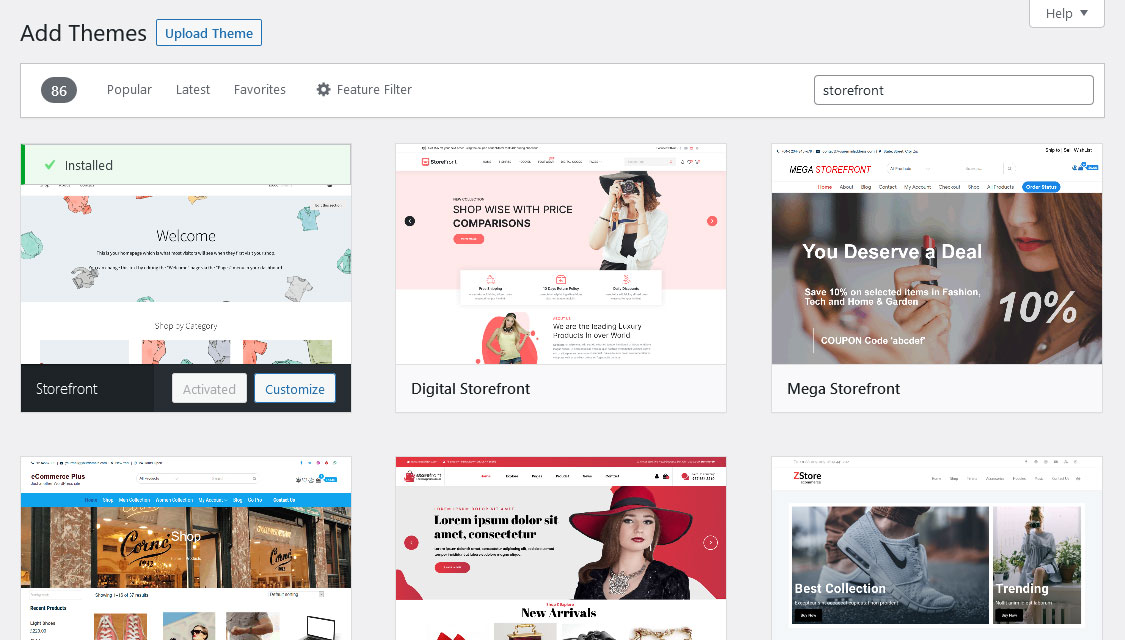
First: WooCommerce Themes. Where can you get them?
- WooCommerce Theme Store — 30+ free and premium themes, all sortable by industry.
- WordPress Theme Repository — 1000+ free WooCommerce-ready themes.
- ThemeForest — 1300+ beautiful WooCommerce themes are available here. All these are paid, but range in price from under $20 to over $100.
You can install WooCommerce themes the same as any other; go to Appearance > Themes, click Add New and then Upload Theme. You can also simply search for the theme if it’s on the WordPress repository.
What about extensions? It’s not much harder. The easiest way is to go to WooCommerce > Extensions and simply pick what you want from their 600+ extensions. This page also allows you to manage any recurring subscriptions you may have.

WordPress also hosts 1000+ free WooCommerce extensions in its official repository, and they cover just about everything you can imagine. Install these the way you would any other plugin from the repository.
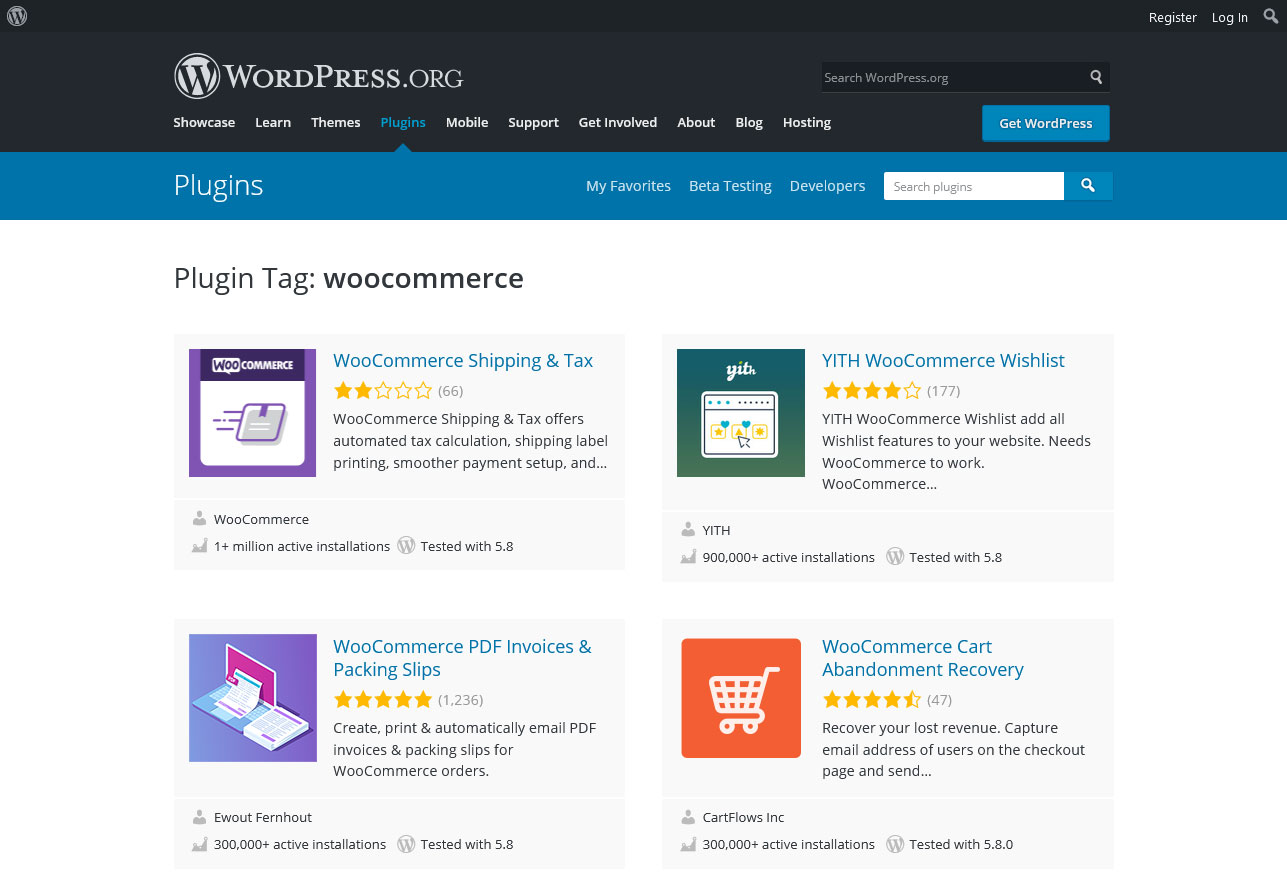
Sites like YITH and CodeCanyon offer paid extensions for WooCommerce that may not be found in its repository. You can install extensions like this by uploading them to Plugins > Add New > Upload Plugin.
All in all, extending WooCommerce is easy and you should definitely take advantage of its thriving community of developers.
WooCommerce Tutorial: Final Thoughts
Although it isn’t often advertised as such, ecommerce is another strong suit of the WordPress platform and WooCommerce is clearly the star in this particular arena.
The online shop plugin offers a powerful and free solution to build extensive online shops for both digital and physical products. Once you’ve got the hang of WooCommerce, it’s a very simple and efficient system for stores of any size.
Learning WooCoomerce is just a matter of following the setup wizard and getting adjusted to the UI. While the basic plugin is all you need to get your shop up and running, users can also rely on thousands of paid and free extensions to further customize their store.
The tutorial above provides you with enough knowledge to give your own WordPress WooCommerce shop a go. All that’s left for you is to come up with a good product. Thanks to WooCommerce, the infrastructure is already in place.
Have you used WooCommerce before and care to share your experience? Any particular extensions you recommend? Let us know in the comments section below!
5 Comments