Welcome to part five of our series on developing a plugin from scratch. Progress has been nice and steady to date, and by this stage we’ve successfully created a significant portion of our theoretical functionality. In the last installment, we finally got to see the fruits of our labor on-screen in the form of a functioning shortcode.
This time around, we’re dipping in and out of both the front and back end. We previously left ourselves a little work to do in terms of organizing the display, and we’ve also yet to look at the settings page that was mentioned way back in part one.
We’ll tick off both of those boxes today, and touch on a number of core concepts along the way for you to explore further at your leisure. Let’s start things off by briefly covering the subject of templating.
Tidying Up Our Shortcode Output With A Template
Previously in our series, we successfully displayed quotes on the screen via a shortcode, but the way they were actually outputting content left a little bit to be desired – we were simply sticking a bunch of HTML in our main public-facing class at /my-rdm-quotes/public /class-my-rdm-quotes-public.php. A quick look into that folder suggests there’s actually a better place to handle things:
In the WordPress Plugin Boilerplate system that we’re using, the /partials folders are specifically designed to house this type of HTML for public and admin-facing functionality. What we’ll quickly do is tidy up our initial ragbag approach in /public/class-my-rdm-quotes-public.php by including the template file called my-rdm-quotes-public-display.php that’s already in the relevant /partials folder:
if ( is_array( $items ) || is_object( $items ) ) {
  include ('partials/my-rdm-quotes-public-display.php');
}
We’ll then handle the HTML rendering directly in that file:
<h4><?php echo($args['quotes-title']) ?></h4>
<ul>
<?php foreach ( $items as $item ) { ?>
	<li><b><?php echo ($item->post_title) ?></b> <?php echo($item->post_content) ?> </li>
<?php } ?>
</ul>
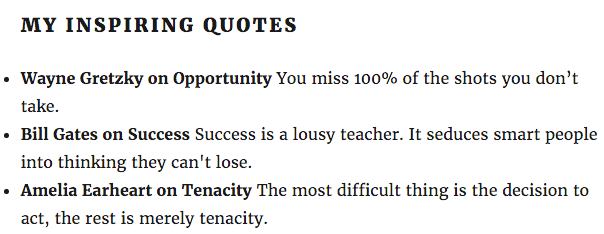
A quick look at the front end to make sure everything is still displaying as it was before, and we’re nearly ready to move on:
All looks fine and dandy above. At this stage, it’s worth pointing out that there’s plenty of room for breaking out your templating into a substantially more modular fashion using this approach. As mentioned previously, a good root around Chris Wilcoxson’s now-hiring plugin on Github will give you access to a fully fleshed-out version to explore.
Okay – let’s turn our attention to settings!
An Overview of Our Settings
The vast majority of plugins are going to require some sort of user settings to be useful, and the WordPress Plugin Handbook does an admirably succinct job of laying out the basic options available to us when it comes to creating them.
To sum up the general idea, we’ll be using the power of the Settings API to handle a lot of heavy lifting behind the scenes, to create options for our users to potentially choose from, and to add a dedicated place in the admin where they can actually make those choices.
A quick look at what’s currently in place shows that we’re pretty much starting with a blank slate here:
As with the previous functionality we’ve added, the first question to tackle is where we should be fitting it all given the structure provided by the WordPress Plugin Boilerplate framework. Let’s look at that now.
Creating a Settings Page With the WordPress Plugin Boilerplate
Fortunately, there are a number of handy tutorials out there that step through creating settings options with the WordPress Plugin Boilerplate in considerable detail. For our own purposes, we’ll be keeping things super simple here, but Firdaus Zahari’s SitePoint piece, and Guillaume Kanoffi’s Scotch series, are both well worth a look if you’re following along. We’ll be drawing heavily on the approach taken in the latter below.
We need to do three things straight off the bat:
- Add an options page to the Settings menu.
- Stick a link to that page into our existing plugin admin screen.
- Actually create the page in the back end.
Seeing as this is very definitely an admin type of affair, based on our experience so far we’ll be heading straight for the main class at /my-rdm-quotes/admin /class-my-rdm-quotes-admin.php. We’ll use add_options_page() to take care of the menu, add_action_links() to tie things in with our existing plugin page, and also tee up rendering of the actual page:
/**
* Register the administration menu for this plugin into the WordPress Dashboard menu.
*
* @since 1.0.0
*/

public function add_plugin_admin_menu() {
	add_options_page( 'My Random Quotes Options Settings', 'My Random Quotes', 'manage_options', $this->plugin_name, array($this, 'display_plugin_setup_page'));
}

/**
* Add settings action link to the plugins page.
*
* @since 1.0.0
*/

public function add_action_links( $links ) {
	$settings_link = array(
		'<a href="' . admin_url( 'options-general.php?page=' . $this->plugin_name ) . '">' . __('Settings', $this->plugin_name) . '</a>',
	);
	return array_merge( $settings_link, $links );
}

/**
* Render the settings page for this plugin.
*
* @since 1.0.0
*/

public function display_plugin_setup_page() {
	include_once( 'partials/my-rdm-quotes-admin-display.php' );
}
We’re taking the same approach with partials in the /admin folder as we did up top in the /public folder. However, we won’t be seeing a whole lot if we visit the back end at this stage. We still need to actually make our main class aware of what’s going on. Let’s go back up to /includes/class-my-rdm-quotes.php and make a quick addition to our define_admin_hooks() function:
// Add menu item
$this->loader->add_action( 'admin_menu', $plugin_admin, 'add_plugin_admin_menu' );

// Add Settings link to the plugin
$plugin_basename = plugin_basename( plugin_dir_path( __DIR__ ) . $this->plugin_name . '.php' );
$this->loader->add_filter( 'plugin_action_links_' . $plugin_basename, $plugin_admin, 'add_action_links' );
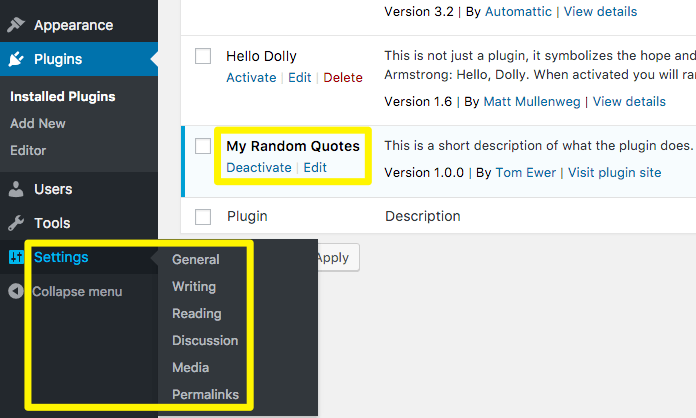
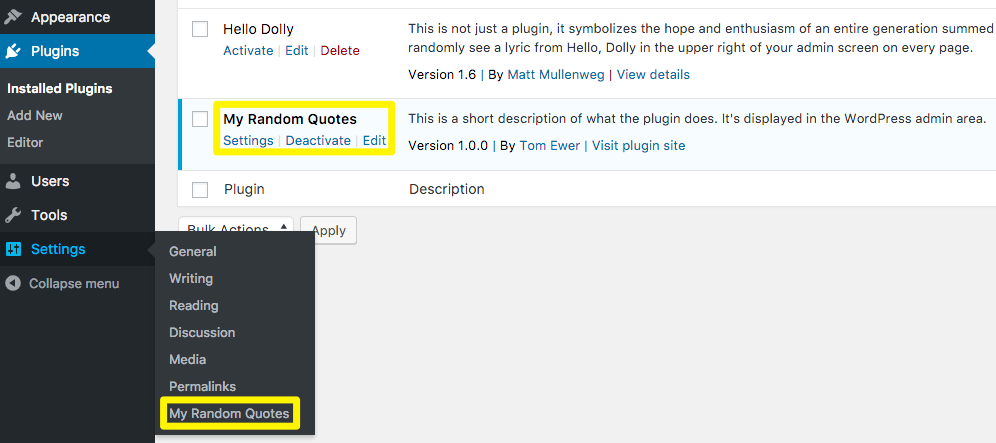
If we now go back into the admin, we should nearly be in business:
We’re slowly getting there, but clicking on either of those links will still give us a big fat nothing. It’s time to fill in some final blanks.
Adding an Option Field
To avoid getting lost in a sea of unnecessary detail, we’re going to keep things very stripped down here. The single option we’ll be making available to our users is a global one to either show a header for our quotes or not – a simple checkbox in other words.
As you may have guessed from the code above, we’ll be doing this in the file /admin/my-rdm-quotes-admin-display.php, which conveniently already exists (albeit with very little in it). Let’s stick in some code:
<div class="wrap">

    <h2><?php echo esc_html(get_admin_page_title()); ?></h2>

    <form method="post" name="my-rdm-quotes_options" action="options.php">

		<?php settings_fields($this->plugin_name); ?>

        <!-- Optional title for quotes list -->
        <fieldset>
            <legend class="screen-reader-text"><span>Include title in quotes list.</span></legend>
            <label for="<?php echo $this->plugin_name; ?>-quo-title">
                <input type="checkbox" id="<?php echo $this->plugin_name; ?>-quo-title" name="<?php echo $this->plugin_name; ?>[quo-title]" value="1"/>
                <span><?php esc_attr_e('Include title in quotes list?', $this->plugin_name); ?></span>
            </label>
        </fieldset>

        <?php submit_button('Save all changes', 'primary','submit', TRUE); ?>

    </form>

</div>
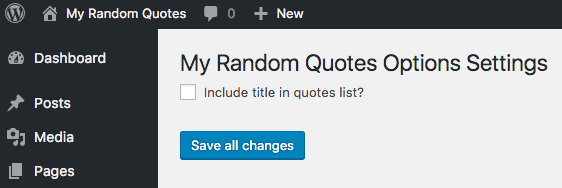
Let’s see where that gets us:
We’re getting there! However, there are still a few quick connections we need to make. Firstly, we’ll add a very quick validation function back in our main admin class at /admin/class-my-rdm-quotes-admin.php:
public function validate($input) {
    // All checkboxes inputs
    $valid = array();

    //Quote title
    $valid['quo-title'] = (isset($input['quo-title']) && !empty($input['quo-title'])) ? 1 : 0;
    //return 1;
    return $valid;
 }
Then we’ll make use of it just above in a function that also handles updating using register_setting() from the API:
public function options_update() {
    register_setting($this->plugin_name, $this->plugin_name, array($this, 'validate'));
}
Now we just need to pop back into our /partials folder and add a quick line of PHP to our form code in my-rdm-quotes-admin-display.php:
<?php settings_fields($this->plugin_name); ?>
Finally, we’ll register the options_update() function to the admin_init hook back in our main class at /includes/class-my-rdm-quotes.php:
$this->loader->add_action('admin_init', $plugin_admin, 'options_update');
At this stage, we can actually make a decision and save the changes!
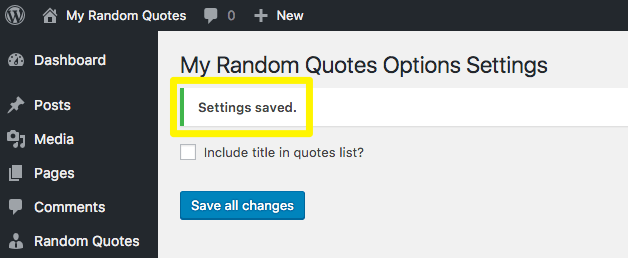
We’re getting a reassuring looking Settings saved message after submitting the form, but that checkbox remains stubbornly unticked. A quick peek into the database shows that things are working fine behind the scenes:
The final piece of the jigsaw is making sure our settings page actually reflects changes post-save:
<form method="post" name="my-rdm-quotes_options" action="options.php">
    <?php
        //Grab all options
        $options = get_option($this->plugin_name);

        // Title quote
        $quo_title = $options['quo-title'];
    ?>
	<?php
    	settings_fields($this->plugin_name);
    	do_settings_sections($this->plugin_name);
	?>

    <!-- Optional title for quotes list -->
    <fieldset>
        <legend class="screen-reader-text"><span>Include title in quotes list.</span></legend>
        <label for="<?php echo $this->plugin_name; ?>-quo-title">
            <input type="checkbox" id="<?php echo $this->plugin_name; ?>-quo-title" name="<?php echo $this->plugin_name; ?>[quo-title]" value="1" <?php checked($quo_title, 1); ?>/>
            <span><?php esc_attr_e('Include title in quotes list?', $this->plugin_name); ?></span>
        </label>
    </fieldset>

    <?php submit_button('Save all changes', 'primary','submit', TRUE); ?>

</form>
We do this by accessing what’s currently stored in our plugins options, and performing a quick check in our checkbox input field as above. Reload the admin screen now and all should be well:
Let’s finish up by making sure that decision is also reflected in the front end. After all, that’s kind of the point of the whole exercise!
Making Use of Our Options
Actually using our option is nice and straightforward. As we did above, we simply use the built-in get_option() function. In our case, that’s as simple as adding a basic check back in our public-facing partial at /public/partials/my-rdm-quotes-public-display.php:
<?php
$options = get_option('my-rdm-quotes');
if($options['quo-title']){
echo('<h4>' . $args['quotes-title'] . '</h4>');
}
?>
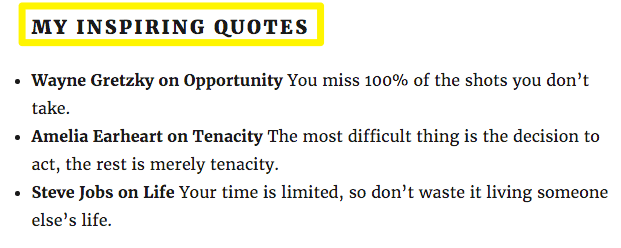
Select the option to display in the back end and we get the following:
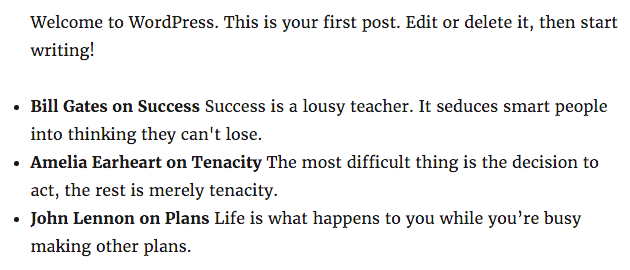
Flick it off and reload the page, and our title disappears as expected:
We’re done for today!
Conclusion
At this stage of proceedings, we’ve pretty much hit most of the main points we set out to cover. We’ve got a working plugin, an easy way of adding content to it in the back end, display options for deploying it on the site, and the bare bones of some specific plugin settings to tweak further when necessary. All of this is handily contained within the nicely composed structure that the WordPress Plugin Boilerplate provides.
Necessity has caused us to skip a fair amount of detail just to cram in what we’ve managed so far. If you were sitting down to create a plugin in earnest, there are a number of crucial areas you’d have to also bear in mind that we’ve blissfully ignored so far. We’ll set out to rectify that in the final installment of the series, where we’ll go on a lightning tour of the major parts of the plugin development process we’ve glossed over. We’ll also give you some advice for further exploration on your own.
As always, questions and comments are gratefully received if you’re following along. Get in touch via the comments section below to share your thoughts!



No Comments