
Way back in 2013, the WordPress 3.4 Green release introduced the Customizer to the masses. If you’re up for a trip down memory lane, here’s the announcement post over on Make WordPress.
Not without its fair share of naysayers, the Customizer looked to, and still does, bring accessibility and instant feedback to visual changes you make on your WordPress site. Its humbler beginnings focused on smaller things like changing your site background color or changing your site title, but to anyone who really understood what it represented, it meant WordPress users would have:
- The ability to preview changes before making them go live on their site.
- A foundation for plugin and theme developers to deliver settings and options according to WordPress best practices.
Needless to say, the underlying value of the Customizer has helped it navigate its teething pains and become a feature that is both meaningful and good to use.

In this post, we’re going to have a look at different ways anyone can leverage the power of the Customizer to extend their WordPress site. We’ll touch here and there on a few development techniques, but rather than give you play-by-play tutorials, we want to share with you resources and guides elsewhere you can use to implement what you read here.
Big picture though, we’ve broken this post down into three main sections:
- Extending the Customizer with .org Plugins
- Extending the Customizer with simple custom development
- Extending the Customizer with advanced custom development
But first…
What’s new in the land of Customizer?
The Customizer is out of its infancy and is starting to mature in its feature set. Over time, as with WordPress in general, features that are facilitated by feature plugins are reviewed and occasionally proposed for merge into core. 4.7 Vaughan was the most recent major Core release and it came bundled with a few fairly major updates to the Customizer.
Customize changesets
One of the weaknesses of the Customizer has been that any changes you make in the Customizer, setting changes etc, that you do not publish immediately are lost if you close the window. Changesets solves this by storing your session’s settings in the background, keeping them available for future reference.
Each change made to a setting in the Customizer is saved to a changeset (a new customize_changeset post type).
This important change lays the groundwork for some significant updates around revisions, sharing previews etc. that are in the pipeline.
Custom CSS
A new section was added to the default Customizer view that gives users a simple input for adding custom CSS. There are many many ways to add custom CSS to a WordPress site, but the value of having it in Customizer is the instant visual feedback.
Other updates
There were some other recent updates around UI and UX, including the ability to create pages within the live preview during site setup. You can read further details on this release post.
Let’s now look at different ways you can extend the Customizer to bring more capability to your WordPress site.
1. Extending the Customizer with .org plugins
For the WordPress community, the .org repo is a cornerstone of the great WordPress engine. And for anyone looking to go beyond what WordPress offers in Core, not only is it a treasure trove of offerings, it’s typically the first stop on the path to finding what is possible. If you’re looking to extend the Customizer, the .org repo is the place to begin.
Customizer export / import
This plugin from the folks who brought us the Beaver Builder page builder plugin allows for an easy in-Customizer method of exporting and importing Customizer settings.
It has a five-star rating on .org with 40,000+ Active Installs
Customizer reset
This is another what-it-says-on-the-box plugin. Customizer Reset is super handy for if you want to quickly revert to the original Customizer settings. Check it out here.
Built by WP Zoom, it has a 5-star rating and 1,000+ active installs
Customize posts
This plugin is from the team here at XWP and brings a lot of the editing experience of pages and posts into the Customizer environment. The big upside of this plugin is the instant feedback you can have for post/page settings you typically have to toggle back and forth between preview and editing to achieve. More than anything, this plugin is seeking to lay a foundation for what would be a more seamless editing experience in WordPress’s future.
Customize snapshots
Customize snapshots does what I alluded to earlier under Customize Changesets. It provides a UI for letting you save and share Customizer states.
Customize Snapshots save the state of a Customizer session so it can be shared or even published at a future date. A snapshot can be shared with a private URL to both authenticated and non-authenticated users. This means anyone can preview a snapshot’s settings on the front-end without loading the Customizer, and authenticated users can load the snapshot into the Customizer and publish or amend the settings at any time.
https://wordpress.org/plugins/customize-snapshots/
2. Extending the Customizer with simple custom development
When existing plugins don’t do what you need, the great thing about WordPress, if not the greatest thing, is that some simple custom development can more often than not get you where you want to be. The Customizer, as part of core, has strong documentation around extending it and adding functionality.
We (XWP) have worked on a number of Enterprise WordPress projects where the Customizer has been a central part of the solution. Despite the size of these sites, a lot of the components still leverage what would be considered simple and standard WordPress development. Here are a few examples of how you can easily extend the Customizer.
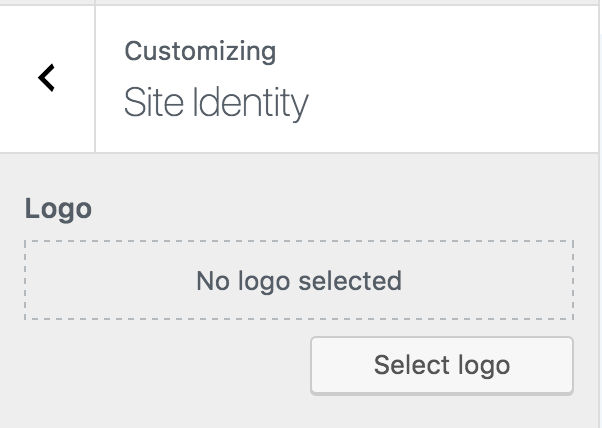
Adding theme support for a custom logo
If you’re developing a theme, or even a Child Theme, one of the simplest uses of the Customizer is to add theme support for a custom logo. The Customizer comes with out-of-the-box functionality for allowing site users to upload a logo for their site, typically used in the header or top navigation. While this feature has been available as part of Core since 4.5, it actually needs to be enabled by a theme. To do so, you just need to add the following snippet to your theme, typically in the functions.php file.
add_theme_support( 'custom-logo' );
Adding theme support will give users a new control in the ‘Site Identity’ tab:
Once enabled, your theme or plugin will need to output the logo. Typically you would use something like the following.
function theme_prefix_the_custom_logo() {

	if ( function_exists( 'the_custom_logo' ) ) {
		the_custom_logo();
	}

}
For further details around adding theme support for a custom logo, including custom arguments, visit this page of the WordPress Codex.
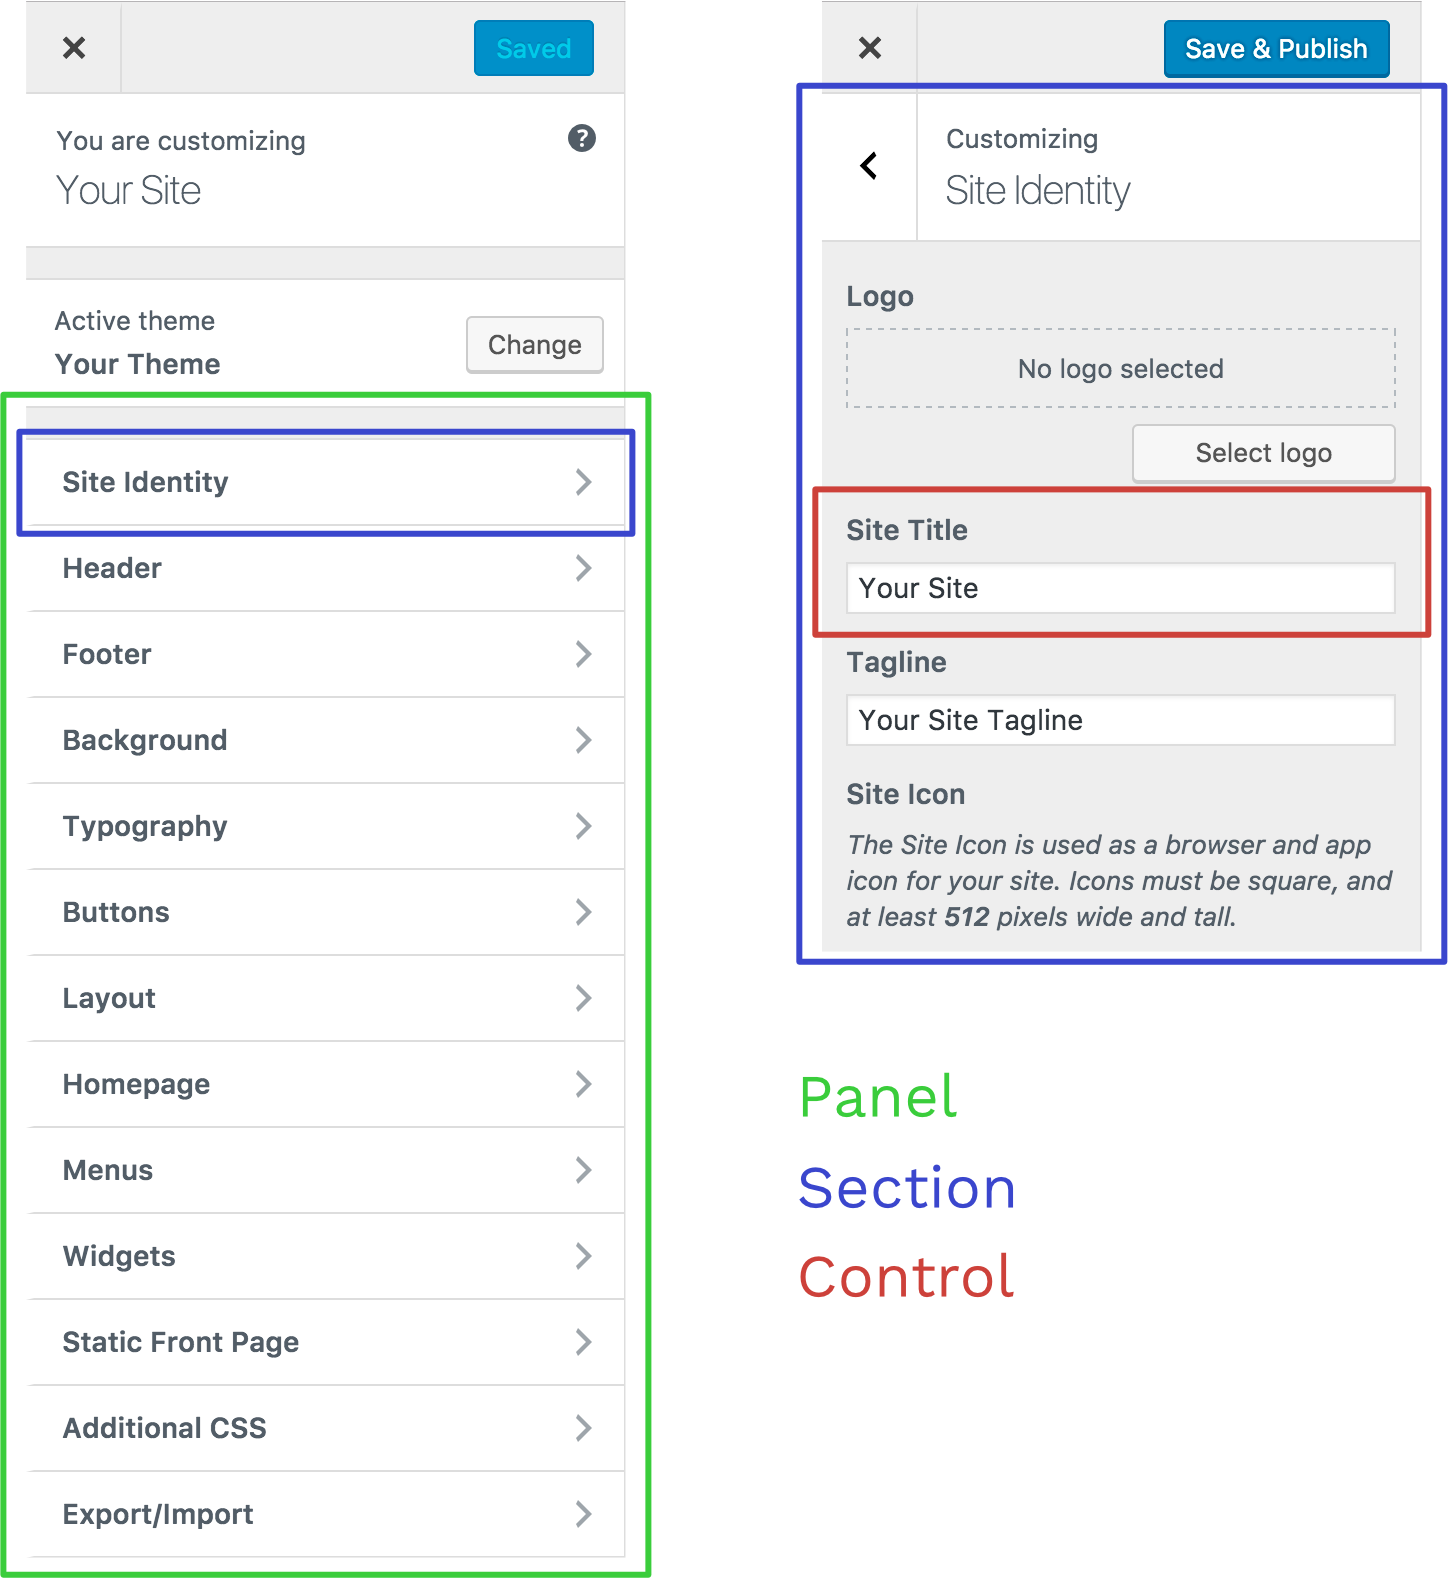
Panels, sections, controls, and settings
The true value of the Customizer for Theme and Plugin developers is the framework it provides for adding settings. The structure of these is mostly based on the visual experience of end users. The Customizer UI is broken into:
- Panels
- Sections
- Controls
- Settings
Breaking it down a little further we have:
Panels – The Customizer Panels API was introduced in WordPress 4.0, and allows developers to create an additional layer of hierarchy beyond controls and sections.
Sections – Sections are UI containers for Customizer controls. While you can add custom controls to the core sections if you have more than a few options you may want to add one or more custom sections.
Controls – Controls are the primary Customizer object for creating UI. Specifically, every control must be associated with a setting, and that setting will save user-entered data from the control to the database
Settings – Settings are the actual data, saved to the database, that are used by the theme or plugin.
Visually, we have something like this:
Editing and adding Panels, Sections, Controls and Settings within your Theme or Plugin is fairly easy. Especially with the good docs available. See Customize API Documentation.
Settings: theme mods vs. options
Initially, the Customizer was focused on facilitating theme settings. As it grew, the value it would bring to plugin developers and users was recognized. However, Customizer settings were tied to themes. This meant that if a theme was switched, custom settings disappeared along with it. To address this, a second kind of setting, an option, was added to the mix.
Functionally an option’s data is stored in the wp_options table, meaning it’s available outside of whatever the active theme is. Perfect for plugins. The original type of setting, the one tied to a specific theme, is now called a theme mod.
For more details and a demo of the differences, check out the docs here.
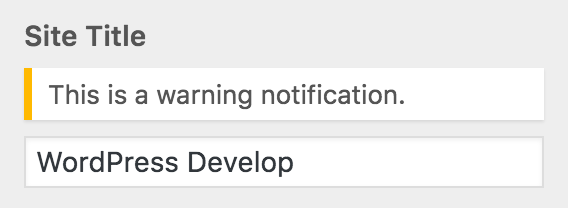
Setting notifications
When using the Customizer controls, it’s helpful to get feedback if a required field is empty or if a field has an invalid value. For example, if you want a user to drop in a hex code for a brand color, there is a particular format it needs to be in. Get it wrong, the user should know about it so they can fix it up.
The Customizer Notification API allows displaying a message above a field. To display red error messages, you only need to create a PHP callback. You can also set warning and notifications with JavaScript.
Supporting selective refresh
When you’re writing custom WordPress widgets or any other elements that must be rendered by PHP, you can allow them to selectively refresh. This gives fast feedback for changes that you make to the related controls in the Customizer as it loads only the relevant part, or partial, of the screen that the widget belongs to. Otherwise, the entire preview window will reload.
Customizer Tech Lead Weston Ruter describes how to enable Selective Refresh in this Make WordPress Core post. The simplest case involves only two lines of PHP in the widget class. For JavaScript-rendered widgets, there is a slightly more complex setup.
This feature was one of the WordPress Core outcomes of a large platform we built with News Corp Australia. We built some heavy-lifting page building features with the Customizer, and Selective Refresh significantly sped up the user experience.
“I recall working on it on a flight across the Pacific back from Sydney,” Ruter said.
3. Extending the Customizer with advanced custom development
JavaScript-rendered custom controls
Traditionally, you would use the PHP API to render Customizer controls and settings. But displaying them with JavaScript and Underscore.js is often more performant. It allows using the JavaScript Customizer API to dynamically create controls.
As the documentation states, the first step is to register the control type. In an action hook for customize_register, place this line:
$wp_customize->register_control_type( ‘Your_Custom_Control' );
You’ll also need a way to inject PHP-based data into the template. The documentation shows a way to do this by implementing the to_json() method of your custom control class. Then, you can send additional data to the control.
Next, create the Underscore template by implementing the content_template() method of your custom control. And create an empty method for render_content(). Having completed these steps, you can then dynamically create controls using the JavaScript API.
Customize posts + shortcake
Traditionally, WordPress posts are edited in /wp-admin, with no live preview of the front-end. The Customize Posts plugin, mentioned in the plugins section, allows editing and live-previewing posts in the Customizer.
With custom development, you can get more live feedback. By using this along with the Shortcake plugin, you can develop a custom UI for fields. And you’ll see them previewed in the Customizer, using the custom template that you code.
Also, extending the Media Explorer plugin will enable displaying custom media types in the Customizer, via the Customize Posts UI. This provides a way to add external audio, video, and social media, and see a live preview.
What’s coming for the Customizer?
The Customizer, along with the WordPress API and Text Editor, is one of three feature focuses for the WordPress project this year. The value it brings to end users and developers is proven and the challenge is now building on what we have. The Customizer team and community have these few things in their sights for the next few releases:
- Reducing the user experience friction when transitioning between editing content and customizing templates
- Building on changesets, introduce revisions
Want to contribute to the Customizer?
The Customizer is a community project and has had contributions from hundreds of people. It’s certainly transforming the way we all build our WordPress sites, but it’s not perfect yet. If you believe you’d like to contribute to the project then the door is more than open to you.

A BIG thing to realize in contributing to the Customizer, or WordPress in general, is that you don’t have to be an amazing developer or even a developer at all. The value that Project Managers, UI designers, UX professionals, or even testers, bring is more than we all realize.
If you would like to be part the amazing community taking WordPress forward towards 51 percent of the web, you can find out more through these different:
- If you’re on Slack (you should be), #core-customize channel on WordPress Slack.
- The component page for the Customizer provides a gateway for tickets being worked on.
- Also, the customize tag of posts on Make/Core is where you can go to stay up to date with recent announcements and news.
For even more ways of being involved in WordPress in general, this post from Jeff Paul is great.
This post was a collaborative effort, so big thanks to Ryan, Weston, and Utkarsh for helping me pull it all together.
No Comments