How can you use AdSense to make money with your WordPress site? When you manage your own website, it can be a struggle to figure out how to monetize it, exactly. Will you sell products? Will you use affiliate links? Often, bloggers will use a variety of monetization methods to diversify their income.
One handy way of earning revenue on your website is to display banner ads. And there’s probably no more popular way of facilitating this than by setting up Google AdSense on your WordPress site. Here, we’ll spend some time talking about what Google AdSense is, then offer up a step-by-step for signing up for an account, connecting it with WordPress, and seeing ad revenue start to roll in.
By the end, you should have enough info to get started. So with that in mind, let’s dive in.
What is Google AdSense?
There are many advertising networks out there, but AdSense is one of the biggest and most profitable ones. It’s the display ad network run by Google that offers several ad types you can automatically show on your website.
Once active on your site, AdSense shows ads based on the browsing history of your visitors (but with strict family filters). So, in fact, you don’t really put the ads themselves on your site, it’s more like you rent out ad space that AdSense automatically fills in for visitors. This makes it more likely that they will fit the user interest so they will click and earn you money. Available formats range from simple text ads to image-based advertisement to even videos.
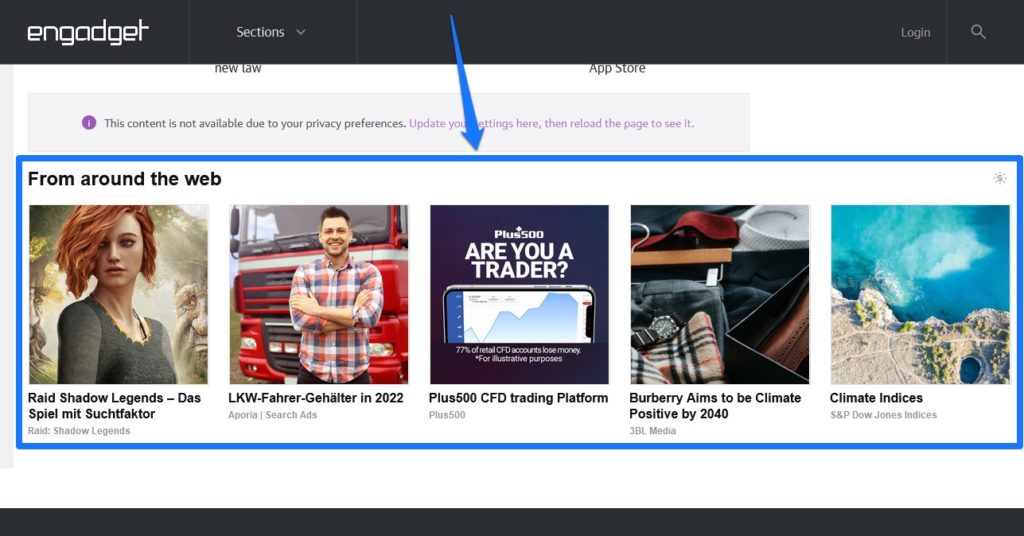
What’s cool about it is that once you sign up and configure AdSense to work with your website, the rest pretty much happens by itself. Ads are automatically selected for you, you get paid automatically, and it’s altogether a pretty hands-off process.
To use this method, it’s usually good if you have a healthy amount of traffic. Site monetization via ads is very much a numbers game. Payout per click is quite low, so you need to get a lot of them in order to earn something worthwhile. If that is not the case for you, you might be better off finding other ways to make money on your site like selling your own products, offering a service, or else.
How to Sign Up for an AdSense Account
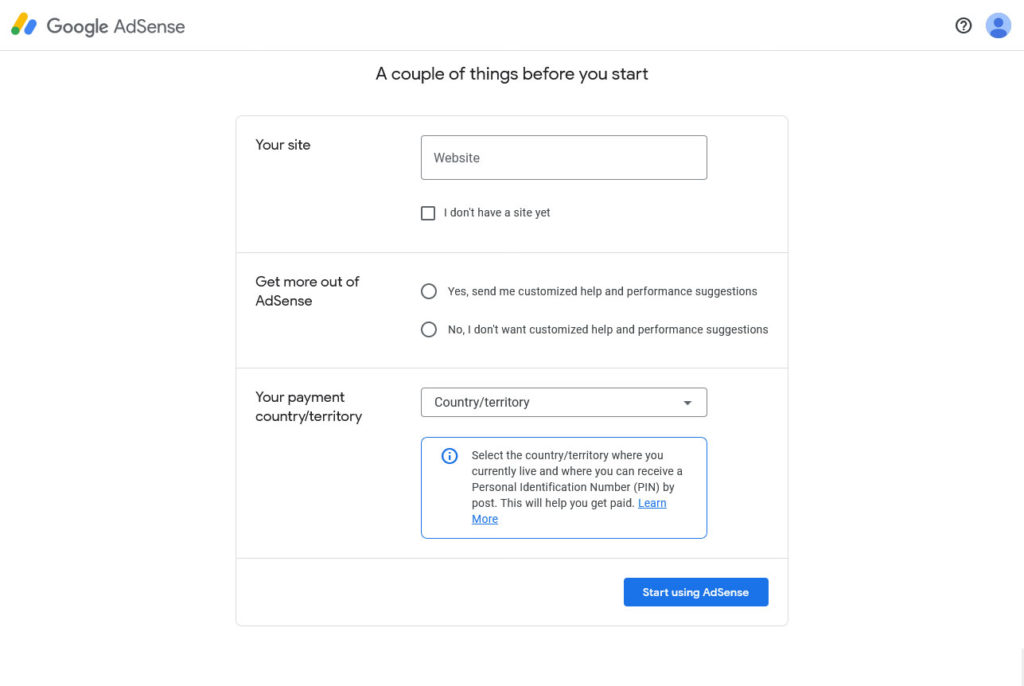
First thing’s first, let’s discuss how to sign up for an AdSense account and activate it. The process works as follows:
- Navigate to the AdSense signup page and click Get Started.
- Sign in to your Google account (create one if you don’t have one yet).
- Input the URL of your website, decide if you want Google to send help and performance suggestions, and pick the country where you live and wish to receive payment.
- Once it appears, go over and agree to the terms and conditions.
- Click the Start using AdSense button.
Prerequisites for Using AdSense on Your WordPress Site
Before you can begin using AdSense, however, they service needs to approve you. After you submit your account application, it can take a while for Google to review your site and see if it’s a good fit.
Why is that?
Google wants to make sure that their ads appear on a high-quality, user-friendly website. For that reason, make sure your site adheres to the Google Webmaster Guidelines and that you follow all AdSense rules, policies, and procedures. Otherwise you might find your account banned, suspended, or face other disciplinary action.
What is a high-quality and user-friendly website?
One that has good, non-plagiarized content and no security issues. If either of those is an issue on your site, you might get rejected. However, if you get an email saying that they couldn’t approve you at this point, it will also list the reasons why. In that case, it’s on you to fix any issues that they had with your site. When you have done that, you can apply again.
Once approved, it’s time to activate AdSense and add it to your website. That’s what we’ll discuss next.
How to Connect AdSense to WordPress
Again, before you can start displaying ads on your website to earn income, you need to enable the feature in the first place. There are two ways to do this: manually and via plugin.
1. Manually
To connect Adsense to WordPress by hand, first go to the Connect your site to AdSense menu and copy the code snippet you find there.
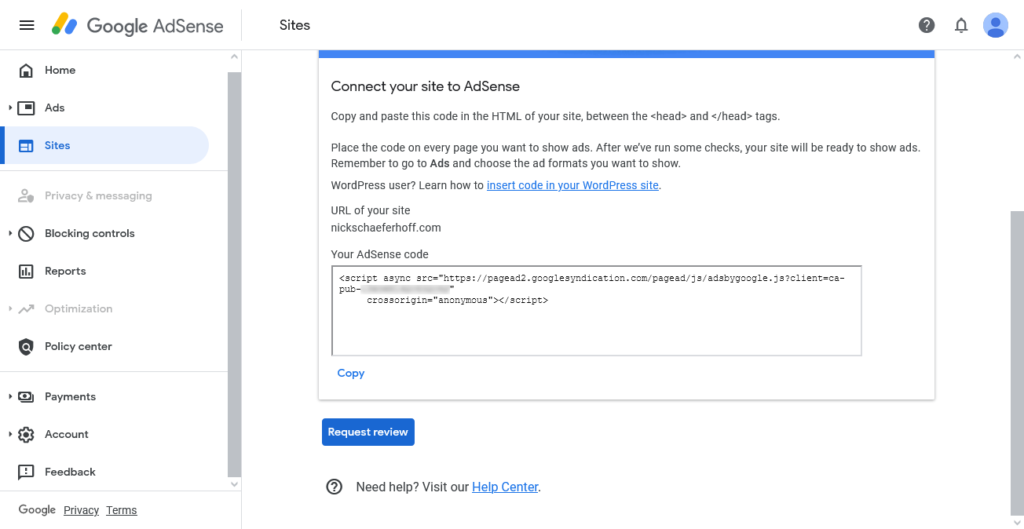
After that, you need to add this to the <head> section of your WordPress site. One way is to log in to your WordPress dashboard and go to Appearance > Theme Editor > Theme Header. Then, paste the code you copied directly above the </head> tag.
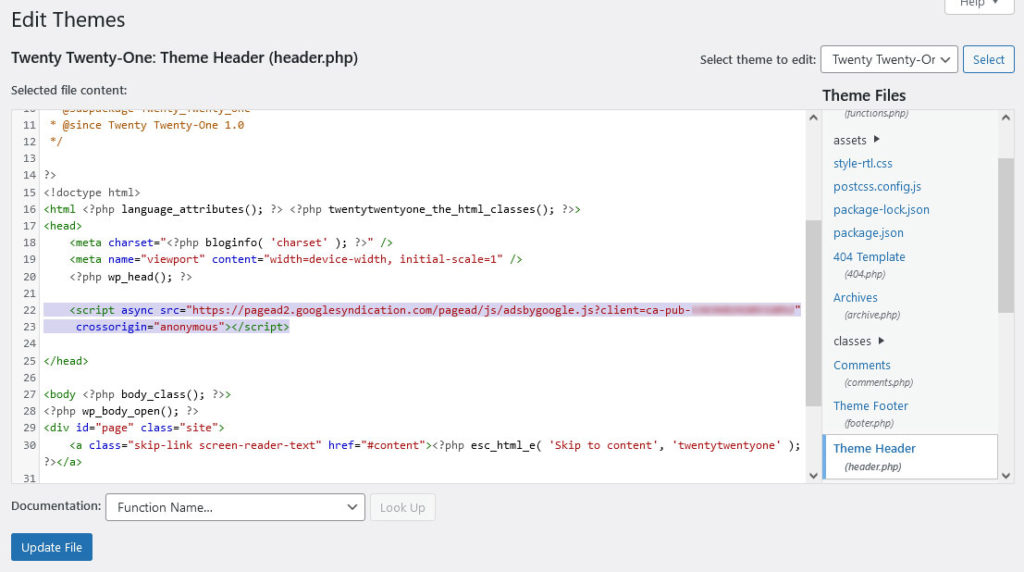
If you have disabled the theme editor for security reasons, fire up your favorite FTP client and log in to your server instead. There, find the header.php file in your (child) theme folder and add the code to the same place.
Voila! Your AdSense account and your WordPress site should now be connected.
2. Via Plugin
Another way to achieve this is to use a plugin. This also has the benefit that it won’t eliminate the code snippet when you change themes. One that can be helpful here is Advanced Ads.
Once installed, go to Advanced Ads > Settings > AdSense and click Connect to AdSense.
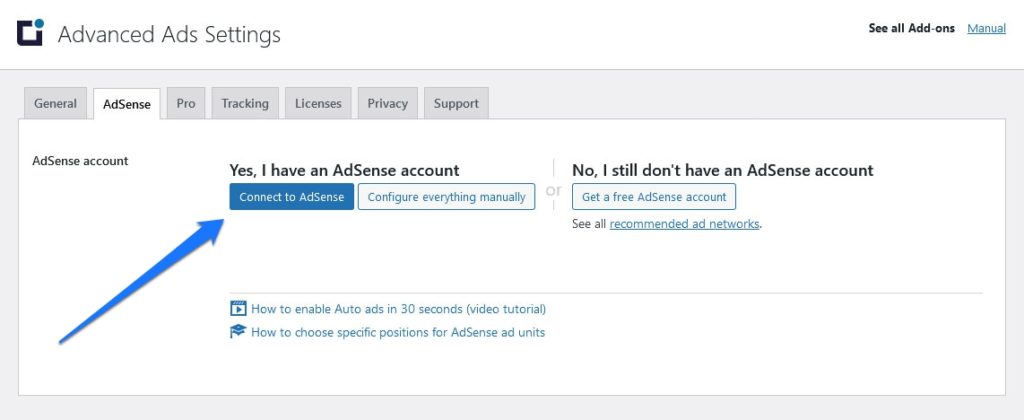
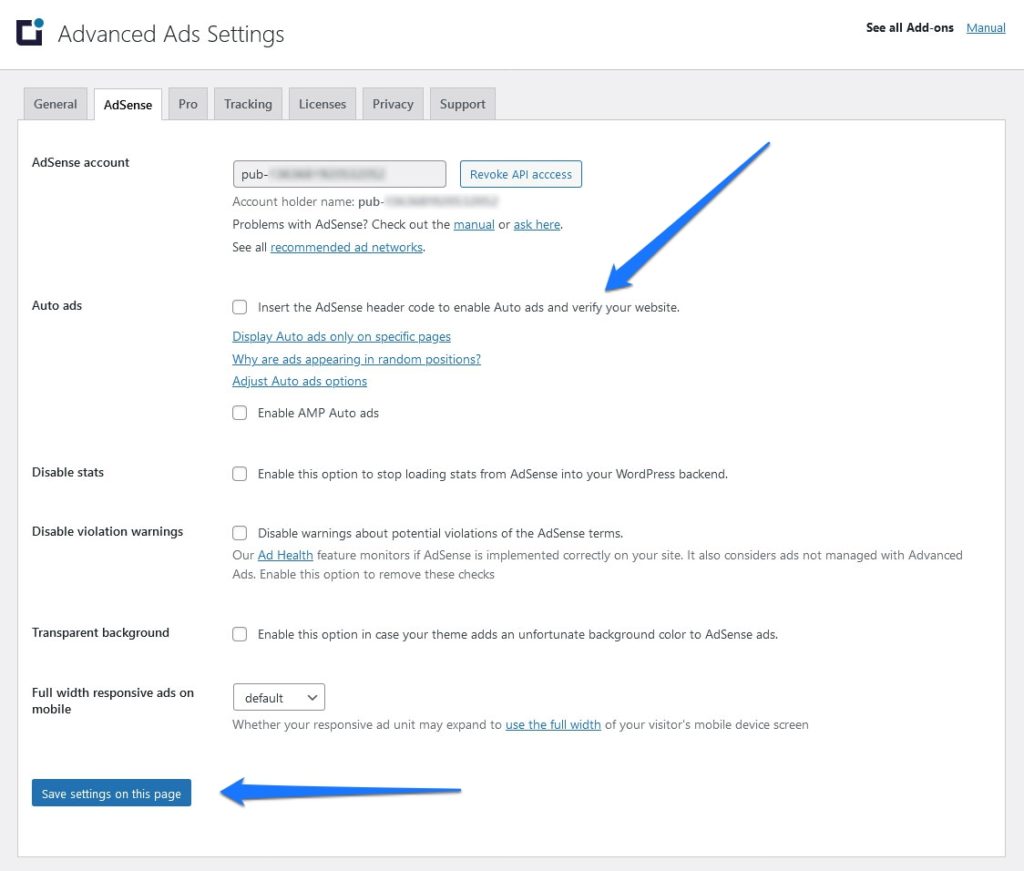
When you do, it will go through process of logging in to Google (use the same account as for your AdSense account) where you need to give permission. When you do, it automatically populates the settings page with your data. All you need to do is check the box that allows the plugin to add to your site’s <head> section and save.
Alternatively, you could also use a plugin like Head, Footer and Post Injections to add the code to your site. Here, you copy the code manually but you use a plugin to add it to your site. It’s a bit of a hybrid solution.
Creating Ad Units
Before you can put any ads on your WordPress site, you first need to create a so-called Ad Unit. That’s a piece of code that you place on your site (more on that below) that displays an ad in that position. Basically, it’s how you create the banner space that Google AdSense fills in.
The ability to do this is available under Ads > By ad units. Select the type of ad you want to create: text and display, in-feed, or in-article.
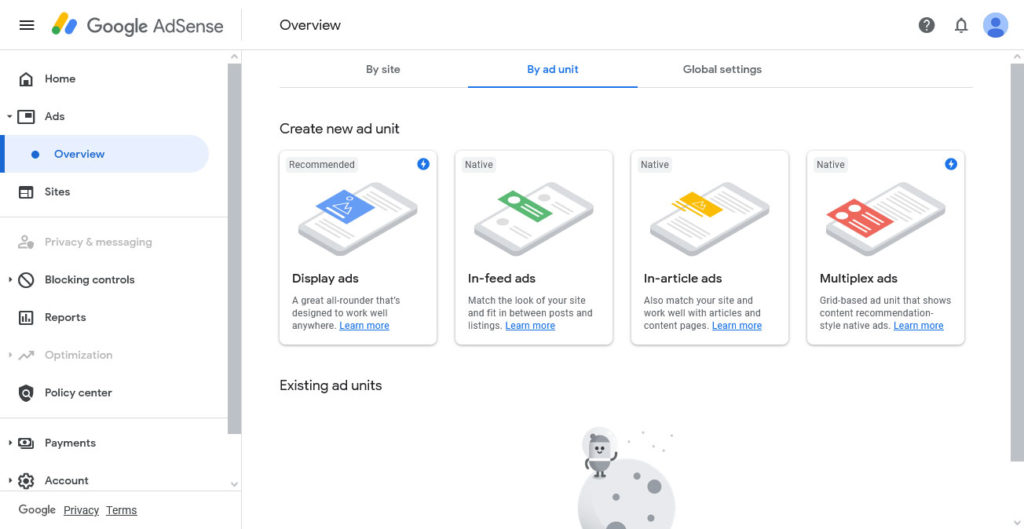
The first type usually goes into a sidebar, header, or similar. In-feed ads appear between different articles on a blog page or in an archive. In-article ads, on the other hand, show up in the middle of a blog post in between paragraphs.
Choose which one you want, give your Ad Unit a name and then select the format: horizontal, vertical, or square.
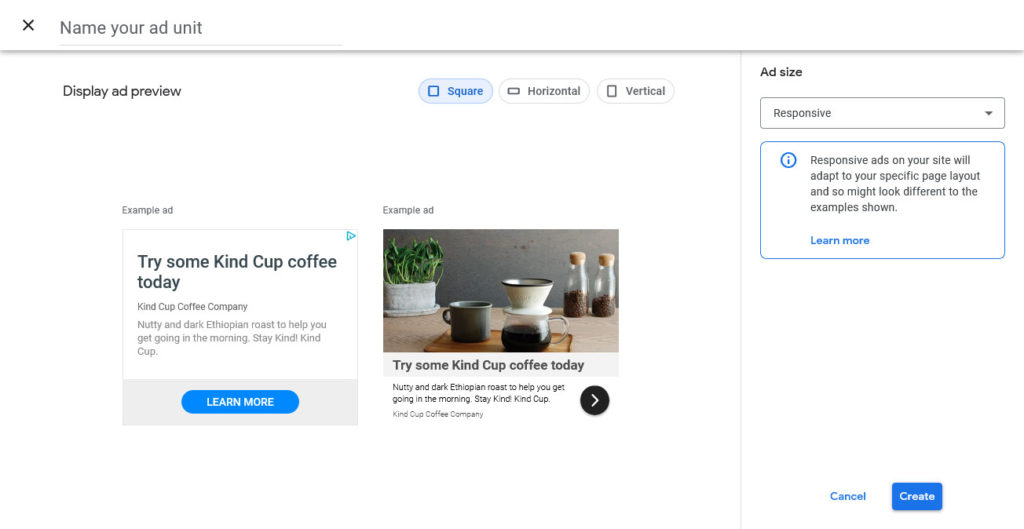
Then, pick the size you want it to display in. Responsive is usually your best bet. That way, it’ll adjust to the size of the space the ad has available automatically. Once done, click Create.
3 Ways to Insert AdSense Ads Into WordPress
Now, we can explore the three ways you can insert the AdSense ads into WordPress.
1. Use an AdSense Plugin
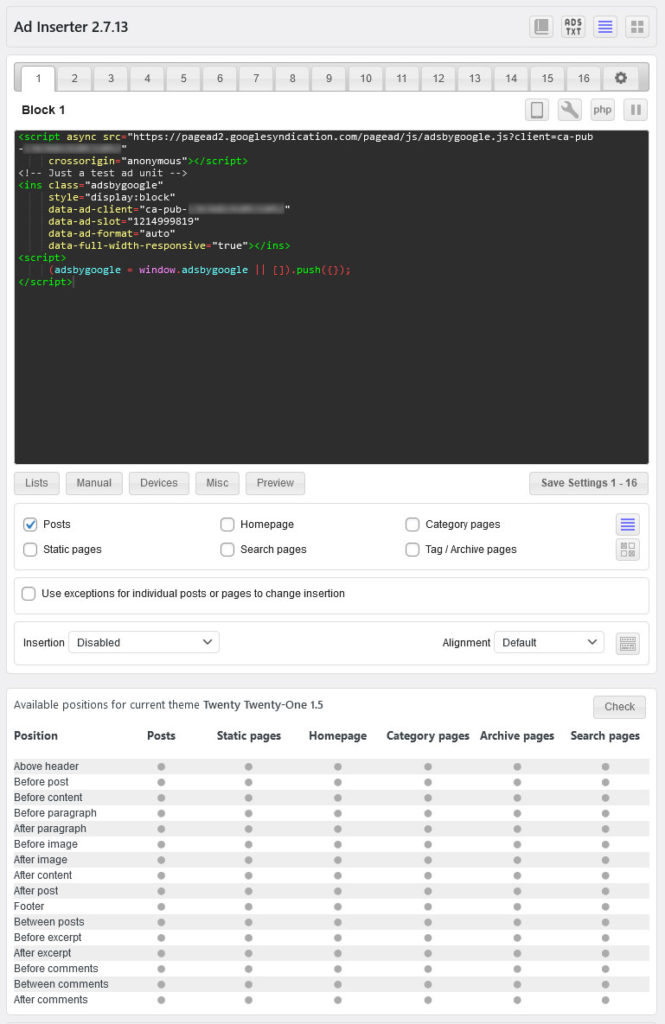
The first method we’ll discuss is using a plugin to set up and configure AdSense for use on your WordPress site. We’ll be using the Ad Inserter plugin in this example as it gives you control over where the AdSense ads appear (beyond just widgetized areas). The great thing about this plugin is that it supports more than just AdSense, so if you ever wish to expand, you have that option.
To get started, simply install the plugin on your WordPress site via Plugins > Add New. Once installed and activated, navigate to Settings > Ad Inserter.
From here, you can select from a variety of options for inserting ads into your website. To do so, you first need to copy the code for your newly created Ad Unit and paste it into the Ad Inserter plugin’s settings.
After that, you can select precisely where you’d like the ad to appear on your site including before specific paragraphs that you designate. You can then apply this standard across all posts and pages if you wish.
Repeat this process for all the different types of ads you want to insert. And again, you can use this plugin with Amazon Native Shopping Ads, Media.net, and Infolinks, too.
A few other plugin options out there include aforementioend Advanced Ads and Woody Code Snippets if you want to shop around.
2. Turn on Auto-Ads
Another way to get ads on your website is to turn on the auto-ads feature in AdSense to automatically place advertisements.
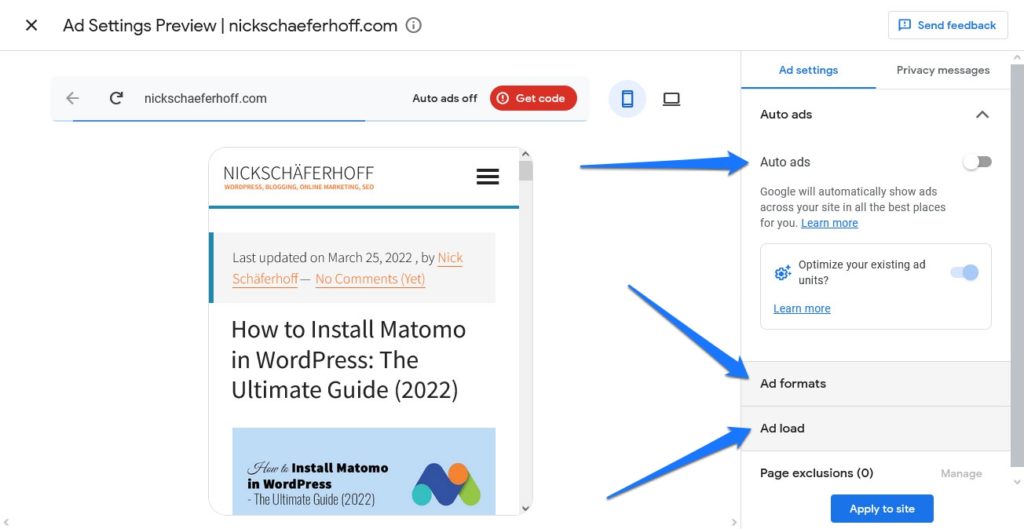
To do this, you’ll need to:
- Sign in to your Google AdSense account then navigate to Ads > Overview.
- From there, find your website’s URL and click the Edit button next to it.
- Under Ad Settings turn on Auto Ads. Configure the type of ads and their format under Ad formats. Then, under Ad load, pick how many pieces of advertisement you want to allow AdSense to place on your WordPress site.
- Select Apply to site then choose Apply now and Save. This will make it so Auto Ads begin appearing on your site immediately.
- Alternatively, you can opt to run an experiment first to see how the ad performs before committing.
This actually brings us to our final means of getting ads to display on your WordPress site.
3. Manually Place Ads
We’ve touched on this method a bit already, but this is the most common way to insert ads into WordPress. It’s the good old-fashioned way – manually!
For this method, you’d follow the same steps as you did in the option for using a plugin described above. Login to your AdSense account, create a new Ad Unit, etc. Copy the code snippet for the ad you’ve created, then log into your WordPress dashboard.
Go to Appearance > Widgets and create a new Custom HTML Widget. Place it in the area where you’d like it to appear, i.e. sidebar, footer, etc. Then, paste the code snippet into the content field.
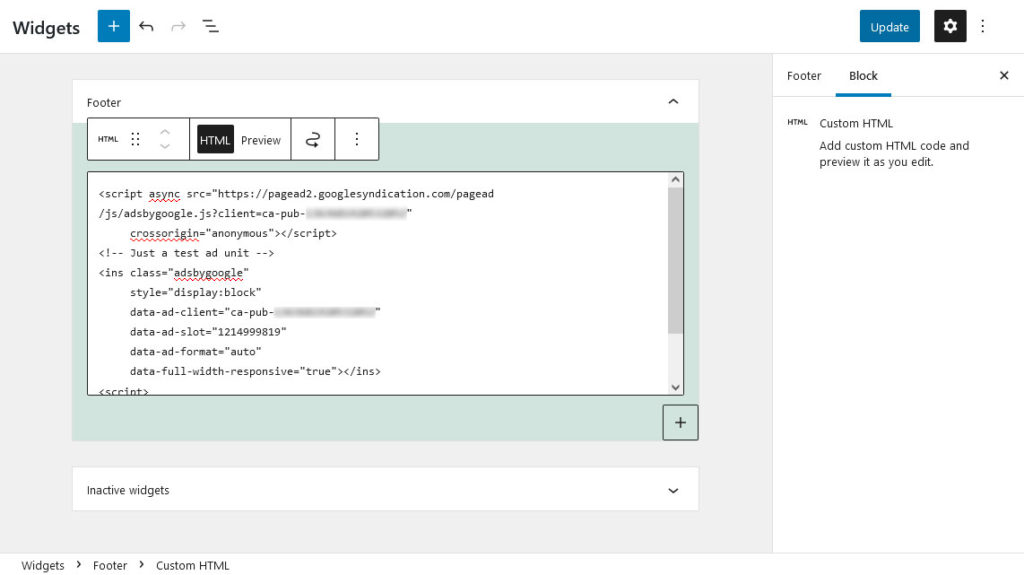
Press Update when you’re done making changes. Then, visit your live website to see the results and ensure the ad widget appears where you wanted it to.
Another option is to include the ad code in your theme template files or via action hooks. If you feel like your skills are up for that, consider giving it a try.
A Few Tips for Using AdSense in WordPress
Though the above covers all you need to know to start using AdSense in WordPress, there are a few nuances you should be aware of. Especially if you want to make the most of your ads and earn real revenue from them.
- Don’t overwhelm your website with ads. Just because there’s a widgetized area available, it doesn’t mean you need to place an ad there. Nor do you need to insert ads after every paragraph in your blog posts. When all else fails, think of your own experience visiting websites and at which point you would consider a website too cluttered to stick around.
- Place them in the right location. Choose positions where your ads are visible but won’t be the center of attention. Your content should be the main focus, not the advertisement.
- Don’t click on your own ads. This is a huge no-no and could result in an account ban. AdSense considers these clicks fraudulent, so don’t do it!
- Remember to conduct experiments when you can to see which ads perform the best.
- Keep tabs on ad performance and swap those out that underperform with new options regularly.
Keeping the above tips in mind as you experiment with creating and placing ads on your website will help you avoid common obstacles and see results faster.
AdSense and WordPress – Final Thoughts
If you have a website, inserting ads can earn you a little extra money once you have a lot of readers. It’s a great way to diversify your income stream. Even though it may not become your primary mode of earning money, it can still serve as a piece of the revenue puzzle.
And with AdSense, the whole process of placing ads has never been easier. First of all, Google makes it super simple with auto-ads. Then, there are third-party plugins to help you with the task as well. Or, you can insert them manually if you’d rather.
No matter the route you choose, just know that a little trial and error can go a long way to making the most of AdSense. But most of all, you can’t be afraid to try. Good luck!
How do you use AdSense in WordPress? Any additional plugin recommendations or tips? Share your experience in the comments!


2 Comments