Since the acquisition and continued dismantling of Twitter by a certain billionaire, an increasing number of people are interested in learning how to use Mastodon, one of Twitter’s more popular competitors.
How popular?
Well, the news recently dropped that Twitter now officially blocks links to Mastodon (and other social platforms) and flags them as malware. So, if Twitter’s new owner takes Mastodon seriously, maybe the rest of us should as well?
All snark aside, after users started quitting Twitter in droves and looking for a new home, Mastodon is one of the biggest winners of this exodus. If, like me, you don’t yet know much about this alternative social network other than its name, this is the right post for you. In this beginner’s guide to Mastodon, we will cover everything you need to know to decide whether it’s worth switching to and how to do it.
What is Mastodon?
So, what is Mastodon? The short answer to that question is that it is an open-source, decentralized microblogging platform that lets its users communicate with each other in a fashion similar to Twitter. Founded in 2016 by Eugen Rochko, the platforms has seen a huge surge in popularity in recent months.

To better understand it, let’s clear up two of the terms above first:
- Open source — If you are working in the WordPress sphere, you should already be familiar with this. It means that Mastodon does not belong to any one company but is produced by volunteers to make it available for free.
- Decentralized — In contrast to most established social networks, Mastodon is not one monolithic provider. Instead, similar to WordPress, the software allows anyone to host their own installation of it. Users can sign up at each node and use the entire network. Therefore, Mastodon is less one cohesive platform as more a collection of servers that all have the ability to talk to each other. This type of decentralization is one of the main ideas behind web3.
What Can You Do With Mastodon?
Mastodon is very similar to other microblogging platforms. In fact, it comes across as a bit of a combination of Twitter and Tumblr.
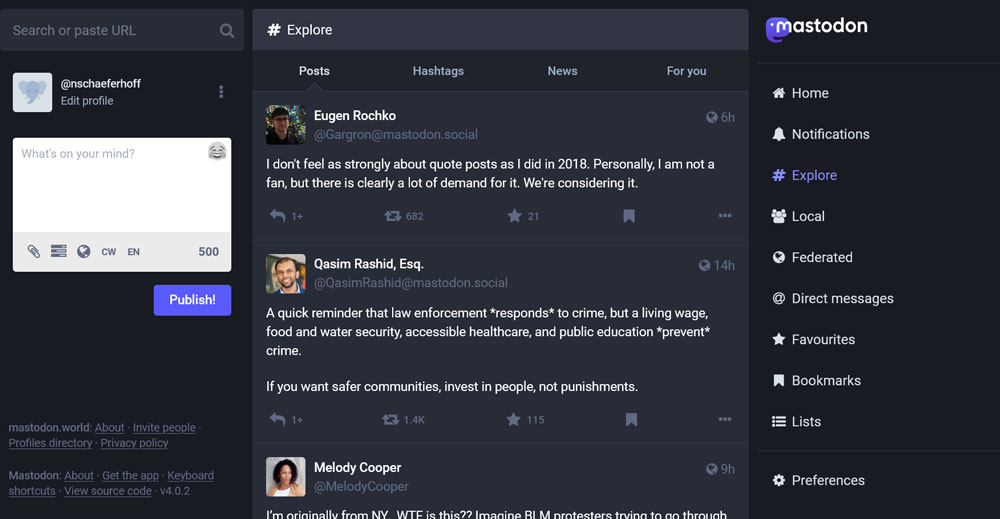
You can post content and share what others have published (called reblogging or boosting instead of retweeting). There are hashtags and lists, you are able to add GIFs, images, and videos to your posts, and do everything else you have come to expect from social networks.
You can also edit your posts out of the box, something that Twitter users waited a long time for. In addition, verification is easy, you simply need to add a special link to a website that belongs to you (more on that below).
Another way the platform differs from other social networks is in the topic of content moderation. Because Mastodon operates decentralized, it doesn’t have network-wide content rules. Instead, each server has their own policy that is enforced by the users who are running it. They also decide which other servers you can communicate with.
How to Sign Up to Mastodon
Because of how Mastodon works, you can’t just create a username and start publishing, you first need to find a server (called instance in Mastodon parlance) for yourself first. That server will also be part of your username.
However, don’t worry, you are not limiting yourself to your original instance. No matter which you use to sign up to Mastodon, you can always talk to users on other servers as well.
1. Find a Server
Alright, so your first step is to look for a server you want to join. You can find a list of available instances here. The page will also ask you for some initial information (language preference, whether you’d like a big or small instance, moderation rules) in order to give you relevant recommendations.

Pro tip: Use the Advanced mode. It allows you to sort instances by number of users and more.

If you are unsure which one to pick, here are some tips:
- Find your old audience — Use Debirdify to find where members of your existing Twitter audience hang out on Mastodon. That way, you can move to where there are already familiar faces.
- Check the most active instances — This list shows what servers are most active, so you can be sure that there is an actual conversation going on that you want to join.
When picking an instance, it’s important to note that, since the Twitter exodus started, many of the more popular servers have been overrun and are currently not accepting new members. Therefore, it might be better to join a smaller instance for the moment.
As mentioned, that does not limit you to only the members of that server. Also, you can always move to another server if you don’t like the one you joined initially. At the same time, make sure to read the rules of your instance beforehand so you don’t violate them and get banned.
2. Join Your Chosen Instance
Once you have figured out which instance you would like to become a part of and that it is currently accepting members, it’s time to hit the Create account button.
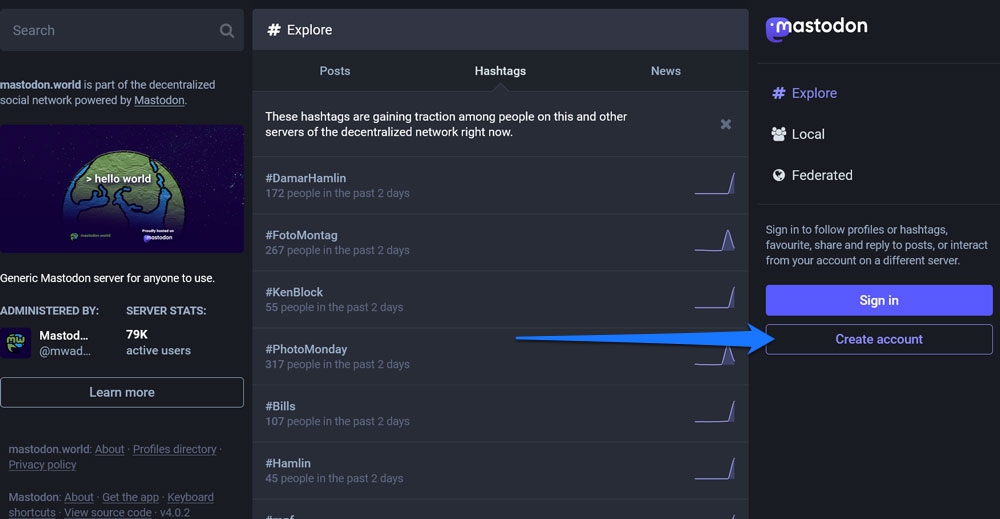
After a list of your server’s policies, you should eventually land on the sign-up form.
Input the required information. The fields are pretty self-explanatory. For the username, it makes sense to use the same as your other social handles if it is available. Agree to the privacy policy and hit Sign up.
Mastodon will send you a message to verify your email address. Click the verification link and you are done. Congratulations, you have successfully signed up to Mastodon!
As already mentioned, your handle always consists of both your username and server, e.g. @[email protected]. So, be sure to remember which instance you joined. You also need the full name to sign in to Mastodon from another browser or app. It only changes when you move servers.
3. Complete Your Profile
Like other social platforms, Mastodon gives you many different ways to share more information about yourself. You can do so using the Edit profile link in the upper left corner or when viewing your profile while logged in.
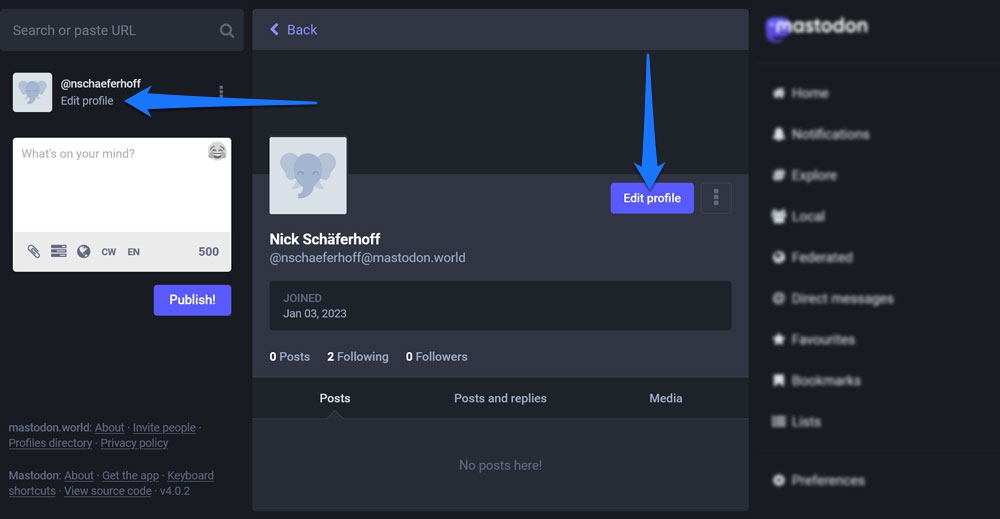
You can edit your display name, add a bio, as well as change your header and profile picture (called Avatar here).

You also have the possibility to make selections for your findability and follows, e.g. whether you want to manually approve follow requests, make your account discoverable for others, or hide who you follow or who follows you.
In addition, you can put additional metainformation to your profile using labels and content.

This is perfect for things like adding your website address or other Internet presences you think your visitors and followers should know about. Finally, there is an example link if you want to verify your Mastodon profile through your website.
You might also want to check out the menu item Featured hashtags.
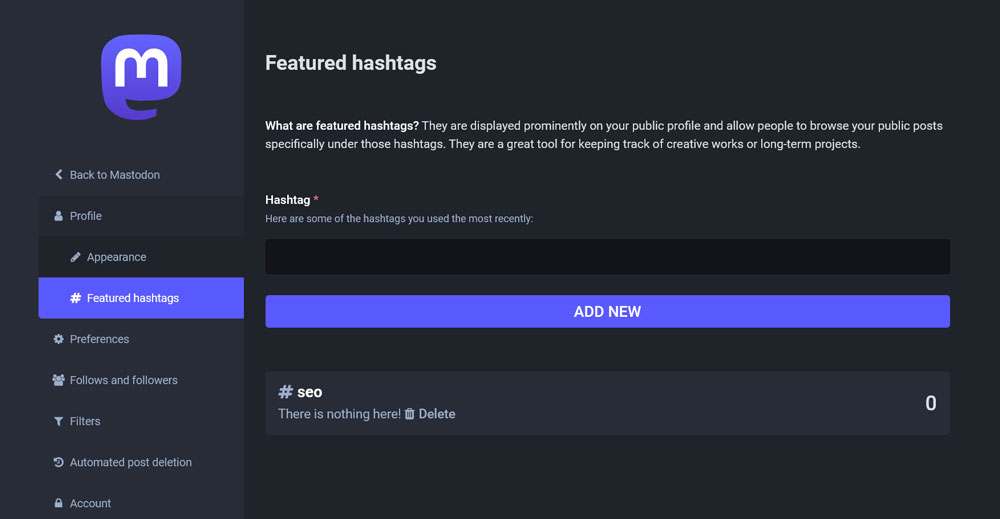
Here, you are able to input some hashtags that you use a lot. They will appear clickable on your profile and show visitors your public posts under that tag.
4. Learn How to Use the Mastodon Interface
Once your account has been established and you are logged in, you land on the main Mastodon interface.

It should look somewhat familiar and a lot of it is self-explanatory but let’s still go over it step by step.
Search Field, Profile, and Post Field
In the top-left corner you find the aforementioned search field. Here, you can enter hashtags, usernames (including the instance name!) and look for users or posts by URL. Below that, there is a link to your profile and one to edit it.

More importantly, you find the input field to create your posts. Simply start typing. There is a character counter (the number of available characters depends on your instance) and icon to add emojis in the upper right corner. In the bottom bar, you find options to add an image, change your privacy settings, add a content warning, or change the language. You can also mark media as sensitive and add an ALT description for visually impaired users.
Mastodon can even detect text from an image and automatically add it as a description (up to 1500 characters). The big Publish! button sends your message out to the world.
Main Feed
In the middle of the screen on your homepage you, of course, find the main feed. Here, you see posts from people you follow with the option to reply to, boost, favorite, or bookmark them at the bottom. You can also click the three-dot icon for more options.
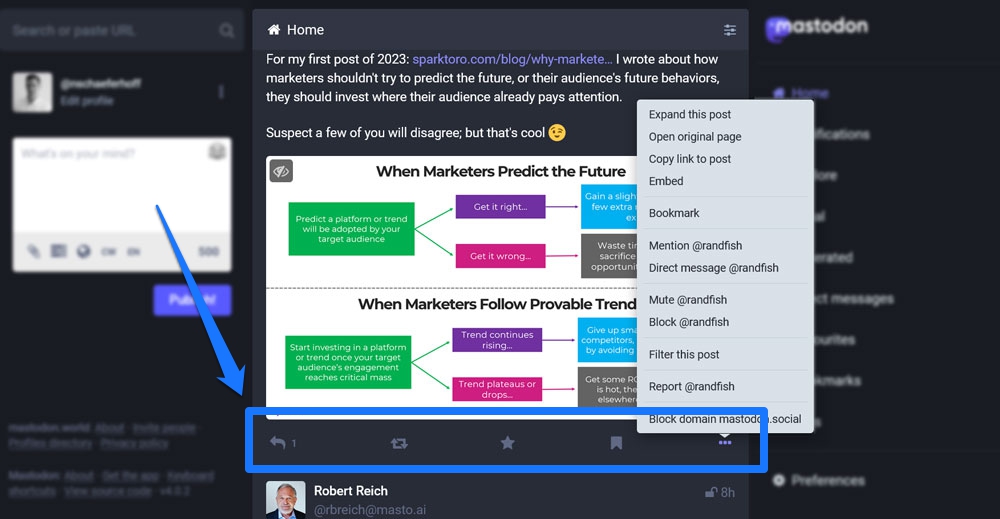
At top of the feed there is a loudspeaker icon for announcements from your server and some filter options to enable or disable boosts and replies to appear in your feed.
Mastodon’s Main Menu
On the right, you have the main menu. This, too, should look relatively familiar. Here is what you find unter the different menu items:
- Home — The link to your Mastodon homepage.
- Notifications — Here, you learn about new follows, mentions, and other things happening with your profile.
- Explore — Posts, hashtags, and news that are trending across the Mastodon universe as well as recommended profiles for you. Note that you can also find trending hashtags at the bottom right of the screen.
- Local — The most recent posts of the instance you are on.
- Federated — A live feed of posts being published in the Mastodon network.
- Direct messages — Here, you take care of your direct messages. Side note: It’s easy to mistake private and public messages when composing, so be mindful about that. PMs are also not encrypted and visible to server admins, therefore, they are not suitable for sensitive information or business dealings.
- Favourites — A list of posts you have favorited.
- Bookmarks — Posts that you have bookmarked.
- Lists — Gives you the ability to set up lists and add accounts to them to create custom feeds.
Pro tip: For even more options, go to the Preferences menu and tick the box where it says Enable advanced web interface.
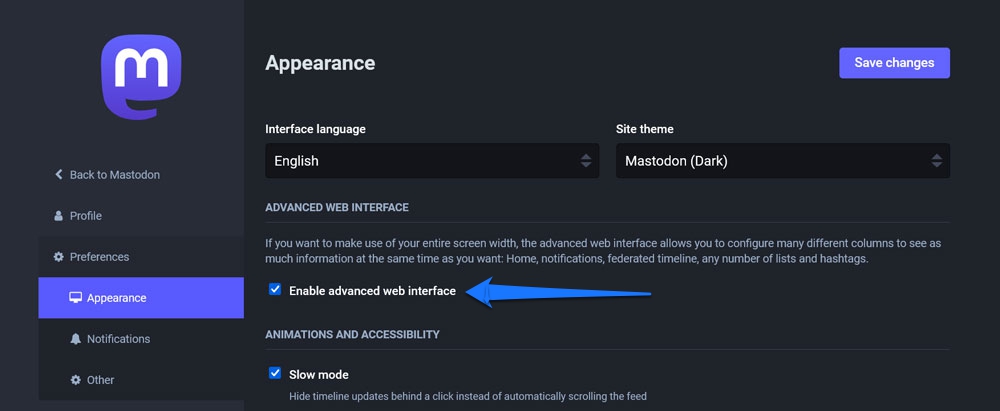
This changes the interface to something very reminiscent of Tweetdeck, which I am quite partial to.

5. Find Your Friends and People to Follow
Of course, what makes social networks most exciting and useful are the people you are connected to. So, if you miss all the friends you made along the way on Twitter, you probably want to see if you can reconnect to them on Mastodon. You have several options for that:
- Manually — If you know the handles of people that you are interested in, you can simply use the Mastodon search function. Type in their name or username and follow them from the results list.
- Using tools — Use the aforementioned Debirdify or Fedifinder to find people you follow on Twitter or that you have added to a list, then connect with them all at once. In addition, check the hashtag #TwitterMigration and filter it using “People you Follow”.
6. Start Posting
Now that you’ve got your bearings, you can properly start posting on Mastodon. Your first post can be a bit of background information on you, your interests, business or what else makes you tick. Post it, then pin it to the top of your feed. That way, visitors can get a good introduction to you and what to expect if they want to follow you.
Aside from that, do the same stuff that you do on Twitter. Share your thoughts and links, add hashtags and images, and engage with others.
Side note: Since Mastodon has seen growth only recently, it is not part of any of the social media scheduling tools yet. However, the program has a native scheduler that you can use to create posts in advance and have them go out at a later time.

7. Check Your Preferences
You find the preferences under a menu item of the same name.

It’s generally a good idea to go through them as there is a lot to discover, such as:
- Accessibility settings, such as slowing down animations
- What events you get e-mail notifications for
- Filter which languages you want to see content in
- Move your account to another server
- Filter and manage your followers and people you follow
- Settings to hide certain content
- Enable automatic post deletion
- Set up two-factor authentication
Again, have a look for yourself, there is more to discover.
Are You Planning to Move to Mastodon?
Twitter alternatives are clearly having a moment. The mismanagement over at the original platform leads to lots of users looking for a new home and Mastodon is one that can quickly feel familiar. It’s free, open source, and quite easy to use. While some things, like its decenetralized nature, take some getting used to, the overall functionality is very similar to what you are used to from Twitter.
So, should you make the complete jump over to Mastodon?
That’s a bit up to you. Twitter is not going anywhere for the foreseeable future. It’s up to you if you want to use Mastodon as a replacement or addendum to your existing presence. Whatever you decide, be sure to look me up! I’d love to connect.
Did you sign up to Mastodon and would like to share your experience and tips? Please do so in the comments below!


1 Comment