Image slider plugins are insanely popular. They make up three of CodeCanyon’s top 10 bestselling plugins of all time, and some of the free options have been downloaded hundreds of thousands of times.
It’s not hard to see why, either.
Image sliders are an important design element on many major websites. They allow you to add eye-catching images to your homepage, make your website feel more interactive, and improve navigation by linking to internal pages.
In other words, they can really improve user experience.
Today I want to take a closer look at the Meta Slider plugin. With more than 1.8 million downloads to date, and half a million active installs, Meta Slider is the most popular free image slider plugin for WordPress.
But why is it so popular?
Well, that all comes down to the plugin’s usability and functionality. In fact, Meta Slider combines the slider functionality of four slider plugins:
- Flex Slider 2
- Nivo Slider
- Responsive Slides
- Coin Slider
By creating a four-in-one “super plugin,” Meta Slider has far more design options and transition effects than your average slider plugin, hence its popularity.
Want to learn you how to use Meta Slider? Then read on!
Getting Started with Meta Slider
After installing Meta Slider, you can start building your image slider right away.
From the WordPress dashboard, simply head over to Meta Slider then click the Create your first slideshow button.
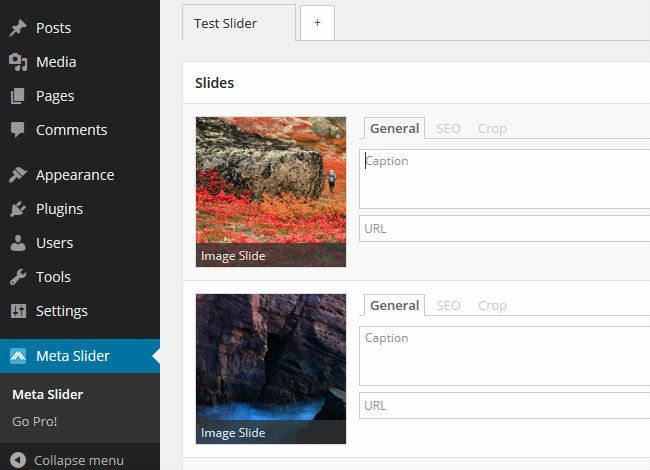
Be sure to give your new slider a name, then start using the Add Slide button to add your images to the slider.
Meta Slider lets you add images straight from your WordPress media library, and the process is incredibly intuitive. After selecting the image for the slide, you can add a caption, a link, SEO tags, and also define how you want your image to be cropped (should it be larger than the slider dimensions you’ll specify later). You can also add multiple images in one go.
If you want to change the order of your slides, Meta Slider supports a drag-and-drop interface for moving slides up or down, which is super-easy to use. Don’t feel restricted on the number of slides you can use—Meta Slider lets you add as many as you want.
Configuring Meta Slider
With your slides set up and correctly ordered, you can now start configuring your slider.
You can change your slider’s settings from the right side of the screen by using the Settings meta box.
To start, choose which slider plugin functionality you want to use—as I’ve already mentioned, Meta Slider supports the functionality of four image sliders for you to choose from. This is done by selecting one of the four colored tabs at the top of the Settings meta box.
Here’s a quick snapshot of what each of the four options brings to the table:
- Flex Slider: two transition effects and one slider theme
- Responsive Slides: one transition effect and one slider theme
- Nivo Slider: 14 transition effects and four slider themes
- Coin Slider: four transition effects and one slider theme
For a free plugin, that really is a lot of choice. A lot of the transition effects do overlap, though, so feel free to test a few options out by clicking the Save & Preview button. For example, three of the four options includes a fade transition effect.
From the Settings meta box, you can also specify the slider’s dimensions. If your images are larger than your slider dimensions, the plugin will automatically crop them.
Moving down to the Advanced Settings meta box, you can choose how the images are cropped.
You can also do this on an image by image basis by clicking the Crop tab on each slide in the Slides meta box. You can specify whether you want the image cropped from one direction (for example, all the excess is trimmed from the top of the image) or from the centre (an equal amount is taken from top and bottom). If you take this option, you will have to specify your horizontal and vertical cropping preferences, but it’s easy enough to get the hang of—you can always preview to make sure you’re doing it right.
The Advanced Settings meta box has over 10 settings for you to configure. This includes whether you want a hover pause, how long each slide is displayed, transition speed, and your slider’s opacity levels, to name just a few. Again, I recommend you view a live preview of your slider after setting each option to ensure you like the changes you’re making.
Finally, when you’re done click the Save button. Now go to the Usage meta box at the bottom, and save the shortcode provided for your image slider.
Paste this into any post or page and the slider is added automatically. Simple!
Final Thoughts
Meta Slider is a great plugin for adding basic image sliders to your website. It’s incredibly easy to set up and start using and produces some great looking results—very few free sliders can boast over 20 transition styles and four different themes.
You have complete control over your slides—their order, SEO, where they link to, and how they’re cropped—plus there is a relatively comprehensive number of settings to play around with to get the slider exactly to your liking. The drag-and-drop interface is easy to work with, and the live preview feature lets you make sure you’re on track.
Overall, a fantastic free slider plugin, I highly recommend Meta Slider!
Have you used the Meta Slider plugin? Share your thoughts and experiences in the comments section below!


1 Comment