Even after working with WordPress for more than four years, I still discover new things about the platform.
There are so many functions and features — some well known, others not so much — that it’s hard to try everything the platform has to offer. Plus, new stuff is added with every update, making it even more complicated to stay up to date.
Luckily, my work as a WordPress blogger allows me to explore things in detail in order to tell others about it (that means you, dear reader).
A feature that I haven been aware of for a long time but never really looked into is WordPress Multisite. If you know even less about it than I do (which isn’t much), Multisite means setting up several WordPress websites from one installation.
Yep, that’s totally possible… and useful as well!
Curious? Me too. So, if you’d like to find out more about WordPress Multisite and what it can be used for, the following article is for you.
Important Terminology
Before we dive in, first we need to settle on some vocabulary in order to understand one another.
In the post, you will hear the words Network and Site a lot. The former describes a Multisite installation that is made up of several blogs or websites. The latter means a single one of those sites.
Capisce? Let’s move along.
What Is WordPress Multisite?
Let’s assume you have several websites running on WordPress and they all reside on the same server. How did you put them there?
You probably downloaded the latest version of WordPress, uploaded it via FTP, created a database and user, and then ran the WordPress install, right?
So, while all your sites share a server, they each have their own core files, databases, wp-config files, themes, plugins, and other things that belong to a WordPress site, am I correct?
Well, Multisite is similar to this situation only that instead of having a dedicated install for each site, you only have one WordPress install that is used by all of your websites at once.
Basically, it means you can create a network of sites with the same effort it takes to create one. And yet, using Multisite is just as easy as using WordPress in the conventional way.
How Is Multisite Different From A Single WordPress Install?
A WordPress Multisite install and a single install are not all that different. However, you will find differences in three main areas:
- The WordPress admin screen
- Files found in the WordPress directory
- The WordPress database
Dashboard Differences
When running a Multisite install, you will find that some parts of the back-end are changed.
First of all, there is an entirely new dashboard for the Superadmin, which is a user role only found in Multisite.
This stands above all others — including site admins — and has some special capabilities. For example, the Superadmin is the only one who can:
- Install themes
- Manage plugins
- Add new sites
That’s right, in a Multisite install, normal site admins are unable to download and install themes and plugins. All they can do is use the resources already part of the site network.
Don’t worry, we will go into this in more detail below.
Changed File Structure
Multisite also introduces changes to the familiar WordPress file system, in particular, wp-config.php and the uploads folder found in wp-content.
The config file of a Multisite network requires additional lines of code to make it work.
In addition to that, this type of WordPress install will create subfolders inside the uploads directory for managing media files for each site on the network separately.
Don’t worry if this sounds complicated, it is all done by WordPress automatically.
Database Changes
Running a WordPress Multisite also has consequences for the database. Again, this is not something you need to worry about or do manually but it is still worth mentioning.
Inside the WordPress database, most of the standard WordPress tables will be duplicated for each subsite created.
While that might result in a lot of tables, it is necessary to keep the content of each site separate.
Advantages Of Multisite And Use Cases
While all of this may sound neat and dandy, why should you even consider going Multisite? I mean, isn’t the normal WordPress install good enough? Why complicate things?
Well, Multisite offers a number of advantages for people running more than one site:
- It enables you to run several websites with the same login credentials. That means you can log in once and take care of all websites from the same place instead of juggling multiple usernames and passwords. Plus, even though everything is technically one site, with domain mapping each subsite can have its own web address (more on this below).
- Every theme and plugin is stored just once, which can be a real space saver. Plus, you can update them at the same time for all websites instead of doing it separately.
- Due to their similar file structure and code base, running a Multisite is not very different than running a single install. At the same time, creating and managing sites becomes as simple as adding posts and pages.
- Users can be easily shared across sites and provided with different levels of access while the control stays with you. That way they can have capabilities close to an admin role without being able to break their site easily.
WordPress Multisite offers three main use cases:
- Managing a network of blogs or websites by yourself
- Centrally handling several client websites as a developer
- Setting up a network in which others can create their own sites
How does that look in real life? Well, a number of examples for large-scale use of WordPress Multisite already exist.
One of them is the blog network of the New York Times, with many sites run by different teams.
Another is WordPress.com, the hosted version of WordPress, which enables users to create their own website within the WordPress.com network.
Large businesses have also started setting up Multisite networks to provide dedicated sites for different locations and branches.
Site owners can also use the feature to host discussion forums, online shops or support desks on subsites. Pretty useful stuff if you ask me!
When Not To Use Multisite
However, as cool as it sounds, Multisite isn’t for everyone. The setup has multiple disadvantages as well:
- If you only plan to run one site, WordPress Multisite really isn’t anything you need.
- The feature cannot be implemented for websites that are located on different hosts or servers. Likewise, if you want to give subsites their own database or IP address, this is not for you.
- Since everything is hooked to one install, when something breaks or you’re hacked, it can easily take out all of your websites at once.
- The reduced capabilities of site admins means installing themes and plugins is always your responsibility.
- Multisite has certain server requirements that not all hosts meet. Furthermore, for that and other reasons, it can be tough to move sites to another server (though it can be done). Plus, not all plugins are able to deal with a multisite environment.
If you think Multisite is not for you, but you still want the comfort of managing several sites from a central interface, you might want to look into ManageWP or InfiniteWP. Both are third-party solutions that provide this functionality.
How To Get Started
If you are still here, I will assume you decided to give WordPress Multisite a try. Good for you! To make it easier, in the following, I will go over how to set up a Multisite environment.
Subdomains Vs. Subdirectories
A Multisite can be set up in two different organizational structures.
In the first, each site will be located in a subdomain of your URL. That means if your main site is http://example.com, your sites will be reachable through an address like http://subsite.example.com.
The aforementioned WordPress.com handles it this way (unless you purchase an additional feature). This structure comes with some special considerations such as the need to activate wildcards subdomains on your server in order to work.
The second option is to go with subdirectories. In this case, all sites get appended to your site address like posts or pages and would end up looking like http://example.com/subsite.
In contrast to subdomains, subdirectories only need WordPress pretty permalinks enabled.
It’s important to note that if your site is more than a month old, WordPress only allows you to use the subdomain option in order to avoid conflicts with existing URLs.
I find this a little irritating because users could just as well restructure their site and move conflicting pages or posts elsewhere. However, that’s the way it is at the moment.
There are also manual ways around this limitation, but it takes a bit of effort.
Creating A Brand New WordPress Multisite
Installing a Multisite environment is very similar to setting up a single site. However, it comes with a couple of additional steps.
1. Download the latest version of WordPress and run the 5-Minute Install.
2. Open wp-config.php in the main folder and look for the following line toward the end of the file
/* That's all, stop editing! Happy blogging. */
3. Above that line, paste the following piece of code:
/* Enable Multisite*/
define( 'WP_ALLOW_MULTISITE', true );
4. Save and re-upload the file if necessary.
5. Log in to your site with your WordPress admin account.
6. Go to Tools > Network Setup to start setting up a Multisite.
7. Choose your preferred URL structure, network title and the email address of the network administrator (aka Superadmin).
8. Click Install.
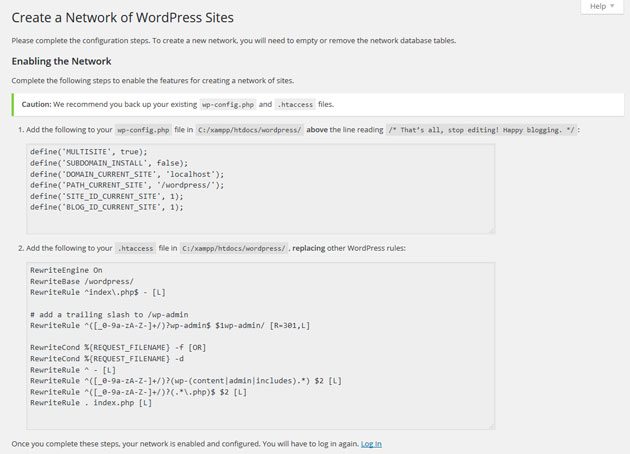
You will now be asked to add some code to both wp-config.php and your .htaccess file.
Both files can be found in your WordPress directory. Remember to back up the existing ones before making any changes.
After that open each file and make the edits as explained on screen.
Be aware that .htaccess might be hidden on your server and you will have to enable Force show hidden files in your FTP client to edit it.
Also, the new code needs to replace everything already present between the <IfModule> and </IfModule> tags in your .htaccess file so be sure to do so.
After you are done editing, save and re-upload each file.
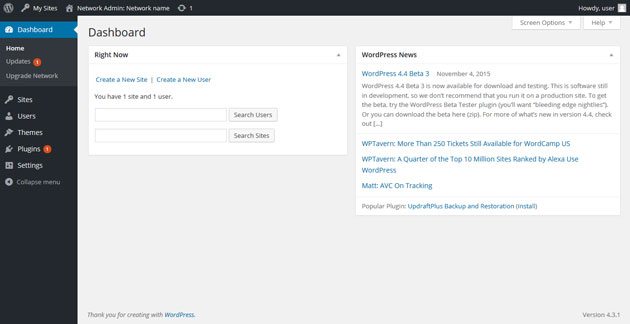
That’s it. Your new multisite will now be installed. Reload the site and you will be asked to log in again. Then you will be greeted by a changed back end.
Congratulations!
Setting Up Multisite On An Existing WordPress Website
For established sites, the steps to create a network are pretty much the same as above. The only difference is that you might be limited in your choice of URL structure.
Of course, backup your site before you try any funny business with your existing website!
Managing Your Network
As mentioned, administrating a Multisite is a little different than in a single install. To help you over the first hump, here is a quick overview of what you can do in your new network and where.
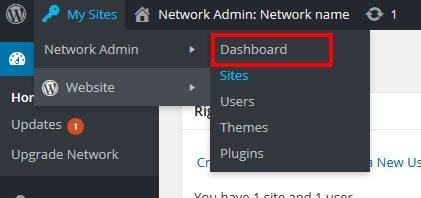
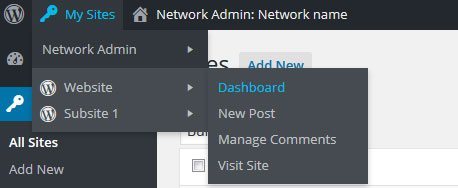
All administration tasks for the network are done within the new admin screen. When logged in as the Superadmin, you can always get there via the admin bar and My Sites > Network Admin > Dashboard.
Creating New Sites
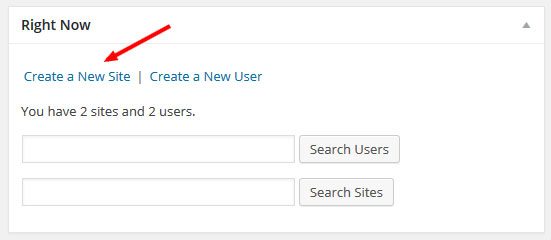
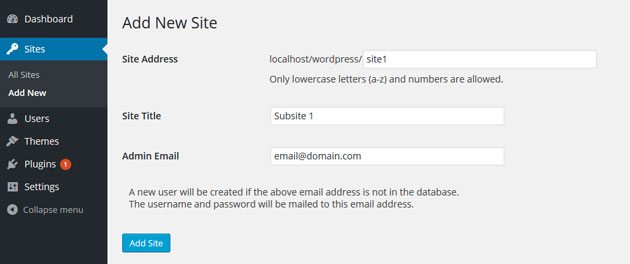
Setting up a new site in your network pretty much works the same as creating a post or page. Simply go to Sites > Add New or use the link in the new dashboard widget.
In the next step, you will be asked to input a site address, name, and admin email. The address will appear according to the URL structure you have chosen.
After that, simply click Add Site and you are done.
The websites in your network will show up under All Sites, thereby furthering the similarities to managing posts and pages.
Site admins can also see every site they are in control of when hovering over My Sites in the admin bar.
Installing Themes And Plugins
As I said before, only the network admin has the ability to install themes and plugins and make them available for sites within the network.
The install works the same as always. Simply go to Themes > Add New or Plugins > Add New and follow the usual steps.
However, after that there are some additional concerns.
Managing Themes
Installed themes can be enabled and disabled network wide or on a per-site basis. Only when a theme is enabled for a site or the site’s network can it be activated there.
One way to make themes available for your network is to click the Network Enable link during install.

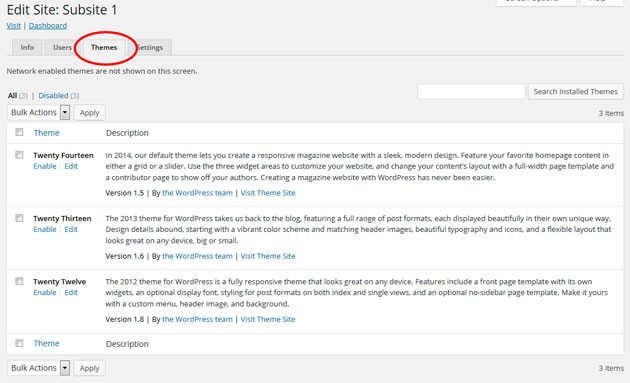
Activating themes for single sites only is a little more elaborate:
1. Go to Sites in the network admin back end.
2. Hover over the site you want to activate a theme for and click on the Edit link that appears.
3. In the next screen, choose the Themes tab.
4. Click Enable for each theme you want to make available for this site. You can also mark the check boxes of several themes at once and choose Enable or Disable from Bulk Actions. Don’t forget to hit Apply!
The chosen themes will now show up under Appearance > Themes for that site.
Plugin Management
In contrast to themes, plugins can not be limited to individual sites. Once installed, they are available for the entire network. However, you can select whether to make plugins mandatory for all sites or let site admins choose to activate them or not.
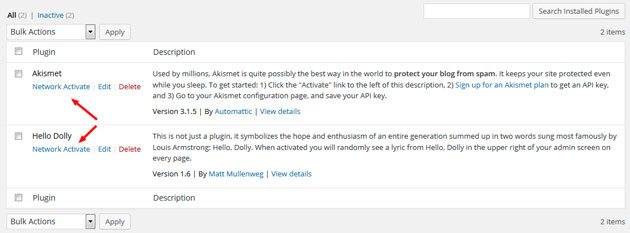
To run a plugin on every site in your network just hit Network Activate during installation or in the plugin menu.
Be aware that if you do, admins will be unable to deactivate any plugin switched on by the Superadmin.
If you only install a plugin without network activation, it can be activated by someone with admin permissions for a particular site.
Site admins only have activate and deactivate options. Deleting or updating plugins is reserved for network admins.
Updating Components
Talking about Updates: New versions of WordPress core, plugins, or themes have to be taken care of by the Superadmin.
In principle, this works the same way as in a normal WordPress install. However, there is an extra step involved.
After getting all components up to date, you need to go to Dashboard > Upgrade Network and click the big gray button there to pass the updates onto your sites.
Good job!
Network Settings
Under Settings you can find configuration options for your network:
- General Settings
- Change network name
- Superadmin email address
- Registration Settings
- Permission level for site admins to add users to the network
- Enable/disable welcome emails for new users
- Limit user registration to certain email domains
- Ban email domains from registration
- New Site Settings
- Content of welcome emails for registered users
- Default content of new sites
- Upload Settings
- Space available for uploads
- Permitted file types
- File size limit
- Language Settings
- Default network language
- Menu Settings
- Enable and disable access to the plugins menu for site admins
Settings for single sites still have to be adjusted from each site’s dashboard.
Helpful Plugins For WordPress Multisite
Last but not least, here are a number of plugins that make running a WordPress Multisite a little easier. Not that it was very complicated to begin with.
Multisite Enhancements
As the name suggests, this plugin enhances Multisites with a few helpful features. These include:
- Ability for site admins to install plugins
- Show which themes and plugins are active on which sites
- Additional options for the Superadmin admin bar
That and more make the lives of network admins a little easier.
WordPress MU Domain Mapping
Domain Mapping is the ability to provide sites with their own network-independent URLs.
For WordPress.com users, this is a paid feature but this plugin allows you to do it for free (yay!).
User Role Editor
This nifty piece of software enables you to make changes to user roles and capabilities. That means you can give additional permissions to users that are usually reserved for the Superadmin.
The plugin also lets you create new roles with completely customized abilities and more.
User Switching
User Switching is another plugin for enhanced user management. This one lets you swap between different user levels without the hassle of logging out and in again.
Pretty useful for checking what other people are seeing when logged into your site and for troubleshooting.
WP Migrate DB Pro
One of my all time favorite plugins for database migration is WP Migrate DB. It also comes with a Multisite addon.
The enhanced plugin allows you to export a network subsite as a single SQL file that can then be imported as a single site install. The team is also working on a feature to push from subsite to single site directly.
Yoast SEO
I talk about this plugin so often, it really needs no introduction. However, you might be delighted to hear that Yoast SEO supports Multisite. Once network activated, all sites on your network will enjoy its powerful features.
WP Super Cache
Another contender that needs no further explanation is WP Super Cache. Caching is one of the best ways to reduce page load in WordPress. WP Super Cache can be easily set up for your network and do its magic for all blogs and websites.
In A Nutshell…
Hopefully in this post you have learned as much about WordPress Multisite as I did. I was pretty amazed to learn what a powerful feature it is and have it right at my fingertips. Who knew it was possible to build more than one WordPress site per install and that it was so easy? Certainly not me.
Building a site network does away with a lot of the back and forth that’s usually involved in taking care of multiple WordPress websites. It is quite practical being able to take care of everything from one central location.
In addition to that, Multisite is pretty straightforward to set up and manage. Anyone who has worked with WordPress before will quickly find their way around the changed interface.
While this feature is not suitable for everyone’s needs, it certainly is worth keeping in your repertoire.
Have you used Multisite before? Any thoughts to add? Please do so in the comments below!




11 Comments