Moving your WordPress site to a new domain can be as exhausting as moving homes. In fact, it’s even more exhausting! At least when you move homes you don’t have to worry about the harm it’s going to do to your SEO.
And this is the scary bit: when we move our WordPress site, it’s natural to get anxious that all the hard work we put into our SEO campaigns is going to go to waste. Our rankings will plummet, and we’ll lose visibility.
The good news? That’s not going to happen if you do this right.
The bonus good news? In this article, I’m going to show you exactly how to keep your SEO when you move into a shiny new WordPress domain. Let’s take a look.
1. Create a Complete Backup
First things first — you need to create a complete backup of your site. WordPress put together an ace article on how to do this the easy way, while there are also lots of handy plugins you can use.
These include BackUpBuddy, VaultPress, and BackWPup.
2. Commence Migration
And so the long journey begins!
To kickstart the migration process, install the Duplicator plugin on your old site. Activate it, and then check your WordPress admin for the Duplicator menu. Click it and then select the “Create Button.”
This button commences the duplication process, at which point the plugin asks you for a name for your package. It’s up to you to pick any name you like, but you can stick to the default name if you wish.
Then, the plugin begins to put together a zip package of all your files and WordPress database. If you have a lot of content, this could take some time, so you might want to work on other tasks while it’s ticking over in the background.
Once it’s all done, the Duplicator packages screen opens. Simply download the installer files and the package before opening your FTP program.
Then, connect your new site, making sure the directory for your new site is totally empty.
Upload your package zip file and the installer.php file to your new site, before launching the installer.php in your preferred browser.
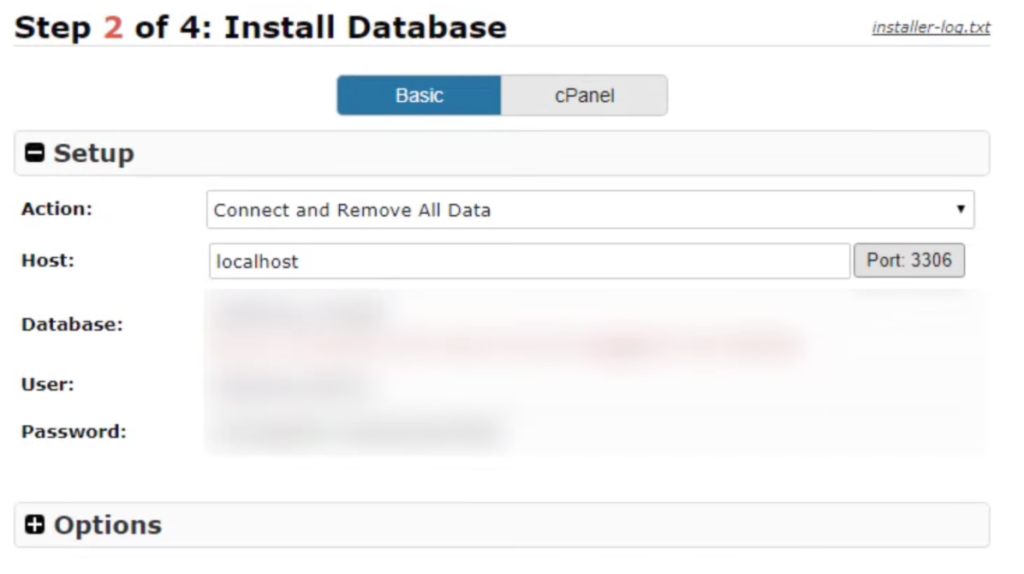
Here, you’ll be asked for the database info for your new website. You also need to tick the Table removal box while making sure the database doesn’t contain anything (this is important, as you don’t want to leave stuff behind).
Next, you will be asked to check the “I have read warning and notices” box. Read the section first to make sure you agree with everything, and then check it.
Then, tap the “Run Deployment” option. At this point, the zip package will be extracted, your database will be installed in your new site, as will your WordPress plugins and themes. If your site is pretty big, this process will take some time. Again, you might want to make headway with other tasks in the meantime.
Once it’s done, you will be shown the update page, where you need to update the URLs. Your trusty duplicate takes a guess at updating some of your URLs itself, but it won’t know them all. As such, you will need to enter some URLs manually.
Once all this is down, the Duplicator kindly reminds you that there are post-install steps to take, the first of which is saving your WP permalinks. To do this, you need to login to your new WP admin, open “Settings” and click “Permalinks.”
Save, and then delete the following files from your root directory:
1) installer-log.txt
2) installer-data.sql
3) installer.php
The last thing you need to do is make sure that nothing is missing or broken — posts, pages, and links. If everything is working perfectly, you’ve just moved your WordPress site into a brand new home while retaining your SEO. Congrats.
However, there are still a few more things to do before you crack open the champagne.
3. Set Up Permanent 301 Redirects
Key to a seamless move from one WordPress site to another is the setting up of permanent 301 redirects. If you don’t do this, search engines and users won’t be able to find your new site when they land on a piece of content. Worse still, your bounce rate will take a hit, which can be bad for SEO.
Setting these 301 redirects up is simple. Pop into your wp-admin or wp-includes folder, open your .htaccess file and then paste this code:
Once these changes have been made, head over to your old site. If you’ve done this properly, you and everyone else will be automatically redirected to the new site. If you are not redirected, check again to make sure you pasted the code exactly right.
4. Update Your Incoming Links
This one is a bit tougher and theoretically quite exhausting, primarily because it’s part of your off-page SEO strategy.
In other words, you’ll need to chase up websites who have linked out to you in the past and kindly ask them to update their links.
Before all that, however, you can at least change the incoming links you’re in control of.
For example, check your social media accounts and change the links so that they direct to your new site. This goes for Facebook, Twitter, Instagram — all of it.
You need to change your email signatures, too, so that they link to your new website.
5. Tell Google About Your New Address
Just like you have to alert the government when you change house address, you also need to alert Google when you migrate your WordPress site if you want to keep your SEO.
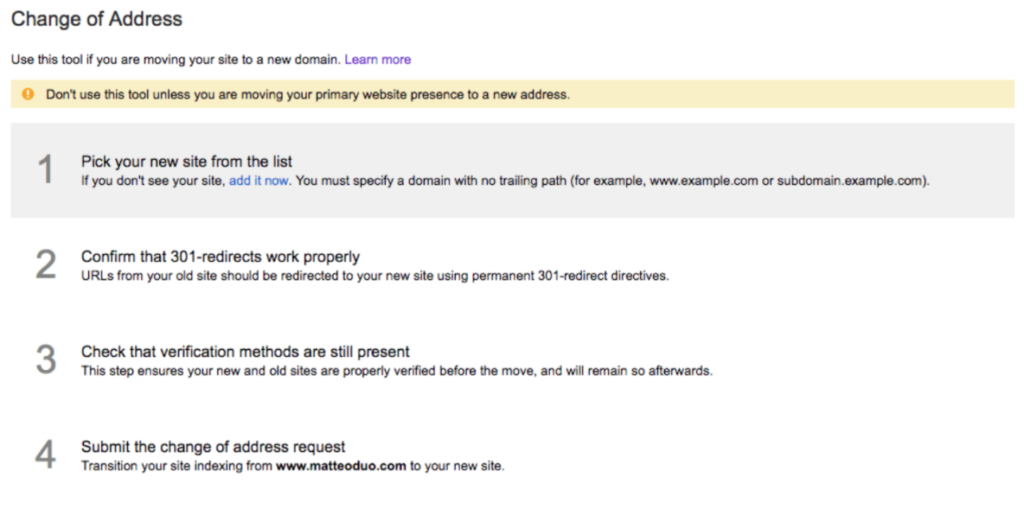
This is super easy to do. Pop over to your Google Search Console, select your old website and then click “Change Address” at the top right.
Google Console will walk you through the next four steps, which look like this:
6. Add a New XML Sitemap to Google
Google will need an updated list of your pages and content once you’ve moved to a new domain. To provide it with this list, you need to index your pages and content, which you can do via a new XML sitemap.
For this, you can use a plugin such as Yoast SEO.
Once you’ve generated a new XML sitemap, copy your new URL to your clipboard, before launching Google Console again. Then, click “Crawl” followed by “Sitemaps.”
You will see a red button at the top called “Add/Test Sitemap.” Simply add your new XML sitemap and press submit.
Et voila! To use an analogy, you’ve now moved house with nothing missing or broken, your Internet is all hooked up – and a glass of champagne is waiting for you to celebrate.
In other words, you’ve kept your SEO. Phew. Now, it’s back to climbing those rankings.
Got any tips you’d like to add? Feel free to leave a comment!


1 Comment