WordPress has already conquered the Internet, and is slowly but surely turning its attention towards the world of apps.
This is nothing new: there are plenty of impressive services out there promising to turn your WordPress website into a full-blown app, suitable for inclusion on Google Play and the App Store.
One of the best of these services is AppPresser, which I discussed several months ago.
Well, the people behind AppPresser are back with their revolutionary new app builder, Reactor. This combines nearly a year’s worth of feedback from AppPresser to give WordPress users exactly what they want when building an app: namely, better performance, a user-friendly experience, offline capabilities, and more native features.
Co-founder Scott Bolinger was kind enough to put together a Torque app as a featured demo so Torque readers could see Reactor’s capabilities — check it out on Google Play, or you can view a demo of it here.
I’ve also been able to test Reactor out for myself, so that I can show you all how easy it is to use.
If you’re looking for a powerful tool to turn your website into an app in the most painless way possible, look no further than Reactor.
Getting started
Getting started with Reactor is incredibly easy: the entire building process of your app is done using the Reactor interface, called the Reactor: Builder. This looks very similar to the WordPress interface, so regular WordPress users will feel right at home.
For those of you who get stuck, there are some very helpful video tutorials, conveniently located by clicking the Reactor dashboard — I watched these to help me find my bearings, and found they covered everything involved in the app-building process while remaining short and to the point.
Before you can start building your app, though, you will need to install the Reactor: Core plugin on your WordPress website. This is done in exactly the same way you would install a standard WordPress plugin: from your WordPress dashboard go to Plugins, Add New, search for Reactor, then hit Install Now and Activate Plugin.
This will connect your website up to Reactor, and you can follow a log in button to take you directly to the Reactor: Builder to start putting your app together.
Adding pages
Reactor makes it incredibly easy to get started with building and adding pages to your app, even for first time users like me. The interface is very easy to use, and clearly inspired by the WordPress dashboard. As the Reactor app builder is aimed at WordPress users, I found this to be a nice touch. It also made me feel like I knew exactly what I was doing — there was nothing to get intimidated about.
To add a page to your app from the Reactor interface simply click App Pages > Add New. From here you can title your page in exactly the same way you would a new WordPress page/post.
However, this screen also allows you to select what type of page you want it to create. This is done from a drop-down menu, with nine page types to choose from:
- Text/HTML
- List
- Media List
- Card List
- WooCommerce
- WooCommerce Two Column
- Page From Site
- Photo Gallery
- Google Map
If you want to create a brand new app page from scratch — in other words, a page not found on your WordPress website — you can do so by selecting the Text/HTML option from the drop-down menu. After making this selection, you can type up your page using a visual editor, which allows you to type and to add HTML tags where relevant. This is a handy feature as it allows you to create app-specific pages for your app.
However, the real excitement starts when you start to pull through your WordPress content into the app. You can do this by selecting any of the “list” options — List, Media List, or Card List. See below to see what each list type looks like.
After doing this, you can then select what content from your WordPress website you want to be pulled through to the list page. Your list can display all posts, pages, or custom post types, and you can also choose to display content saved under specific categories or with certain tags attached — you can also define which posts to display using a slug.
If you are trying to create an app from a WooCommerce store, there are two list types suitable for WooCommerce product pages — WooCommerce and WooCommerce Two Column. These are similar to the other list types, but with a style more appropriate for listing WooCommerce products.
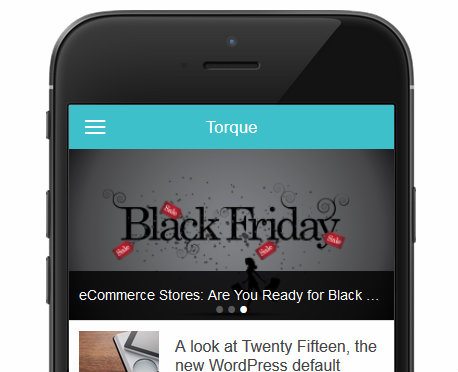
All list types come with the option of including a slider that displays your post’s featured images at the top of the screen. App users will be able to scroll through the slider by swiping their touch screen.
Although you can’t preview what your page looks like at this point — possibly something the developers could add in future updates — the slider looks great, and below is a screenshot taken from the final version of the Torque app.
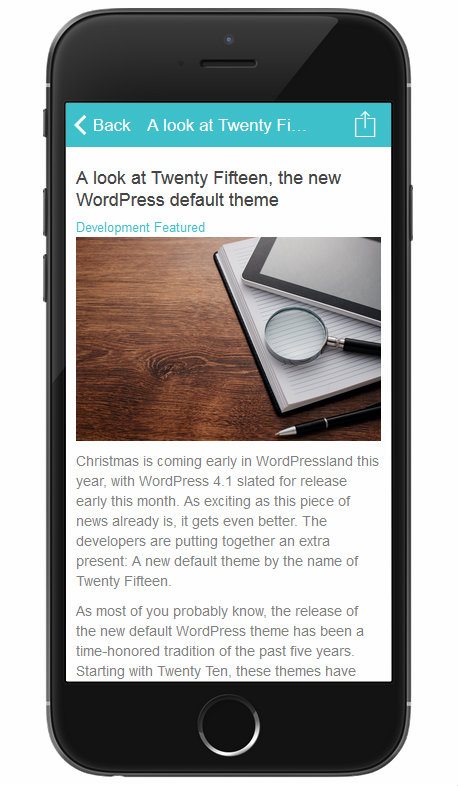
When you’ve settled on how you want the list page to look, you can then choose how the actual content pages will look on your app, for when a visitor clicks on one of the links — this is called the Full Page View. At present there are three options: Default, Card View, and a WooCommerce Product styling option. Each full page view option also supports social sharing buttons underneath your content.
Again, although you can’t preview your full page view choice, here is a quick screenshot of the live Torque app to show you how our content is displayed.
And that’s all there really is to adding a list page to your app! I found the process to be quick, simple, and intuitive — really impressive stuff.
As well as building “list” pages from your content, you can also add an individual page by selecting Page From Site and specifying the page id number, or a Photo Gallery from your media library by adding a tag to your images.
Building a menu
With a few pages created, the next step is to focus on navigation, and build a menu for your app — it’s worth pointing out that even if you’ve published your app pages, they won’t feature in your app until they have been added to a menu.
To add a menu, simply head over to the App Menu section of the Reactor dashboard.
The process for building a menu is very similar to creating a menu using WordPress: simply tick the checkboxes of all the pages you want to include, then press Add to Menu.
When you’ve done this, you can play around with the menu structure by dragging and dropping your app pages to re-order them. To make an app page the home page, all you have to do is make it the top item in your menu — there is no separate section for this as there is in WordPress.
Each menu item is expandable, which allows you to add a small description and an icon to each page.
To add a menu icon is really easy. Reactor uses the Ionic Framework, so to see all the supported icons head over to the ionicons website. When you’ve seen an icon you like, click it to get the icon text, then paste it into the Menu Icon field. There are more than 500 icons, so it’s easy to find an appropriate icon for each page.
Hit save and you’re all done. If you’ve built a menu in WordPress before, Reactor uses the same process, and this makes it really simple to build the navigation structure for your app — again, it took just minutes.
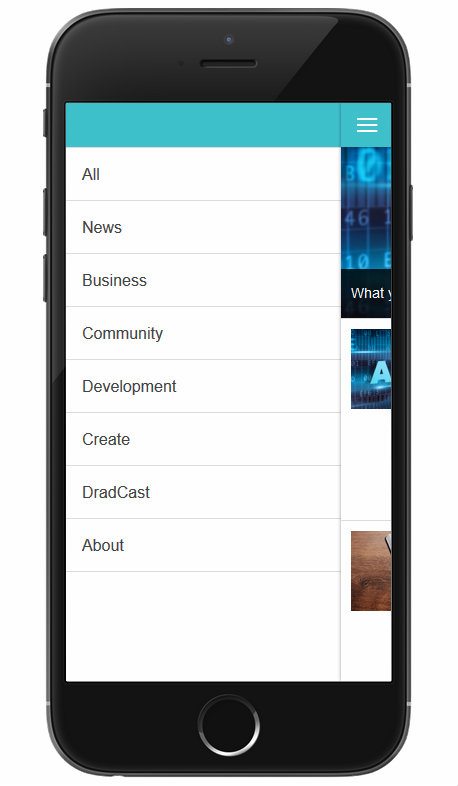
If you want to see what a menu looks like on a live app, here’s another screenshot from the live Torque app.
Designing and configuring your app
Next up, you get to actually design and customize your app — this is done by heading to the App Design section, then clicking Add New.
This process is really easy, with an intuitive interface allowing you to set the background color of the toolbar, as well as the color of the font in the toolbar — it should take no more than a couple of minutes.
You can see the changes you are making thanks to the live preview feature, although this demo app is populated with placeholder content rather than your own.
For more advanced users, you are also able to add custom CSS from this section.
When you’re happy with the design of your app, it’s time to put everything you’ve done together and configure the app. To do this, simply head over to Apps and click on Add New.
From this screen you can add a name for your app, as well as sync it up with your WordPress website — be sure to add the URL of the website you installed Reactor: Core. There are also some drop down menus, which allow you to select the menu you want to use, as well as the design to be used.
Again this process was remarkably simple, and even first time users can race through the building process with confidence.
Finalizing your app
When you’re happy with everything, the final exciting step is to get your app built.
This is done by going to Apps then PhoneGap Account from the Reactor dashboard. To build the app, you will need a PhoneGap Auth Token, which you can get by going to the PhoneGap Build — you can get an Auth Token for one app free of charge, but for additional apps you will incur a charge.
For those of you not aware, PhoneGap Build is a new service from Adobe that allows you to quickly and easily build mobile apps using HTML and JavaScript. This allows you to create an app that is cross-compatible — it works on iOS (Apple), Android, and Windows Phones — and also lets you make use of native device functionality. To learn more, click here.
When you have your Auth Token, paste it into the relevant field and you’re good to go.
To build your app, simply tick the checkbox that says Build App and hit Update. If you make changes to the structure of your app that you want including in the live app — in other words, adding a page, or changing the menu — you can also click to update your live app. Note that this isn’t necessary for when you add new posts to your WordPress website, as these will pull through into the app automatically.
To add the finishing touches to your app, on this screen you can upload an icon for your app and an image to be used as the splash screen — the image displayed when the app is loaded.
You can also choose whether you want to display adverts in your app, and configure your Google Analytics account to track the performance of your app.
And that’s it, your app is all done. You can test out your brand new app on your mobile device by scanning the QR code at the side of the screen. It’s well worth doing this and testing it out extensively before submitting it to the app stores.
Verdict
Reactor is a fantastic app builder that looks set to revolutionize the app-building process. From start to finish the process was remarkably straightforward, and that made Reactor really enjoyable to use — and that was before I was able to test out some of the more specialist features, including push notifications and in-app analytics using Google Analytics.
However, what really counts is the end product, though, and Reactor passed on all accounts: the app built looks stunning, with our very own Torque branding, an interactive menu and slider, and beautifully formatted content pulled straight from the WordPress site. If you want a different way to read all the new articles we publish, it’s well worth downloading it from Google Play — it’s free of charge, of course!
If you want an easy-to-use and affordable way to reach new audiences with the content on your WordPress website, I would highly recommend Reactor.
Reactor co-founder Scott Bolinger will do his best to respond to any questions Torque readers have, so if you have one, fire away in the comments section below!
 Shaun Quarton is a freelance blogger from the UK, with a passion for online entrepreneurship, content marketing, and all things WordPress.


19 Comments