Email remains one of the most effective marketing tools. Having a direct channel for connecting with your audience is a priceless way to bypass all the noise on the Internet.
Among the many email marketing providers is MailChimp. The service is a favorite for bloggers and small businesses. And the best part is, it completely free to use up to 2000 subscribers.
In this article we will go over the basics of using MailChimp for email marketing. Our goal is to help you create your very own MailChimp account, start collecting email addresses on your website, send out your very first email campaign, and everything in between.
You with me? Then let’s go.
Why MailChimp?
MailChimp is only one of many solutions out there. So why should you go with this service?
- As mentioned, MailChimp is free for up to 2000 subscribers on your email list and 12,000 monthly emails
- The service is trusted by more than seven million users
- It integrates extremely well with WordPress, as you can read here
- MailChimp is very easy to use and lets you create HTML email templates without any coding
- It provides a superior user experience
Getting Started With Using MailChimp for Email Marketing
As a first step, you will need to set up a free MailChimp account. For that, simply go to the MailChimp website and click Sign Up Free in the upper right corner. Enter an email address, user name and password, and click Create My Account.
After clicking the link in your confirmation email, you need to input some personal info (no credit card required, don’t worry). Once completed, you automatically move on the main menu.
1. Getting to Know the Dashboard
The MailChimp dashboard is the heart and soul of your MailChimp account. But hey, you are a WordPress user, so what else is new?
- Create and Send Campaign: Here’s where you set up your campaigns. This is what MailChimp calls an email broadcast.
- Create a List: This list is where your subscribers are stored.
- Start Building Your Audience: This is where you build forms where people can sign up to your list(s) on the web.
- Invite Your Colleagues: You can have multiple people work on one MailChimp account. It’s very useful, but beyond the scope of this article.
2. Create Your First Email List
While we all know that “the money is in the list,” before you can start putting anything of value in it, you have to create it. So let’s do it, shall we?
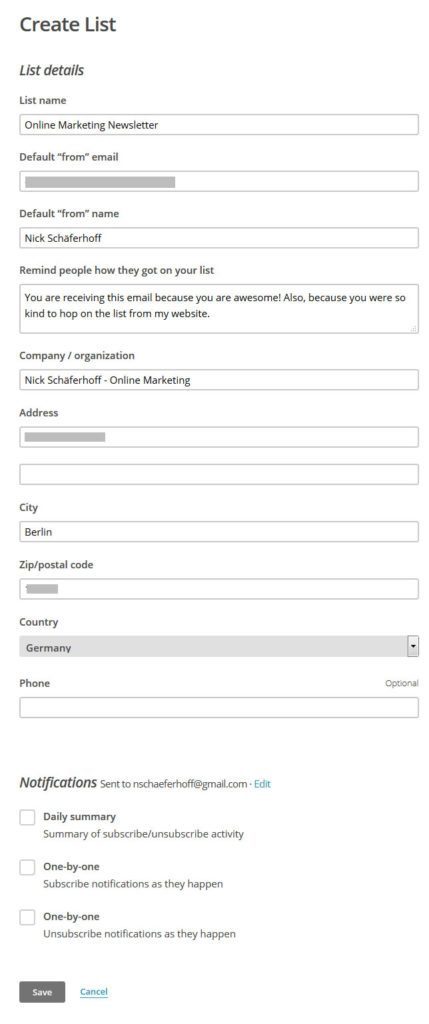
- Click “Create A List”
- Enter necessary information
- List Name: Put in something that makes sense. This will show up for your subscribers as well, so don’t go for “suckers I’m gonna make money off” but rather “[your website] newsletter” or something similar.
- “From” Email: The address entered here shows up in your recipients inbox as the sender. Use something official like “[email protected]” not a Gmail account.
- “From” Name: Again, this appears in the inbox. Either go with your actual name, or say something like “[your website] Newsletter.”
- Reminder How They Got on Your List: People are forgetful. Before they report you as spam, let them know how they signed up for your service.
- Your Information: Your info will show up at the end of each email and is to distinguish spam and legitimize your email, so make sure your info is correct.
- Notifications: Here you can choose how MailChimp will tell you about the activity of your list. This is in addition to detailed analytics. Choose what you feel necessary.
- Save
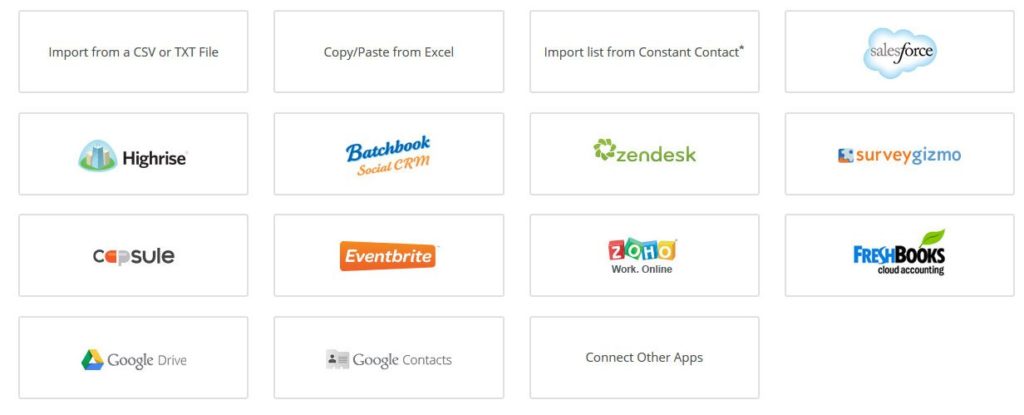
Now you have an empty list, ready to be filled. Should you already have a subscriber list in another service, you can import it to MailChimp.
Click on Import subscribers at the bottom or Add subscribers > Import subscribers. This will provide you with a number of ways to add existing contacts.
3. Generate a Signup Form
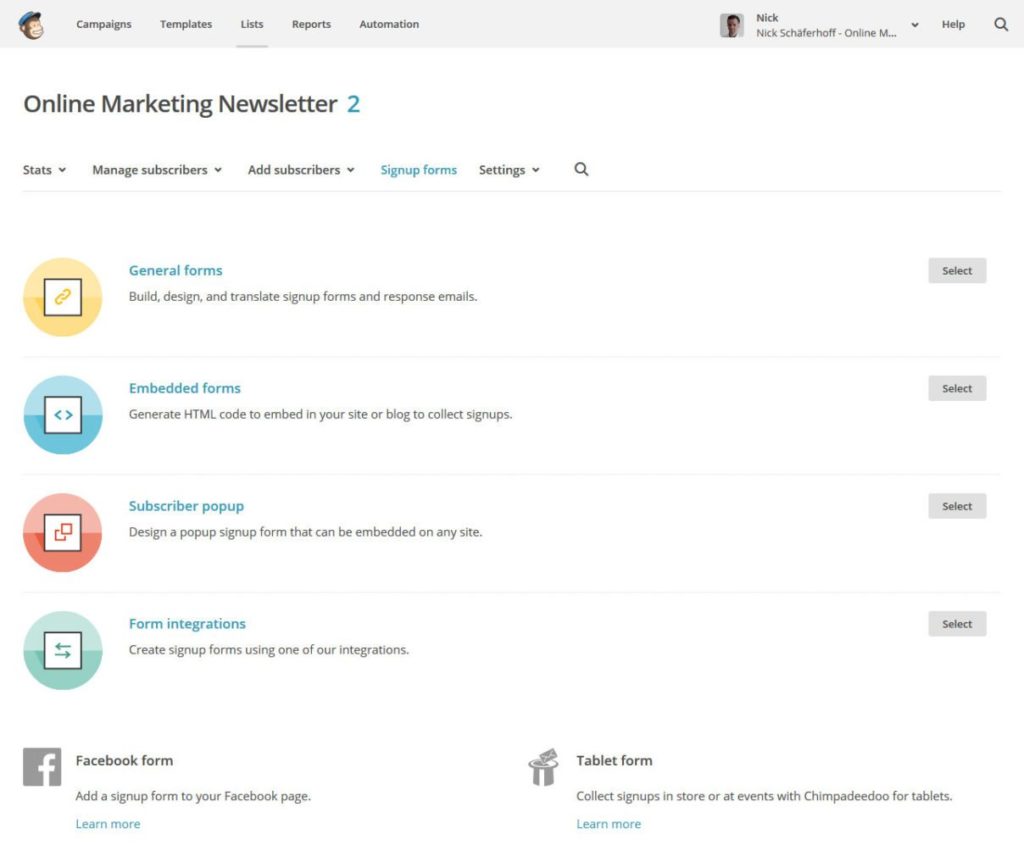
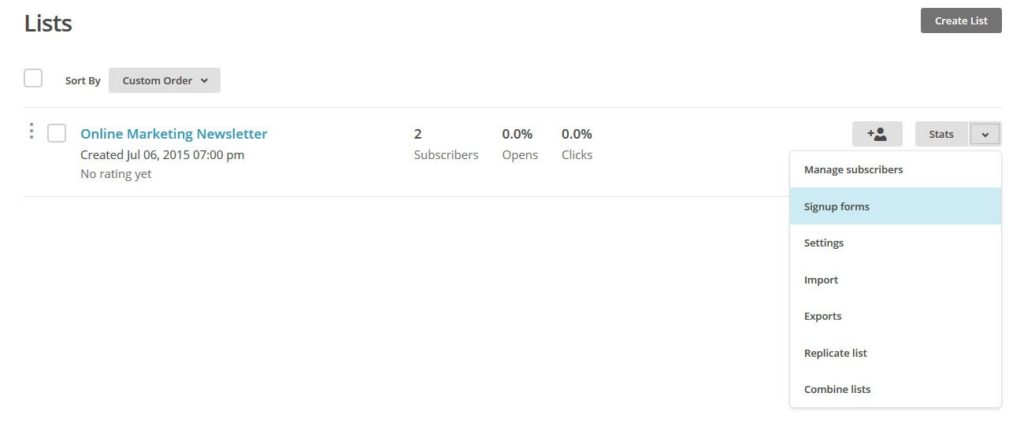
Signup forms appear on your website and allow people to subscribe to your newsletter. You can get there via Lists and then use the drop-down menu to the right and select Signup forms.
Once you get to the menu, you are confronted with several items:
- General forms
- Embedded forms
- Subscriber popup
- Form integrations
To start, we will only deal with the first two.
Note: MailChimp might ask you to confirm your “From” email address before allowing you to create a signup form. If that is the case, you will be taken automatically to the settings. Click on the Verify domain link, send the verification email and click on the link or copy and paste the verification code.
Customize the Form
Under General Forms you can determine the look of your forms as well as the emails for double opt-in, unsubscribe, and update profile. This will be our first stop, so click on Select to the right.
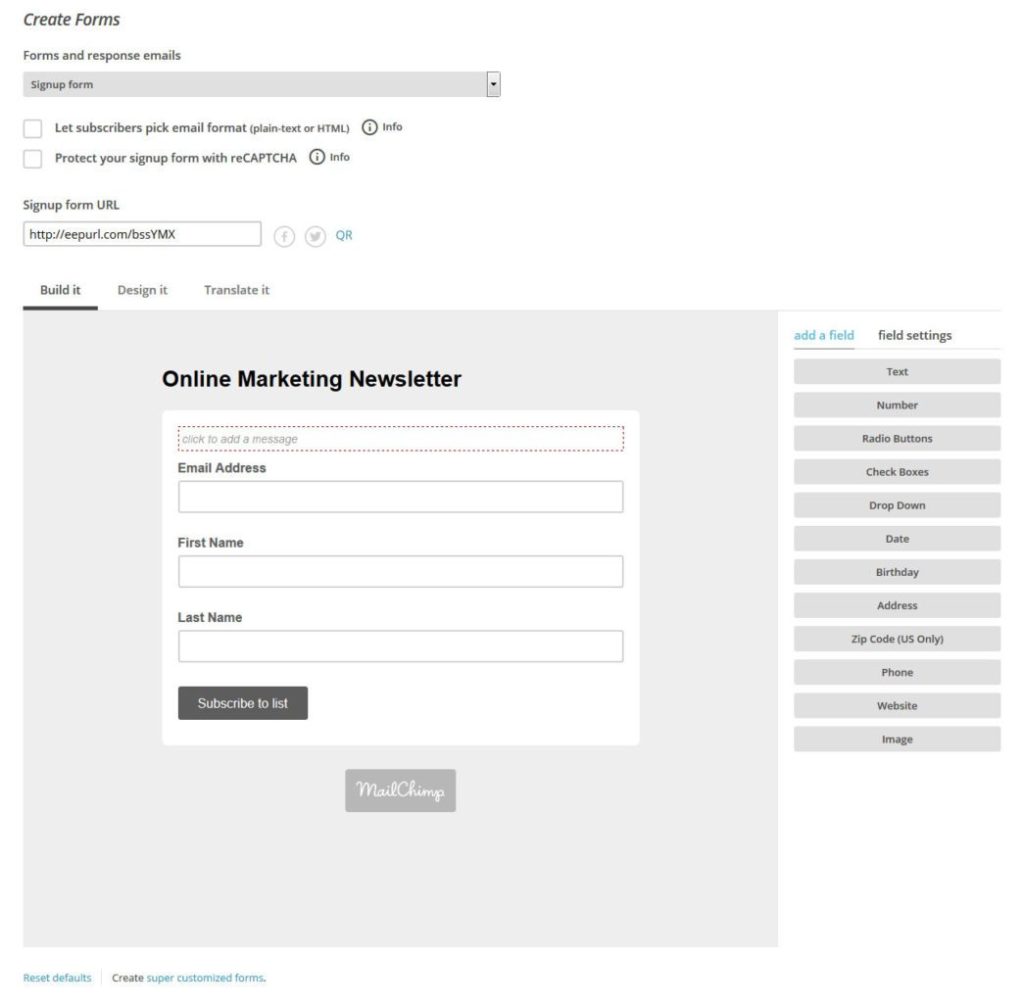
- Build it: Here you add and remove fields to your signup forms. Drag and drop radio buttons, drop-down menus, image fields, and more right into your form. Click each element to customize its settings: change the text, toggle visibility, add a help text, more. You can also remove elements by activating them and then clicking the subtraction button.
- Design it: This menu controls the forms’ styling. It lets you adjust colors, font sizes, and everything else. Note that changes are made universally and not on a per-page basis. That means if you change something about the normal form, it will translate to the emails as well.
- Translate it: In case you are using MailChimp in another language, you can adjust the form messages (such as errors) here. By default, MailChimp comes with translations in a multitude of languages. However, you can make your own adjustments in your own language as well as English.
Apart from styling the forms, you can also allow your subscribers to choose the format of their emails (HTML or plain-text) and whether you want to protect your form from spam bots via reCAPTCHA.
To get started, the standard settings should be sufficient. However, if you want you can go completely nuts and make everything look exactly the way you want it.
Quick Note on Merge Tags:
If you include fields for first and last name in your signup form, you can later use the data collected here to personalize your emails. This is done via something called merge tags.
Merge tags are placeholders inside your emails that pull information about your subscribers stored in MailChimp. For example, by starting your email with “Hey *|FNAME|*” every recipient is greeted with their first name, if it is saved with their email address inside your account.
To take advantage of this feature, it is a good idea to collect the necessary information from the get-go, so keep that in mind. A full list of merge tags for MailChimp can be found here.
Add the Form to Your Website
Getting a MailChimp signup form onto your WordPress site can be done in several ways:
- Via Plugin: In my opinion, this is the easiest way. Install the MailChimp for WordPress plugin, enter the MailChimp API key, and follow the easy step-by-step guide. A working knowledge of CSS might not be the worst idea for this approach.
- Manually: In the MailChimp backend under Signup Forms > Embedded forms you can also create HTML to paste anywhere in your WordPress website.
- Other: Additional solutions for MailChimp integration exist, such as WP Popup Plugin or SumoMe.
Since I have already written a step-by-step article on how to integrate MailChimp into WordPress including how to get signup forms on your site, I won’t repeat the entire process here.
4. Set Up an Email Template
Now that are ready to collect subscribers, we better have something ready to send to them. Step one of that is to create an HTML template for our email campaigns. This will make sure our email content looks nice and polished when it arrives in our subscribers’ inboxes.
In my opinion, one of the biggest strengths of MailChimp is how easy they make this step. The drag-and-drop editor lets you create fully customized and mobile-ready HTML templates in no time.
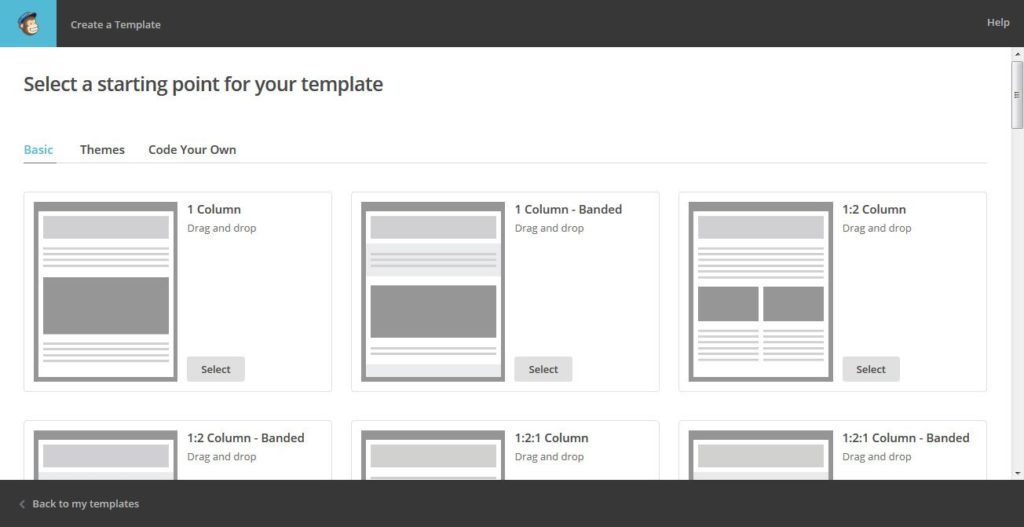
Find the Templates menu item at the top of the dashboard. Once there, click the button that says Create Template.
From here you have three different choices:
- Basic: Use the editor to create a template from scratch. This is my preferred method since it is easy to use and allows you to control every aspect of what your emails will look like.
- Themes: For the hasty, MailChimp also provides a number of out-of-the-box email templates. They are ordered along themes, from e-commerce, to birthdays, to fitness, and more; and they come in two varieties: drag and drop and classic. The former allows more customization, while the latter only let you change colors and content.
- Code Your Own: If you already have a template for your newsletter, you can paste your custom code here or import it from HTML or as a zip file. Be aware that to use your custom template with MailChimp, you need to make sure it adheres to the MailChimp template language.
For the purpose of this article, we will assume you want to create your own email template. So your port of call is the Basic section.
Creating the Template
Select your basic layout: such as one, two, or three columns (or a mix), left or right sidebar, integrated RSS feed, and more. Choose wisely, as you will not be able to change this later.
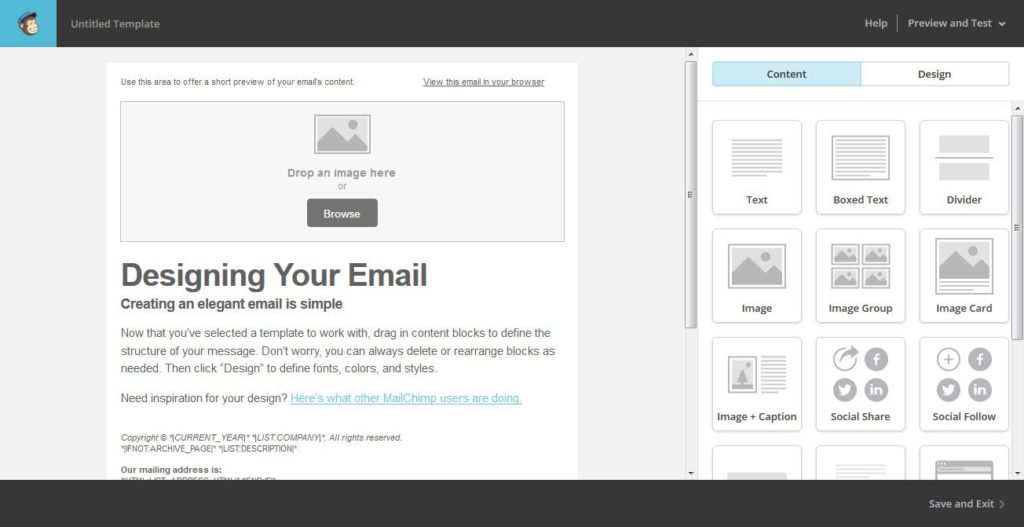
This will take you to the template editor, the heart of template creation.
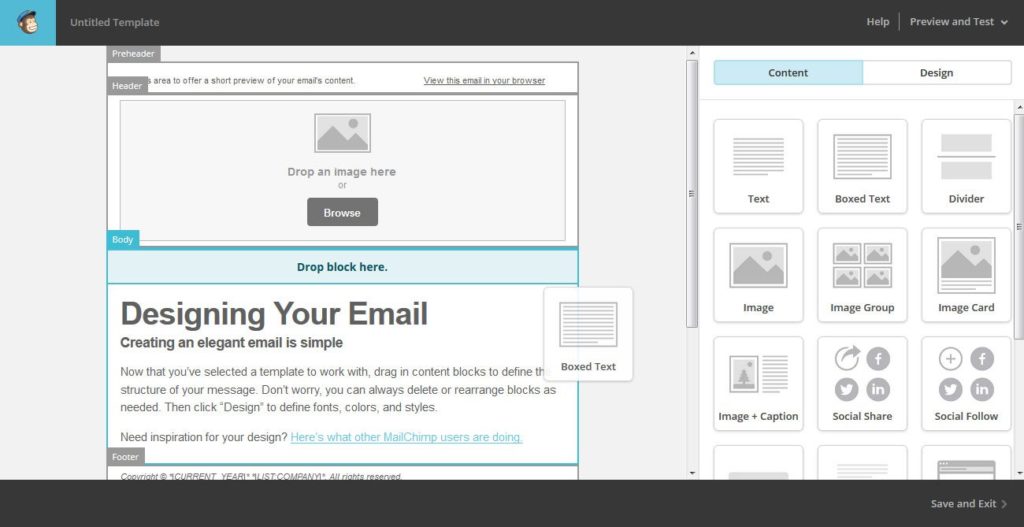
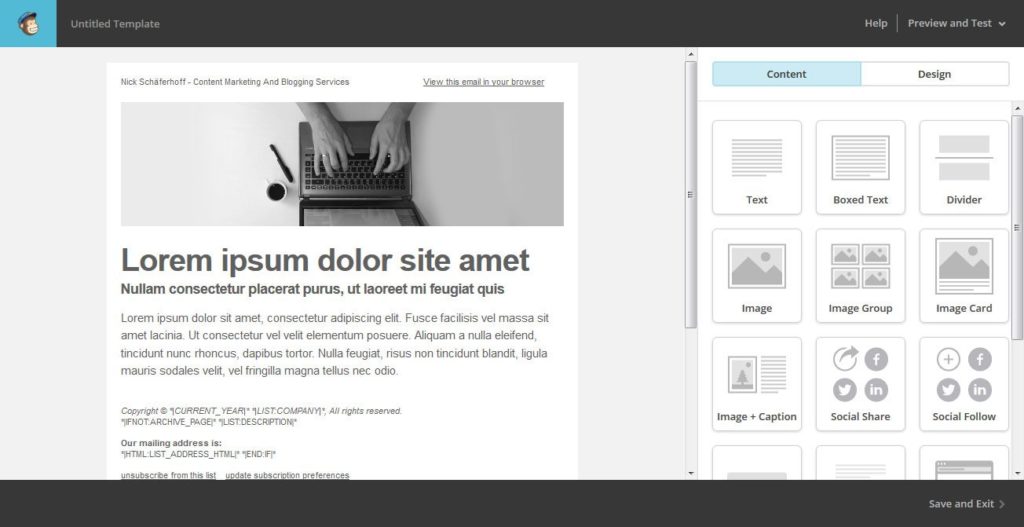
On the left side is the preview of your template, and on the right side the content blocks you can add and further design options. To add text, images, and groups of images, as well as dividers and other elements to your template, simply drag and drop them into position.
Once in your template, you can hover over each block to edit, duplicate, or delete them. Upload images, edit and format text, create columns, and more. Everything is pretty self-explanatory and you should be able to find your way around quickly.
P.S. Don’t forget to change the text in the pre-header where it says “Use this area to offer a short preview of your email’s content” to something more meaningful. And don’t delete all of the weird looking code in the footer—that stuff is important!
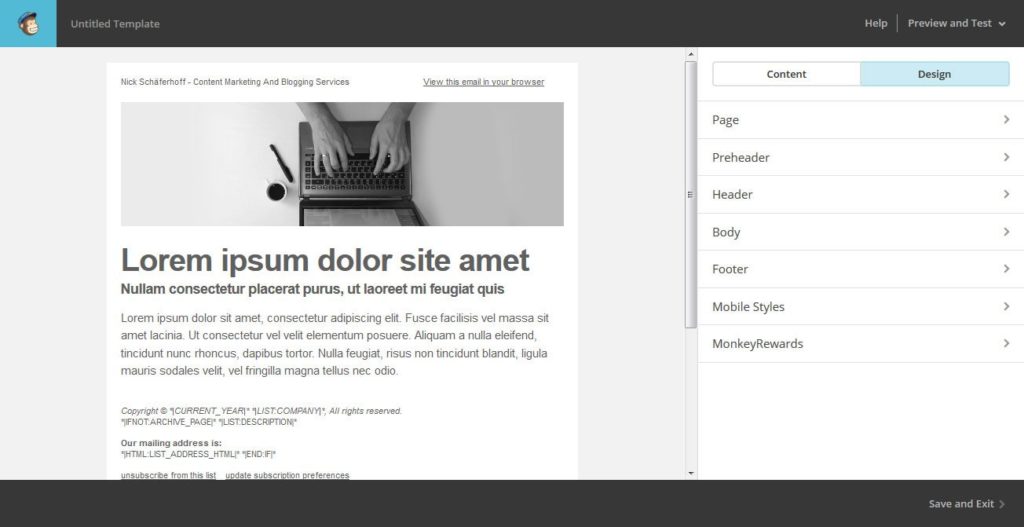
If you need to change more global settings for your template, stop editing content blocks (press Save & Close) and choose the Design column in the upper right corner.
This lets you choose styling for different elements of your template such as the entire page, pre-header, footer, and more. You can adjust the background, text colors, fonts, line height, text align, and more. Those proficient in CSS will feel right at home.
There is also an option for Mobile Styles. This allows you to further customize your template for display on mobile devices. This means, for example, that you can decide on a smaller font size on phones and tablets.
Under MonkeyRewards you can choose which little MailChimp badge will be attached to your email (a non-negotiable feature for free accounts). But hey, for everything MailChimp offers for free, it’s only fair you advertise them a little.
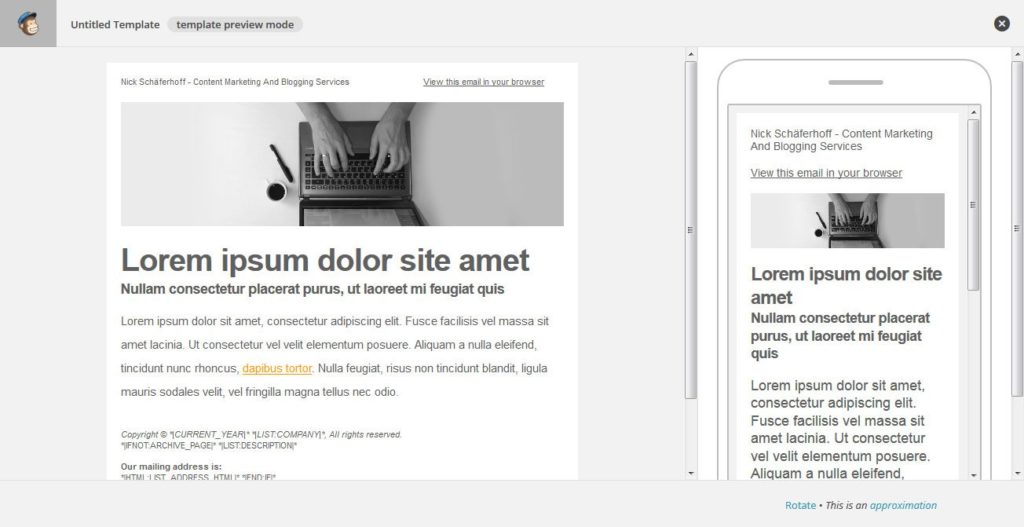
Once you are satisfied with your changes, or if you want to get a better impression of your work, you can enter the preview mode by using the menu Preview and Test in the upper right corner. This will show you what your emails will look like on desktop computers and mobile devices.
For an even better experience of what your subscribers will see, you can send yourself a test email. Once you are satisfied, Save and Exit your template with the bottom right button.
Note: The purpose of a template is to be used over and over again. While the content of your emails will change, the overall look will stay the same. Therefore, when designing your template, concentrate only on the latter such as colors, header image, etc. while leaving dummy content for the elements that will be modified in each campaign.
5. Create your First Campaign
Alright sparky, with the newly created template you are now ready to run your first campaign. Hopefully you have a bunch of subscribers at this point.
Don’t worry if your first email campaign only goes out to your mom and some friends who graciously signed up for your list. This is a test run in order to learn what to expect in the future.
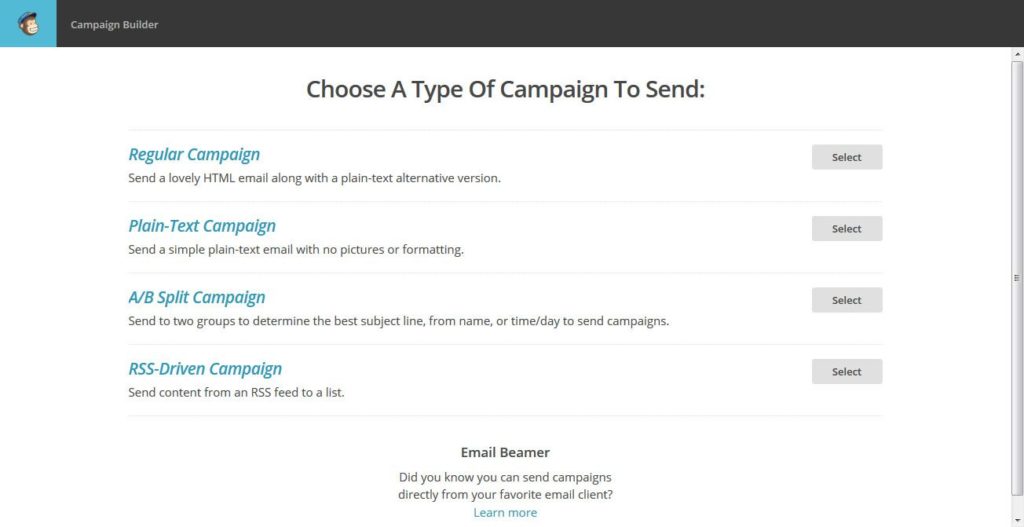
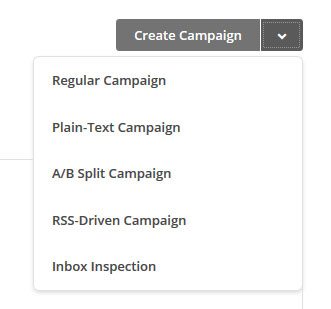
From either your main dashboard or from the Campaigns menu, click on Create Campaign to get started. This will lead you to a submenu where you can choose the type of your email campaign:
- Regular Campaign: Send out a normal HTML email with attached plain-text version (for anti-spam reasons) to your subscribers.
- Plain-Text Campaign: Simple text-only email without images or styling.
- A/B Split Campaign: Test different subject lines, sender names, timings, and even content with several versions of your campaign.
- RSS-Driven Campaign: Send content from your own or any other RSS feed to a list of subscribers.
We are looking to send a good ol’ regular campaign so we will click Select here. Be aware that you can also get there directly by clicking the arrow next to the campaign creation button and choosing your desired option directly.
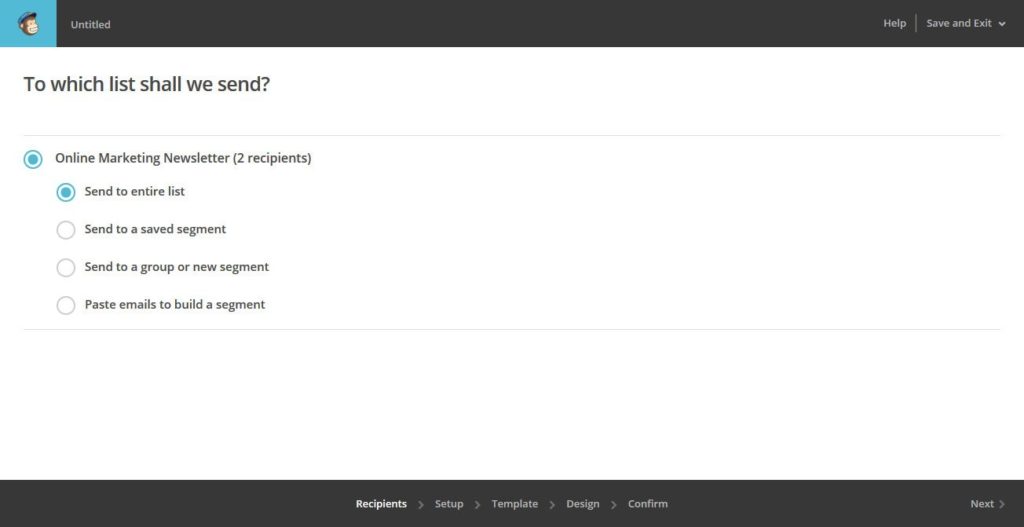
In this next step you will choose the list you want to send your email to. You can either include the entire list or segments that you set up beforehand or will do now.
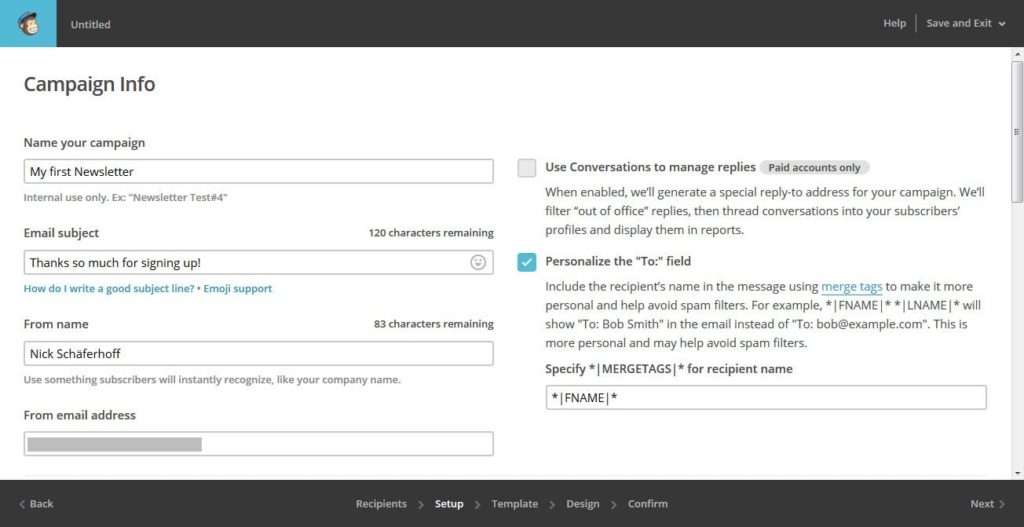
Next up is the setup screen.
Here we need to fill in the following information:
- Campaign Name: This is what your campaign will be saved under. Don’t confuse it with the subject line. It also won’t be visible to your subscribers so choose something that makes sense to you.
- Email Subject: Here, you should enter the email title that your subscribers will see in their inbox. Try to make it non-spammy and relevant. MailChimp actually has a nice resource on how to write effective subject lines and how to use their research tool.
- “From” Name and Email Address: We have already configured this earlier. However, you can modify both of them here, which would make sense if you were running an A/B split campaign.
- Personalize the “To:” Field: If you are collecting first and last names in your sign-up forms, you can use merge tags to address emails to your recipients personally instead of their email addresses.
- Tracking: This lets you set different tracking options for your campaign. Besides tracking opens and clicks, you can also connect the campaign to third-party analytics such as Google or eCommerce360. This is very useful to check how your different email campaigns perform.
- Social Media: Optionally, you can ask MailChimp to automatically post your campaign to Twitter and/or Facebook after sending. I have never used this.
- More Options: You should definitely leave Authenticate campaign checked!
Ready? Alright, it’s time to click Next and move on to the templates.
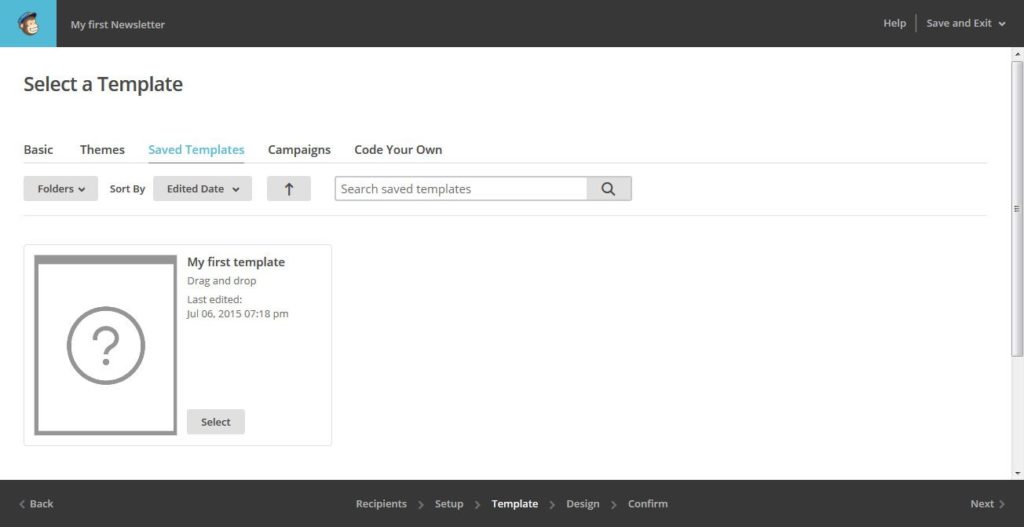
Choose Your Template
In this next step you will pick the design of your email campaign. If you haven’t put together a template yet, now is the time to do so. Since we designed our template earlier, we pick Saved Templates and then choose it from the list.
Adjust the Content and Design
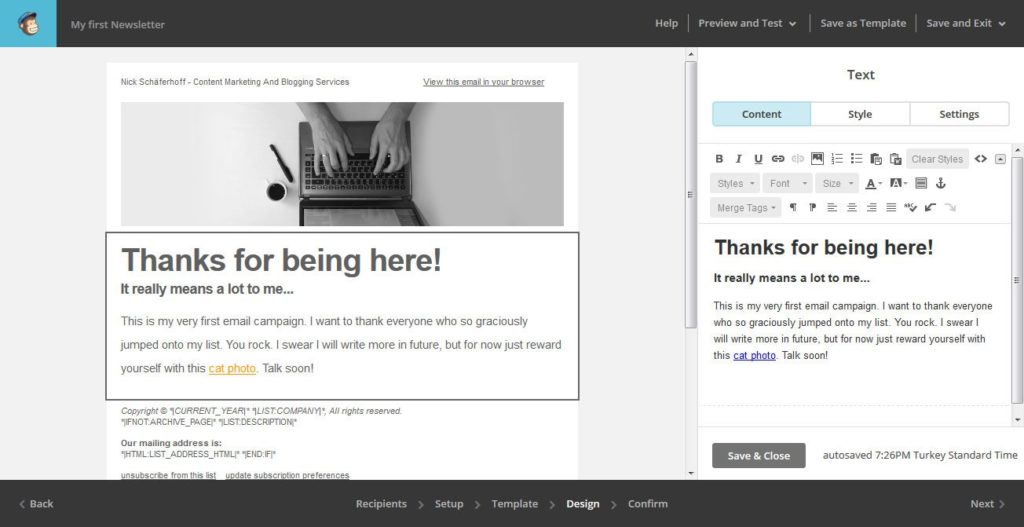
We’re almost done! If you have followed the guide so far, the only thing left in this step should be to plug your content into the email.
This isn’t much different than producing a blog post. You can write headings and subheadings, format your text, and add links and images until you are satisfied. Don’t forget to preview!
Of course, you can also add and remove content blocks if it makes sense for your current campaign. Should you have made any changes to your template that you would like to be permanent, use Save as Template at the top.
Once you are done, click the Next button at the bottom right.
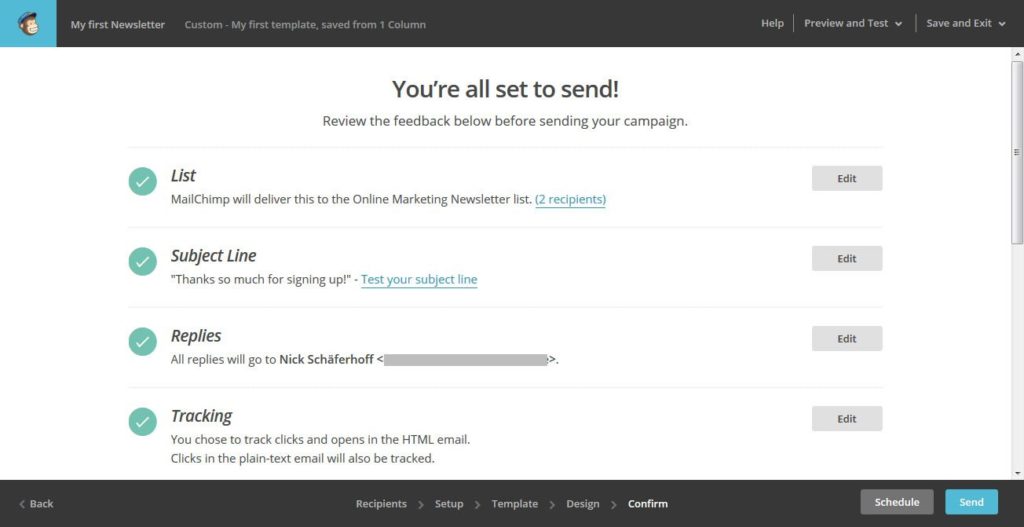
Confirm and Send
You are now taken to a confirmation page that gives you an overview of your campaign. You can review the recipients of your email, subject line, reply address, and everything else. MailChimp will also warn you if anything is wrong from their side.
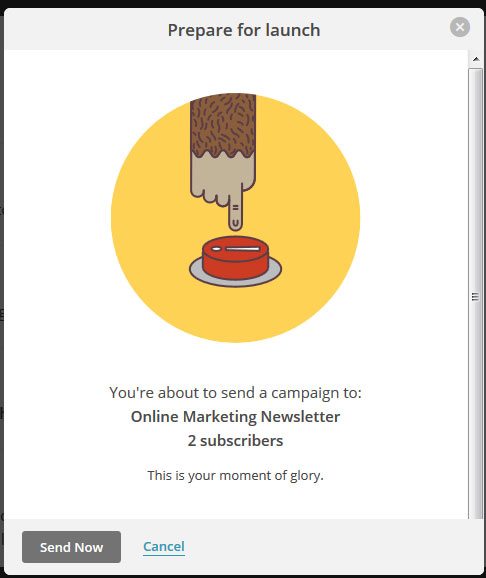
When everything is to your liking, all that’s left to do is hit Send and then Send Now to shoot your email out to the world.
Alternatively you can also schedule it to any point in time in the future. Either way, good job! You can now officially call yourself an email marketer.
What’s Next?
You are all set up to run your own email marketing campaigns. So what’s the next step after you are done toasting to yourself?
For one, it’s time to check your campaign’s performance. Under Reports at the top, you can see how many people are opening your emails, click your links, and more. This will give you an impression on which content they are interested in, which types of email subjects perform best, and will provide you with much-needed feedback to improve your marketing skills.
Another step in your career as future email marketing guru is educating yourself on both advanced features of MailChimp and marketing techniques. A very good place to start is the MailChimp Knowledge Base.
MailChimp: Painless Email Marketing, Even For Beginners
Email is an important marketing tool for anyone doing business online and MailChimp is an extremely attractive option for those getting started with email marketing. Besides being quite affordable, the email monkey also makes it very easy to start building an email list and running marketing campaigns without prior knowledge. The entire user interface is very intuitive and well documented.
For WordPress users, MailChimp is an especially good option. The email marketing service integrates easily with the WordPress platform, a fact that not only beginners will appreciate.
What are your thoughts on MailChimp? Pros? Cons? Making it work with WordPress? We would love to hear your thoughts in the comment section.

28 Comments