
If you’ve been using WordPress and WooCommerce for a while, you may have heard about the REST API. This feature can open up a whole new world of possibilities for your eCommerce site, but it can be difficult to know where to start.
Thankfully, with the help of a modern REST API client and some simple commands, it’s easy to start using your WooCommerce data in new and exciting ways. This includes creating a headless e-commerce setup or native mobile applications.
In this article, we’ll share a practical guide to getting started with the REST API. We’ll walk you through the process of connecting to your WooCommerce store using this versatile and powerful tool. Then, we’ll show how to manage your product inventory and customers using some simple requests. Let’s get started!
An Introduction to the WooCommerce REST API (And Why You Might Want to Use It)
You can use the WooCommerce Representational State Transfer (REST) API to interact with your store’s data from a third-party application. This API gives you the flexibility to use your e-commerce data in other contexts. In particular, it’s widely used by store owners who want to build a dedicated mobile app for their customers.
In 2019, mobile devices accounted for 65 percent of all e-commerce traffic, and 53 percent of sales. As the number of mobile shoppers continues to rise, technologies such as WooCommerce’s REST API will become vital to boosting your sales.
If you build your eCommerce app using the REST API, you’ll also be able to reduce page load times by using native mobile transitions. This is crucial, as studies suggest that 64 percent of smartphone users expect content to load in four seconds or less.
This impatience isn’t unique to mobile users. Forrester found that 40 percent of consumers will wait no longer than three seconds for a page to render before abandoning that website. By minimizing your page load times, you can maximize your conversions and your revenue.
When you work with the REST API, you receive text data only. This means that this API can deliver a performance boost when conducting complicated actions. This data can also be cached, which will further reduce those all-important page loading times.
The WooCommerce REST API isn’t constrained to any particular front-end technology. This gives you the creative freedom to build new layouts that don’t rely on a particular WordPress plugin or theme. You’ll then have the opportunity to delight customers with new and innovative shopping experiences.
How to Enable WooCommerce’s REST API and Make Your First Request
You can connect to the WooCommerce REST API using an API key. This key will authenticate your requests and ensure that WooCommerce only serves legitimate API requests.
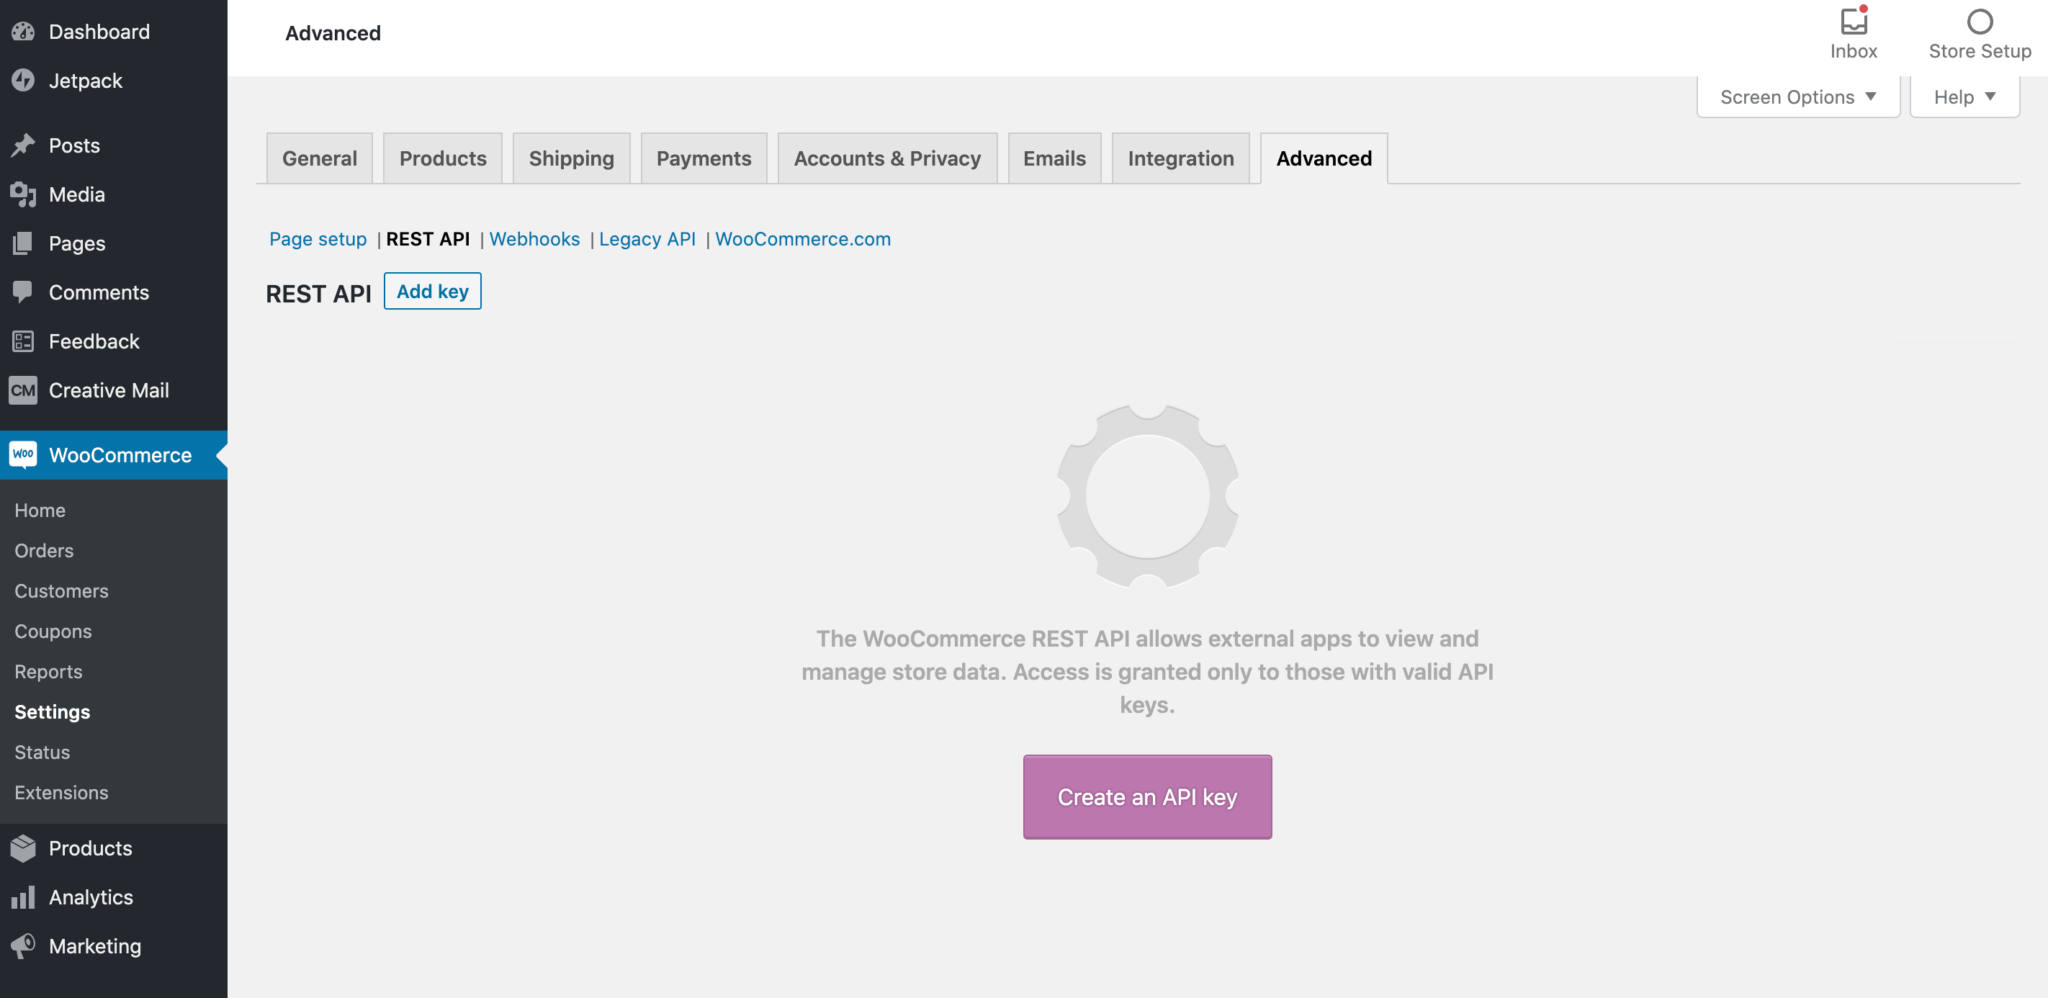
To generate an API key, navigate to WooCommerce > Settings > Advanced > REST API:
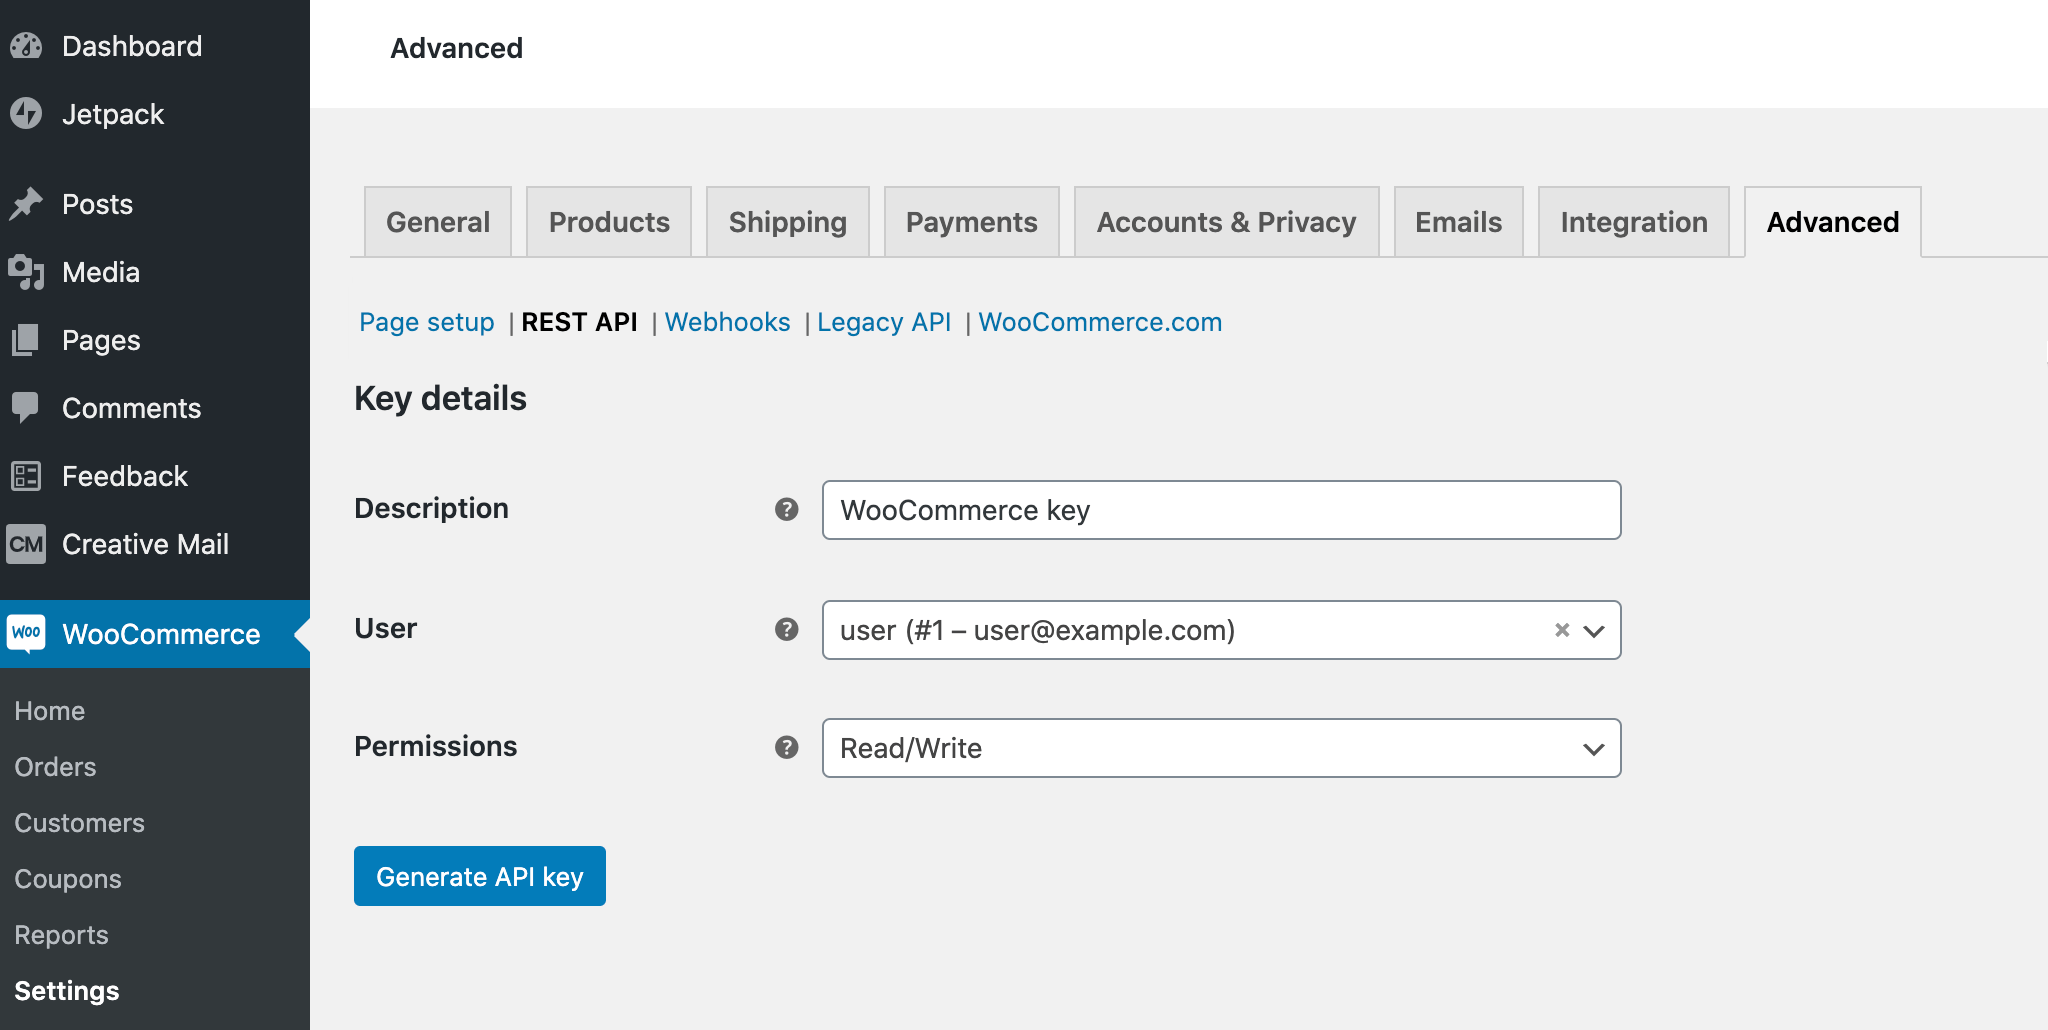
You can now select Create an API key. When prompted, enter a name and a description. You‘ll also need to specify the user who’s generating this key. Just be aware that the key may be restricted based on the user’s WordPress role and capabilities.
You can now choose the level of access for this REST API key. If you plan to change your WooCommerce data, make sure you opt for Read/Write access:
When you’re happy with the information you’ve entered, click on Generate API key. WooCommerce will now create a Consumer Key and a Consumer Secret key for you. You’ll need both every time you connect to the WooCommerce REST API, so it’s a good idea to store them somewhere secure and easily accessible.
When communicating with the REST API, you may want to use a client such as Insomnia API. It provides a Graphical User Interface (GUI) that makes it easier to interact with the target API.
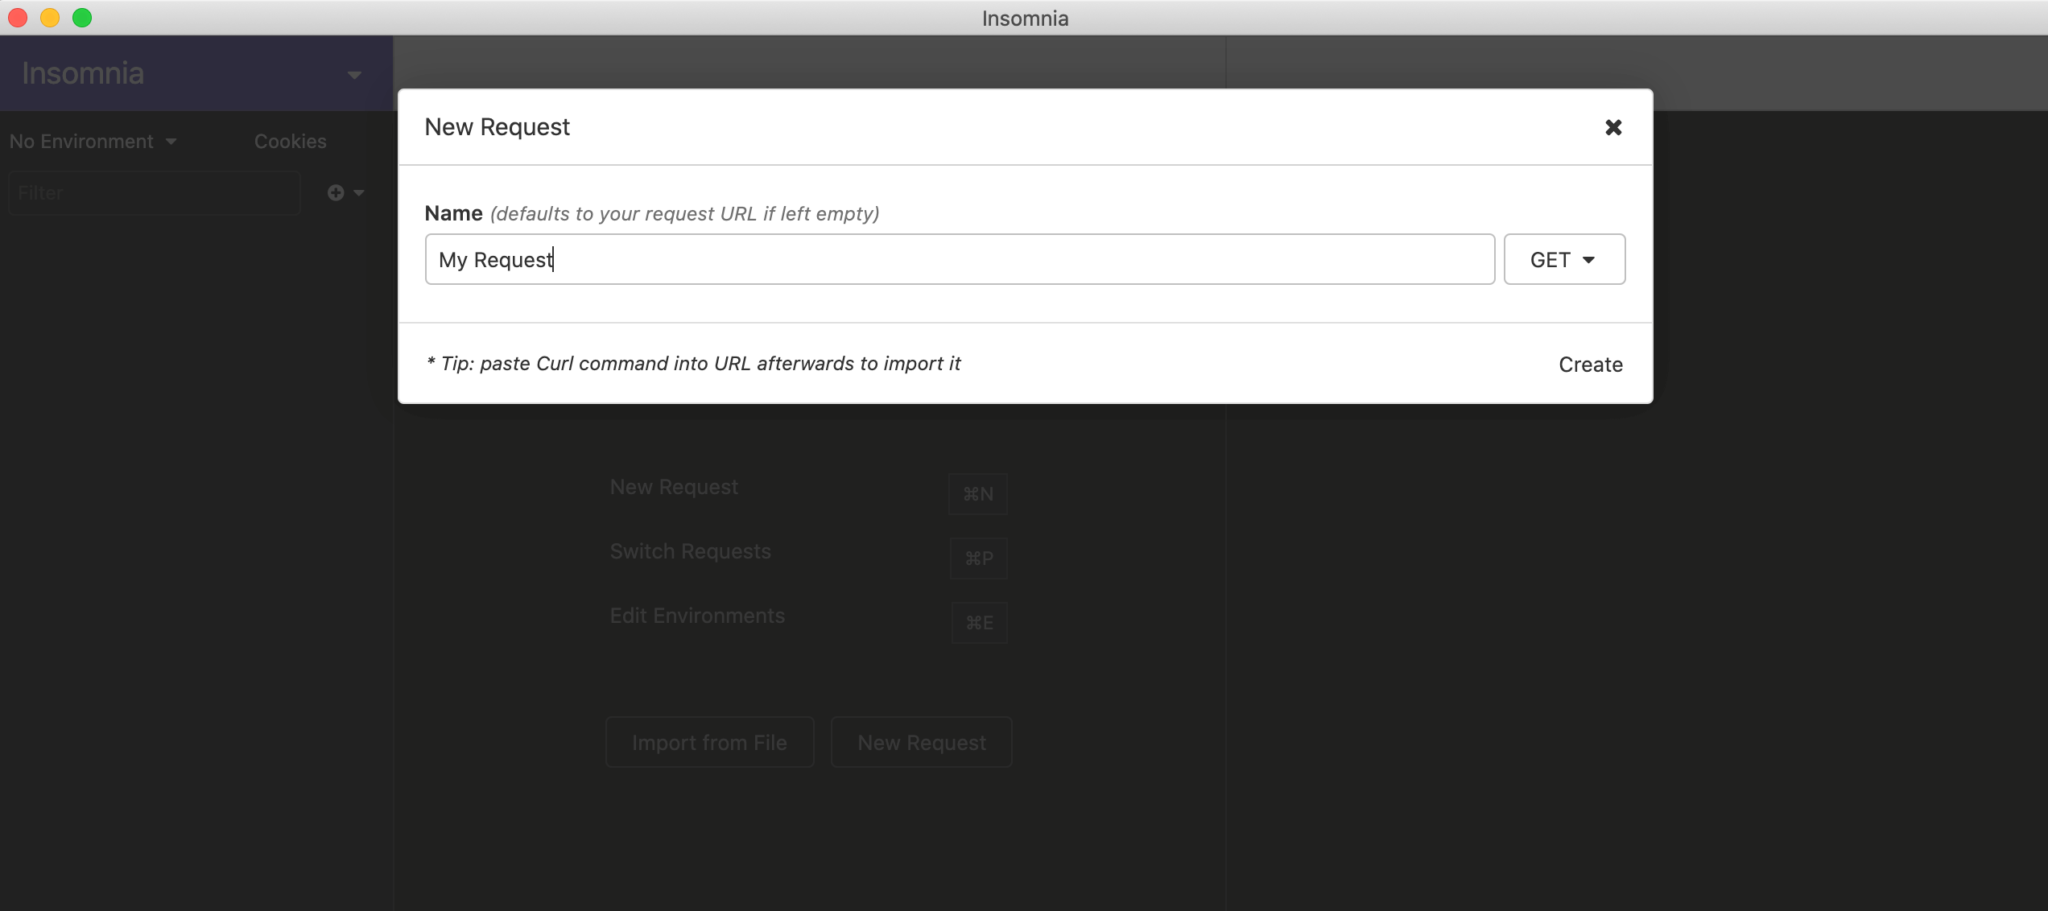
After installing the latest version of Insomnia Core, launch the application and select New Request. Give your request a name, and then click on Create:
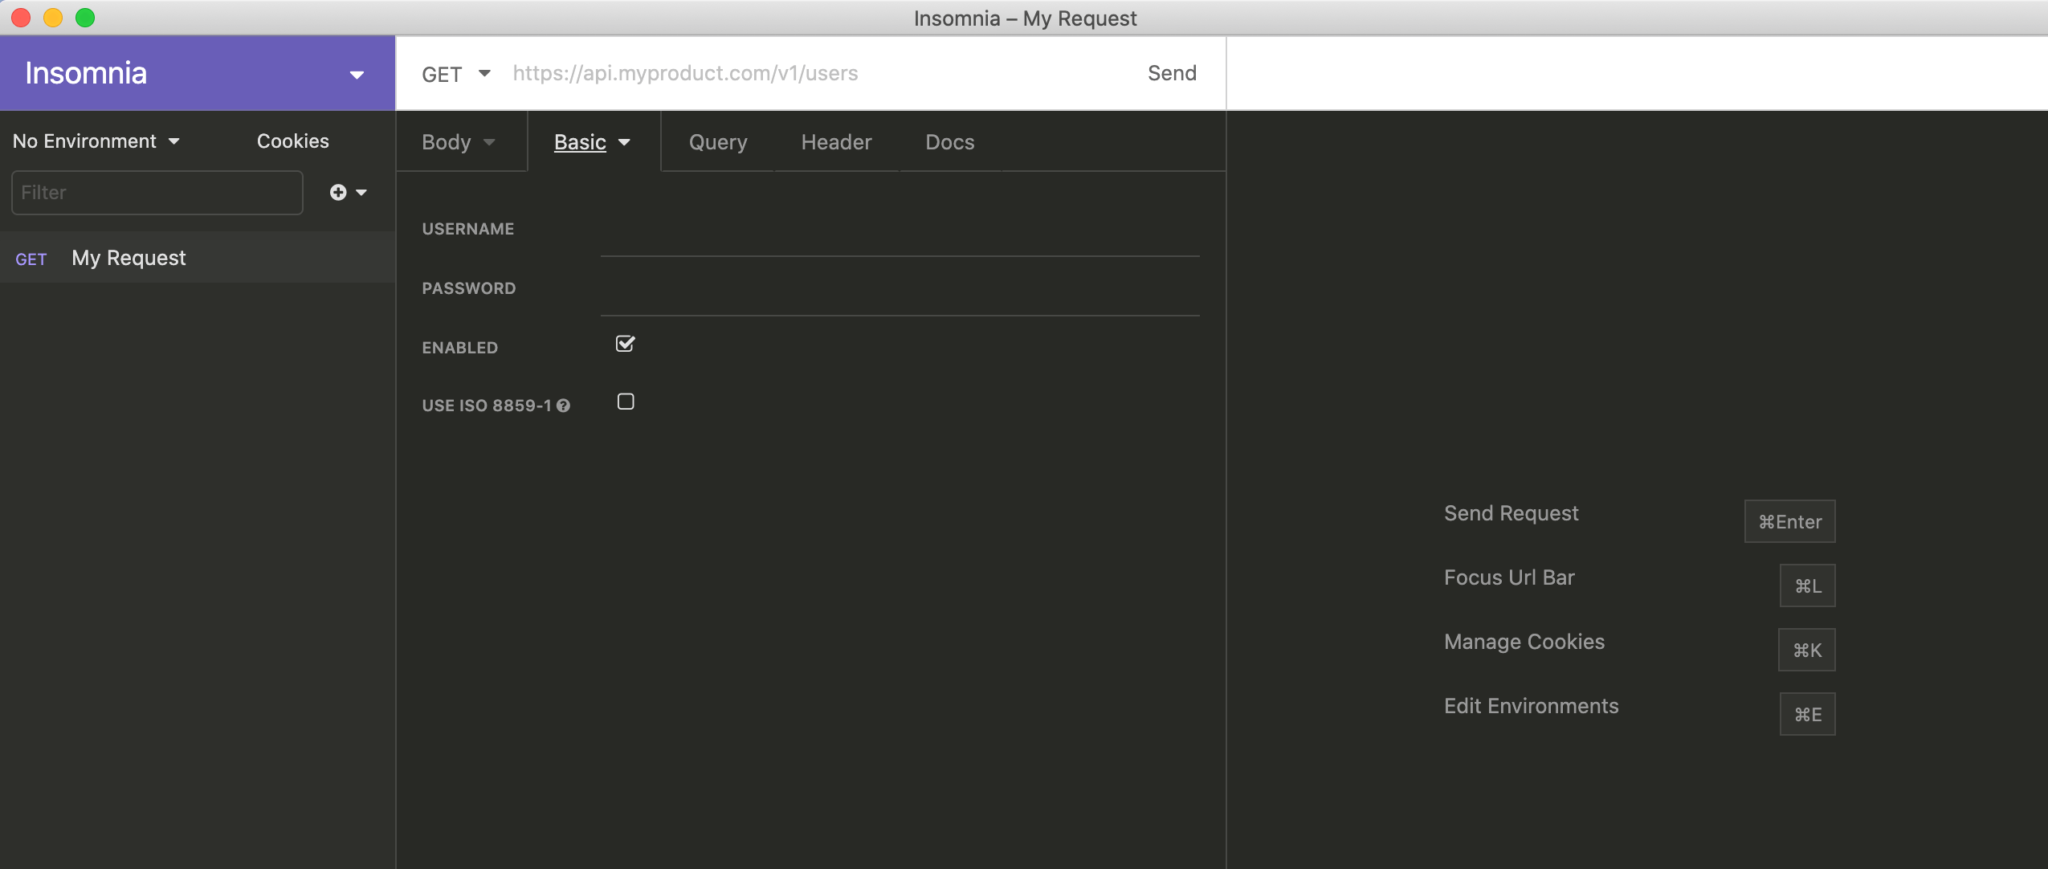
Under the Basic dropdown, select Basic Auth. You can then enter your username (Consumer Key) and password (Consumer Secret):
You’re now connected to the REST API! To test your connection, find the Get field and enter https://mywebsite.com/wp-json/wc/v3/products (make sure you replace mywebsite with your own domain).
Then click on Send. This request should return a JSON string containing all your WooCommerce products.
How to Manage Your WooCommerce Store Using the REST API (3 Easy Ways)
Now that you’ve successfully connected to your WooCommerce environment, you can interact with your eCommerce data. Here are three key tasks you can perform using the REST API.
1. Update Your Product Inventory
You can use the WooCommerce REST API to edit any product in your inventory. Before you can update a product, you’ll need to retrieve its unique ID.
You can do so by navigating to Products > All Products in your WordPress dashboard. From here, you can hover over any item in order to view its ID:
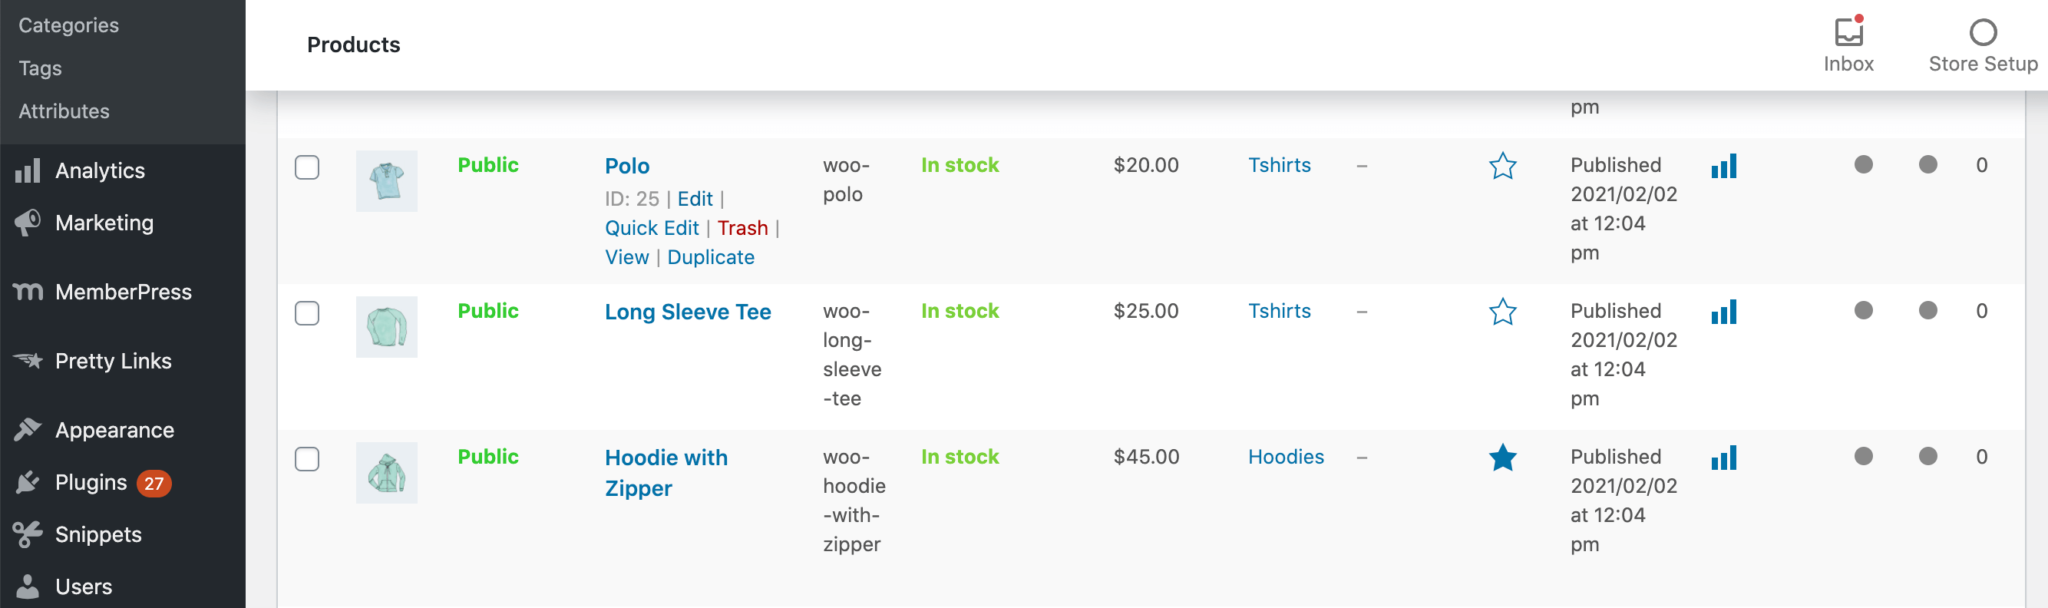
You may want to create a list or spreadsheet of your product IDs for quick reference while using the REST API.
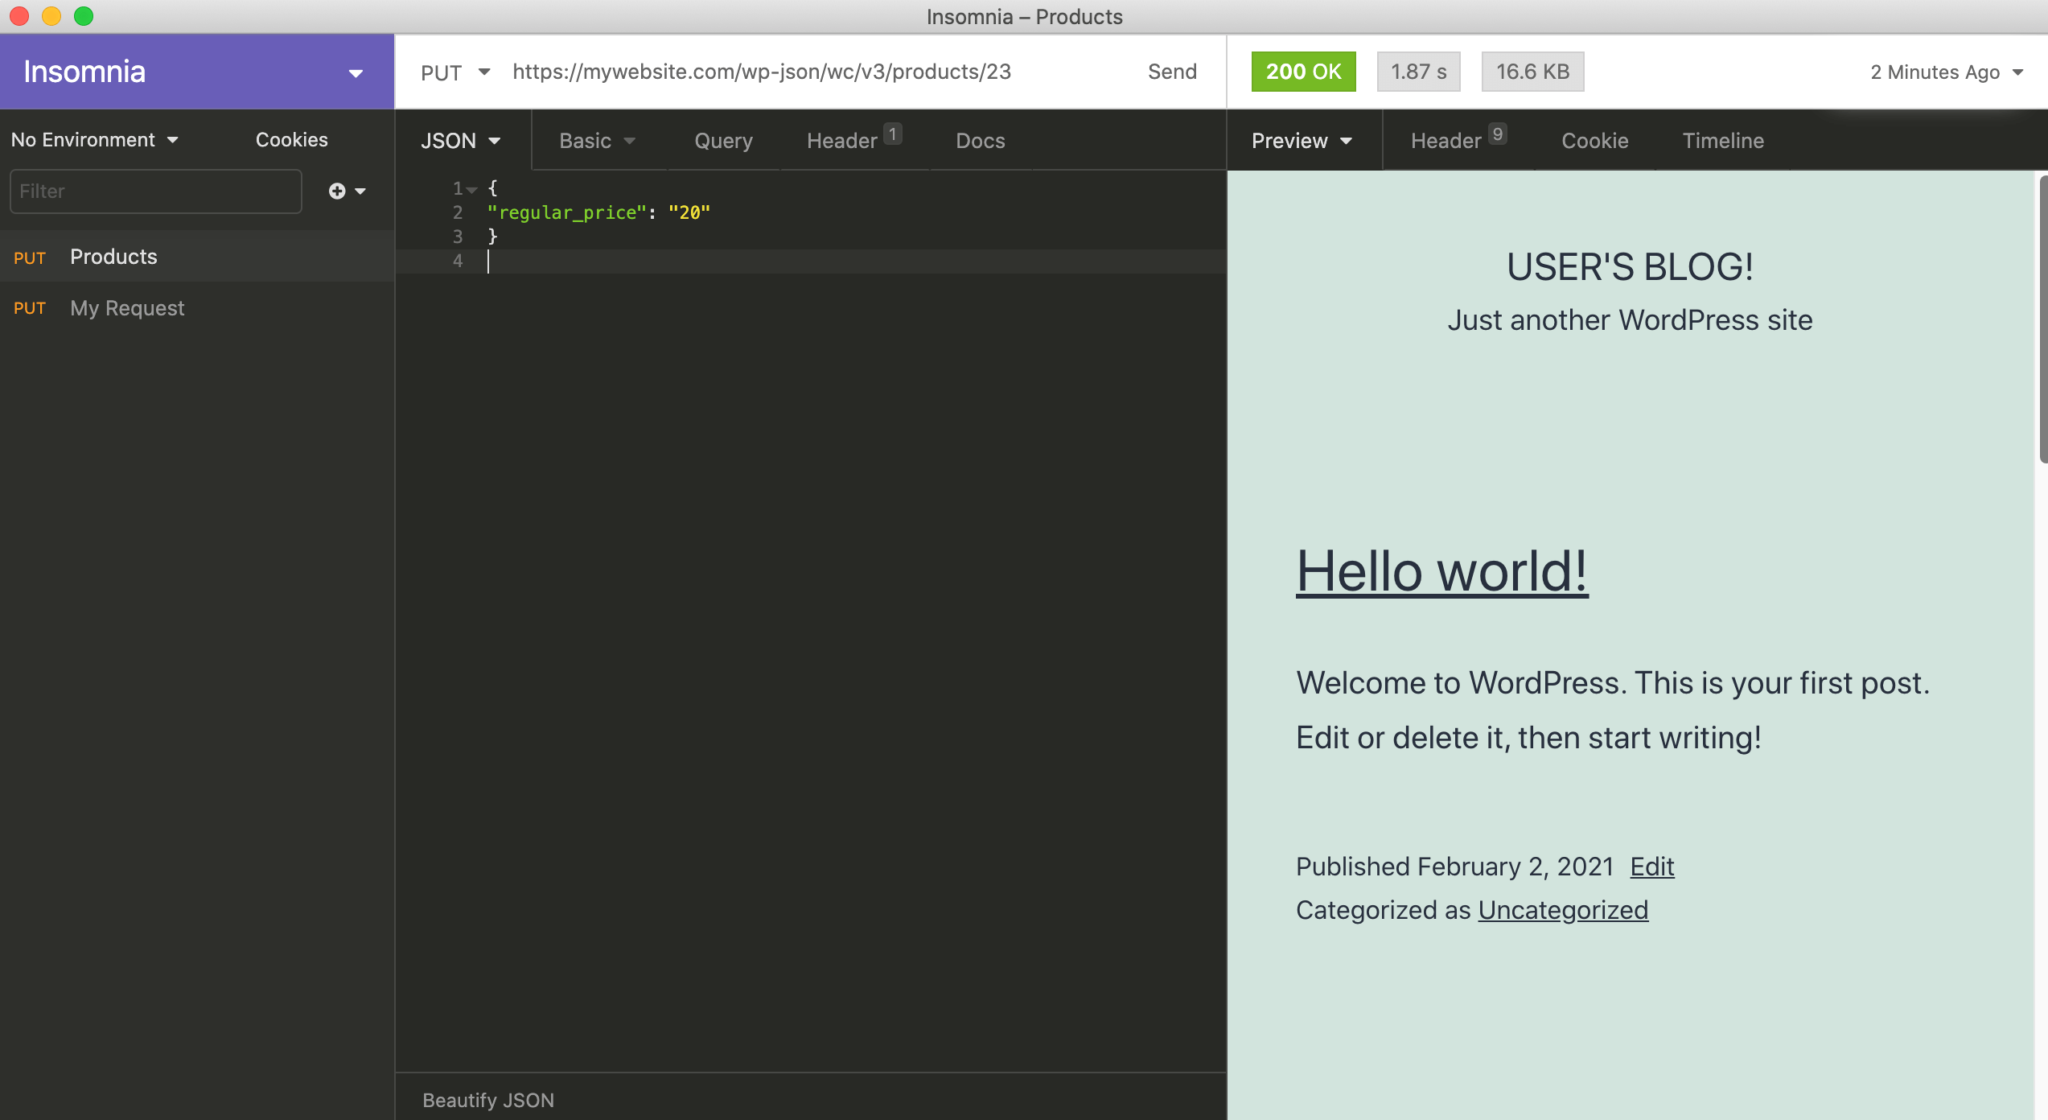
Once you have its ID, you can make various changes to a product. To modify its pricing, click to open the Get dropdown menu in Insomnia and select Put.
Now, enter https://mywebsite.com/wp-json/wc/v3/products/23 (replacing mywebsite with your domain and 23 with the product ID):

Next, click on the Body tab and select JSON. You can now enter the following query, remembering to replace 20 with the price that you want to use:
{
"regular_price": "20"
}
To submit this request, select Send. Insomnia will update the product in question:
You may also want to update the stock quantity. To make this change, use the following request:
{
 “stock_quantity": 30
}
Select Send, and Insomnia will update your inventory.
Alternatively, you may want to delete a product from your inventory. To do so, click to open Insomnia’s Get dropdown and then select Delete. Then run https://mywebsite.com/wp-json/wc/v3/products/794?force=true (where 794 is the product ID).
Just be aware that this command will permanently remove the product from your catalog. If you make a mistake with this query, you will not be able to recover your product.
2. Add a New Product
In addition to editing existing products, you can use the API to add new ones to your catalog. If you want to include product images, you’ll need to host these files somewhere online, then add their URLs to your requests.
To add a product, click to open the Get dropdown menu and select Post. You can then use the following format:
'{
  "name": "Product Name",
  "type": "simple",
  "regular_price": "10.99",
  "description": "This is my product description.",
  "short_description": "This is my product short description.",
  "categories": [
    {
      "id": 5
    },
    {
      "id": 7
    }
  ],
  "images": [
    {
      "src": "http://mywebsite.com/image1.jpg"
    },
    {
      "src": "http://mywebsite.com/image2.jpg"
    }
  ]
}'
\
When you’re happy with the information you’ve entered, click on Send. This item will now be added to your catalog.
3. Modify Your Customer Information
At some point, you may need to update a customer’s information. For example, they may change their address or payment information.
To update a customer’s profile, you’ll need to know their customer ID. You can retrieve this information by navigating to WooCommerce > Customers in your WordPress dashboard:
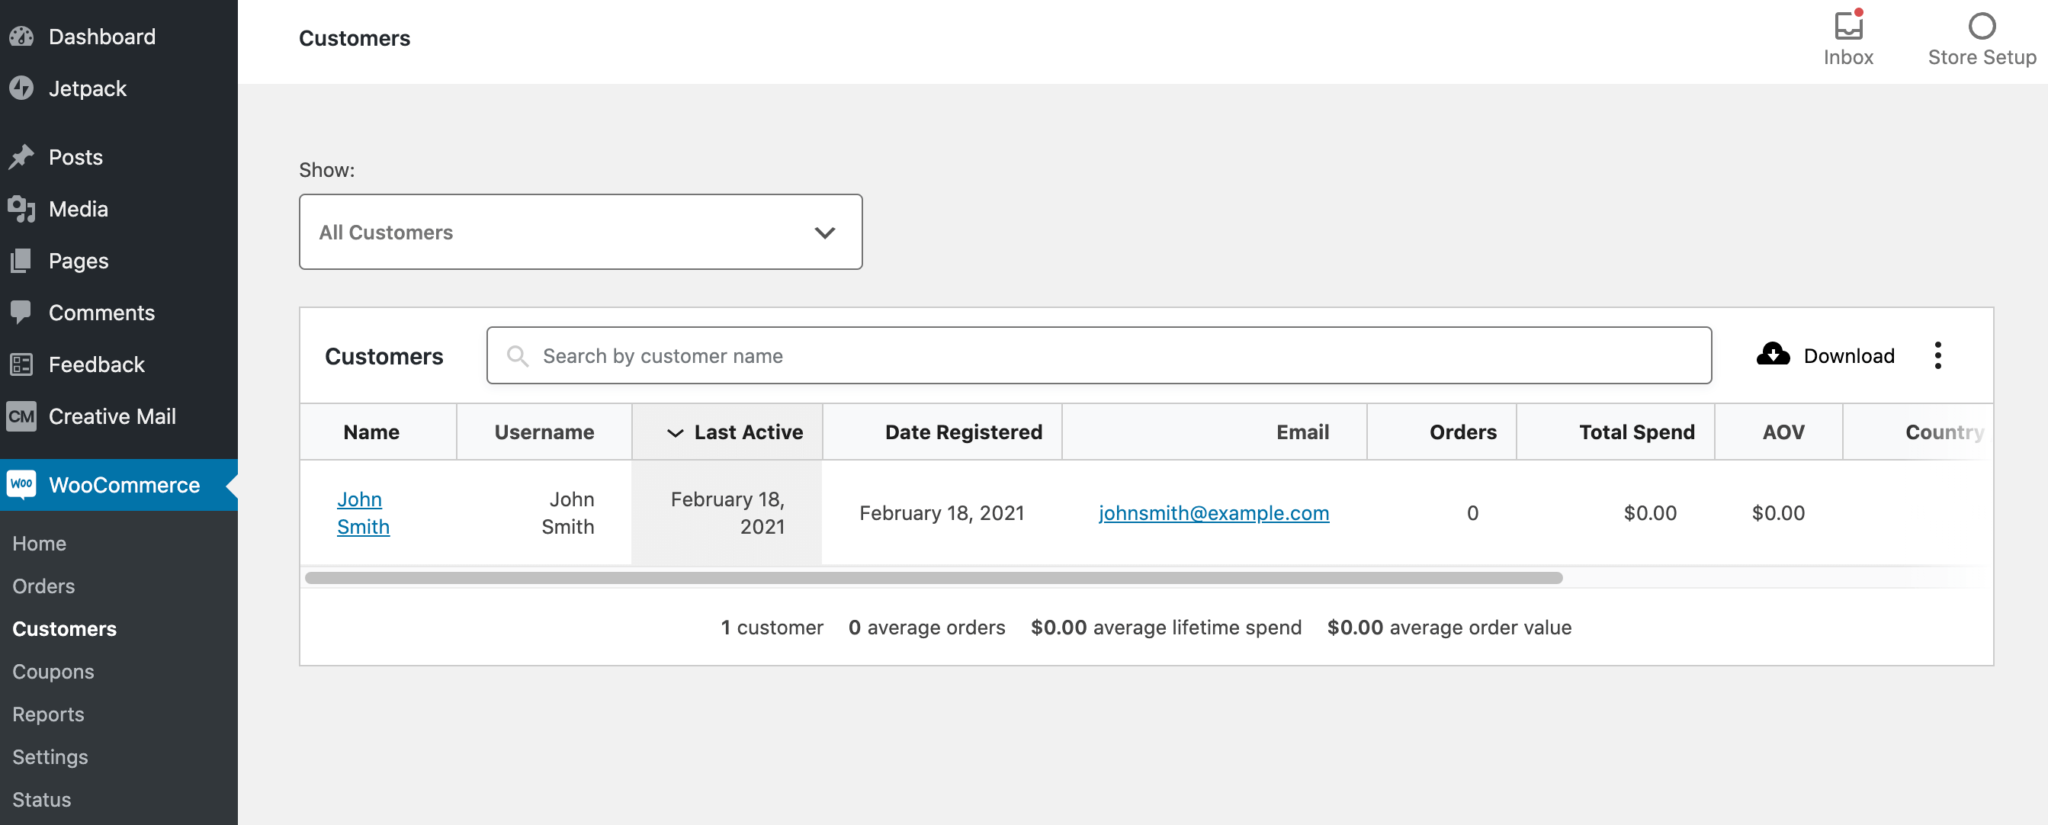
You can open any customer’s profile for editing, and take a look at the URL. The customer ID is the final part of the URL, for example, user_id=2. Again, it may be useful to have this information stored somewhere for quick reference.
Once you have this value, you can retrieve the customer’s information using a single API request. In Insomnia, open the dropdown and select Get.
You can now enter https://mywebsite.com/wp-json/wc/v3/customers/2 (replacing the domain and customer ID as appropriate). Submit this request, and Insomnia should display detailed information about this specific customer.
You can now update the user’s information by switching from a Get to a Put request:
To update the customer’s first or last name, click on the Body tab and then select JSON. You can then copy/paste the following code:
{
  "first_name": "Jane",
  "last_name": "Doe"
}
Click on Send and this customer’s information will be updated.
If a customer moves house, you may need to update their address. To change their shipping address, repeat the above steps, and then use the following JSON to build your request:
{
  "shipping": {
    "first_name": "Jane",
    "last_name": "Doe",
    "company": "My Company Name",
    "address_1": "1 Brook Lane",
    "city": "New York",
    "postcode": "my postcode",
    "country": "US"
  }
}
When you’re happy with the information you’ve entered, click on Send. Insomnia will update the customer’s information, and you can be confident that their next order will be delivered to the correct address.
Conclusion
The REST API may seem intimidating, but it opens up lots of new possibilities for your e-commerce store. Once you’ve mastered this powerful feature, you can use your WooCommerce data in new contexts, including mobile applications and headless e-commerce stores.
After connecting to your WooCommerce store, you can use the REST API to perform several key e-commerce management tasks:
- Updating your product inventory, including stock quantity.
- Adding a new product to your catalog.
- Modifying your customer’s information, such as their shipping and billing addresses.
Do you have any questions about managing your WooCommerce store using the REST API? Let us know in the comments section below!
3 Comments