Managing multiple WordPress sites can be challenging, even for expert developers. Keeping up with the various tedious tasks of site management takes a great deal of time and energy.
Fortunately, you can install WordPress multisite on a localhost to manage your network more efficiently. This enables you to effortlessly run multiple sites from one single install.
In this post, we’ll discuss what WordPress multisite is and why you may want to use it. Then, we’ll show you how to install multisite on a local server. Let’s get started!
What WordPress Multisite Is (And When to Use It)
WordPress multisite is a network of sites hosted on a single installation. This means you can create new projects and manage them from the same admin dashboard.
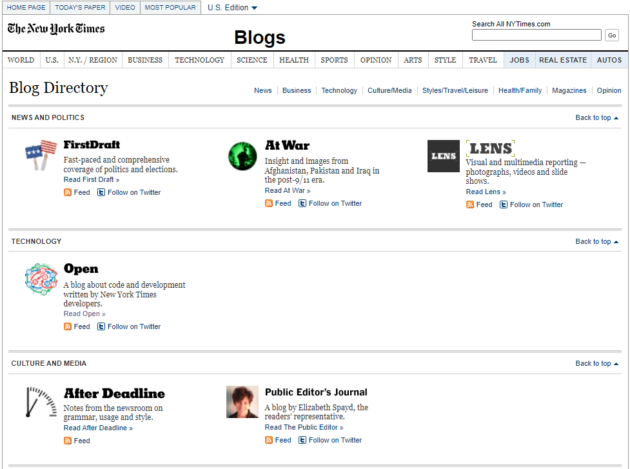
Multisite is a great tool for brands who maintain multiple sites, such as a network of blogs. For instance, the New York Times’ blog network features various sites run by one single admin:

Multisite can also benefit sites that share the same framework and content needs. Large businesses can use it to set up individual subsites for local branches. For example, banks typically have dedicated websites for different locations. It can also be helpful for organizations with multiple departments, such as universities.
However, not all brands can benefit from using multisite. It might not be the ideal option if you have multiple sites that are unrelated or have specific customization needs. Furthermore, it is not practical for high-traffic websites, as these often require a dedicated hosting provider and single-site installation.
How to Install WordPress Multisite on a Localhost (In 3 Steps)
For this tutorial, you will need to have WordPress and your local development environment installed on your computer. You can download and install the latest version of WordPress from WordPress.org.
Then, you can choose and download a localhost, such as Local by WP Engine. Once you have everything set up, you can create your multisite network.
Step 1: Enable Multisite
First, you’ll need to enable multisite on your WordPress installation. To do this, you’ll need to access your wp-config.php file in your site’s root directory. You can use a File Transfer Protocol client like FileZilla to access your site’s back end.
Once you find the file, open it and search for the line that reads “That’s all, stop editing! Happy publishing”. Then, paste the following code above that line:
define('WP_ALLOW_MULTISITE', true);When you’re ready, you can save and close the file. Adding this code will enable multisite on your WordPress dashboard.
Step 2: Set Up Your Multisite Network
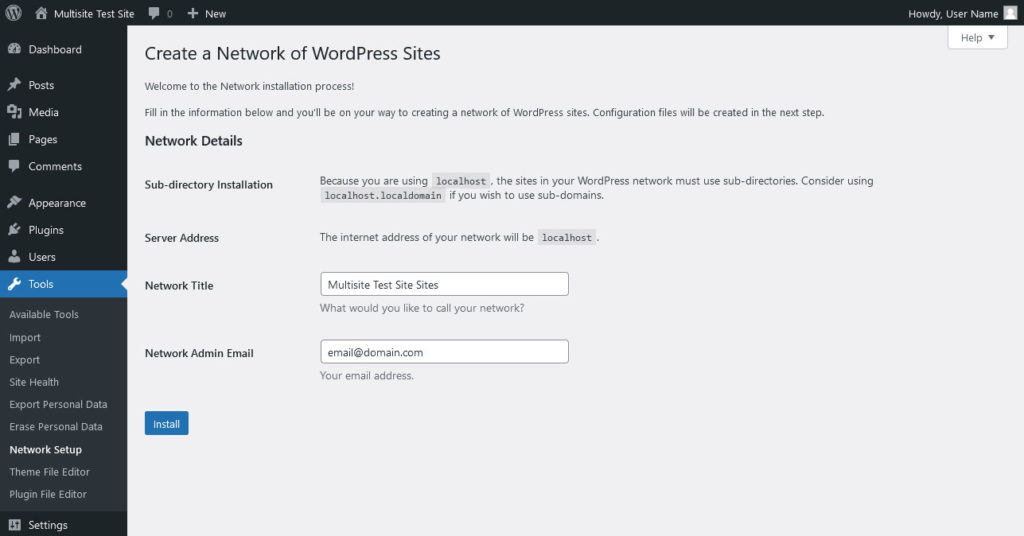
Next, log into your WordPress dashboard and navigate to Tools > Network Setup. You’ll only be able to see this tab after completing the previous step:

Here, you’ll see the option to choose between sub-directory and sub-domain. A sub-domain install means each site will have a different domain, such as site1.example.com and site2.example.com.
Meanwhile, if you choose to create a sub-directory, each site will have a different path, such as example.com/site1 and example.com/site2. Sub-directory is the easiest option when using a local server.
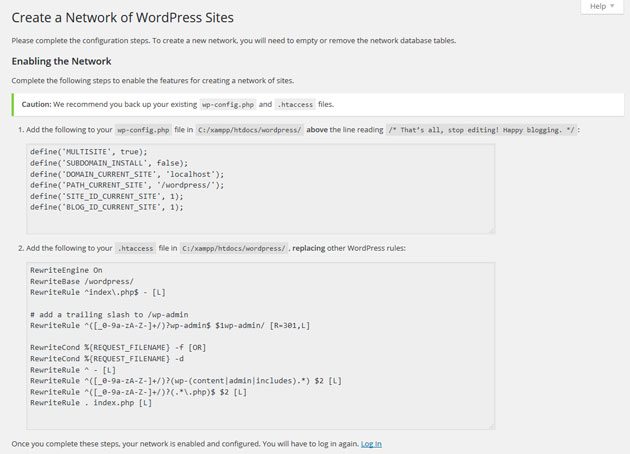
After you enter the details for your network, click on Install. You will then see two snippets of code and instructions for where to paste them:

You’ll need to paste the first snippet into your wp-config.php file, directly over define(‘WP_ALLOW_MULTISITE’, true); to overwrite it. Then, open your .htaccess file and paste the second snippet between <lfModule> and </lfModule> to overwrite all other lines created by WordPress.
You will find both of these file inside your site’s directory. Once you’ve pasted both codes, you can save your changes.
Step 3: Add Sites to Your Network
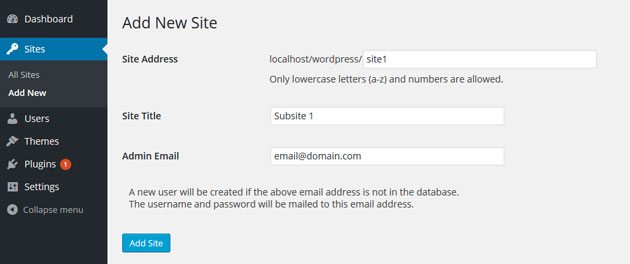
The final step is to add sites to your network. You can do this by navigating to Sites > Create a New Site in your WordPress dashboard:

Here, you’ll simply need to fill in details for each site, including the address, title, and admin email. When you’re ready, click on Add Site. That’s it – you can now start working on your sites.
Conclusion
Controlling a network of sites doesn’t have to be tricky. You can use WordPress multisite to quickly build and maintain your sites from a single dashboard. This will help reduce the time you spend managing the various websites in your network.
To recap, you can install multisite on a localhost in three steps:
- Enable multisite by editing your wp.config.php file.
- Set up your network in the WordPress dashboard.
- Add sites to your network.
Do you have any questions about installing WordPress multisite on a localhost? Let us know in the comments section below!

No Comments