In most cases, you want as many people as possible to visit your website. However, you can also create a “local” site that only you and other users within your network can access. Local WordPress sites are amazing tools for development and testing, and best of all, they’re free to use.
A local WordPress website works just like any regular installation. You can install plugins and themes, access the site’s core files, and edit its code. However, since you’re using a local environment, the website should instantly load.
In this article, we’ll discuss when it makes sense to use a local WordPress website, and then we’ll show you three ways to create one. Let’s get to it!
When to Use a Local WordPress Website
Traditionally, local WordPress websites are meant for development and testing purposes. If you have a hosting plan that limits the number of websites that you can set up, a local environment lets you create new projects at no additional cost.
Some of the specific situations where we recommend using local WordPress websites include:
- You’re working on a new website, but you’re not ready to publish it yet.
- You’re developing or testing a theme or a plugin.
- You need to update critical components of your website.
- You’re playing with design changes to an existing website.
Local websites can also double as staging environments. Thanks to migration and backup plugins, it’s relatively easy to export and import full sites in WordPress. That setup enables you to create local staging copies of a live site and use them for testing.
The only practical downside of using a local WordPress site is that users outside of your network won’t be able to access it. However, some local WordPress development tools enable you to bypass that problem by creating temporary links that give external users access to your local sites.
How to Create a Local WordPress Website (3 Methods)
To create a local WordPress website, you need to set up a development environment. That means installing WordPress’s software, including PHP, web server software, and MySQL or MariaDB.
You can install all of those elements manually. However, there’s no reason to do this when there are several tools to simplify the process. Here are three methods you can use!
1. Use Local Development Environment Software Installers
There are software packages designed to help you install all the local server requirements. The advantage of using one of these installers is that, in most cases, it also includes some type of management dashboard. Instead of relying on the command line, you can configure the software stack using a Graphical User Interface (GUI).
If you’re using Windows, your choice of local development environment installers will be between WampServer and XAMPP. With WampServer, you get an Apache, PHP, and MySQL stack.
By contrast, XAMPP offers an environment that includes Apache, MariaDB, PHP, and Perl:
With either option, you get access to a full local development stack without needing to install the individual components. For Linux-based Operating Systems (OS) or Mac OS, we recommend using XAMPP.
From a practical standpoint, either stack will let your computer run WordPress without any issues.
Once your local development stack is up and running, you’ll just need to download WordPress and extract its files to a local folder corresponding to the software you set up. Afterward, you can run the WordPress installer by accessing the localhost address from a browser.
2. Use a Local WordPress Development Tool
Some tools can help you set up and manage local WordPress websites without worrying about a custom software stack.
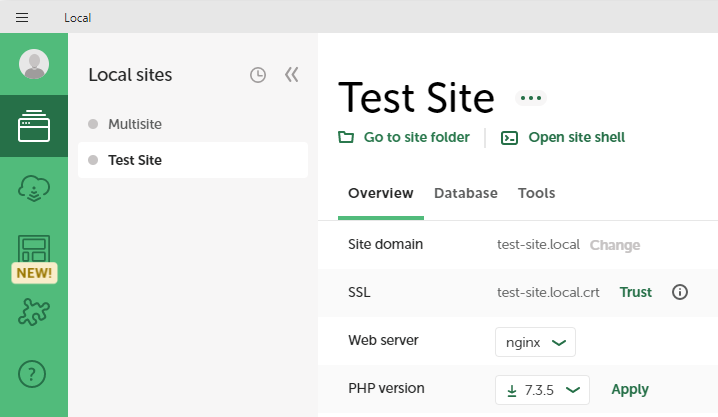
Take Local, for example, which you can use to launch as many local WordPress sites as you need:
One of the advantages of using Local is that you don’t have to install WordPress manually. Local enables you to create as many local websites as you wish and start or stop them. That means you can have sites that “hibernate” and not consume any resources until you need to use them.
Moreover, Local enables you to change your site’s configuration through an easy-to-use dashboard. If you’re a WP Engine or a Flywheel user, you can also clone live sites from your accounts or push local sites to production.
3. Install WordPress Locally Using WP-CLI
WP-CLI, or WordPress Command Line Interface, is a tool to set up, configure, and manage WordPress websites using the command line. Although WP-CLI works on Windows, it’s designed for UNIX-based environments such as Linux distributions and Mac OS.
Many web hosts offer WP-CLI support. This setup lets you manage your WordPress website from the command line by connecting to the server via Secure Shell (SSH).
However, you can also use WP-CLI locally to help you create websites:
The beauty of using WP-CLI is that you can download and install WordPress with only a few commands. You can even configure the installation using parameters, so you never need to open a browser window until WordPress is ready to go.
Here’s a quick example of a WordPress installation command in WP-CLI:
$ wp core install --url=localwebsite.dev --title="Local Website" --admin_user=johndoe --admin_password=wpcli [email protected]Using the command line to set up and manage local WordPress websites is not as complicated as you might think. You don’t need to memorize commands to use WP-CLI, as the tool comes with very comprehensive documentation.
Conclusion
Knowing how to create a local WordPress website can benefit you in many ways. You can use local sites for testing or development purposes. A local environment is also perfect if you want to tinker with new WordPress projects without upgrading your hosting plan to support additional sites.
There are several ways to create a local WordPress website. The three methods below are our favorites because they’re simple and free:
- Use local development environment software installers such as WampServer or XAMPP.
- Use a local WordPress development tool like Local.
- Install WordPress locally using WP-CLI.
Do you have any questions about how to install WordPress locally? Let’s talk about them in the comments section below!


No Comments