WordPress has enabled countless people to start their own web design businesses. Especially if you have some web development chops, the platform is the perfect vehicle to earn money creating web presences for others.
At the same time, WordPress is also a great starter CMS for clients. The simple, yet powerful interface allows them to take care of their site quickly and easily. It is beginner friendly, easy to use and learn, and offers many other benefits. Clients appreciate the capability to care for their own websites.
However, at the same time, this poses a risk. Since the WordPress backend is so powerful, it also has plenty of potential for accidentally harming or completely taking down the site. Pair that with inexperienced clients who are not always sure what they are doing and you have a recipe for disaster.
This is especially critical because in the end you, as the WordPress specialist, will likely get the blame for anything that goes wrong or at least ends up looking bad. For that reason, when handing over a site, you need to seriously consider how much power to put into the client’s hands. This is especially with clients who will maintain the site by themselves.
Luckily there are plenty of things you can do to keep others from messing up your hard work. In this article, we will talk about how to make WordPress safe for clients before handing over the site. This is an important topic so stick around!
Making WordPress Websites Client Proof
In the following, you will learn which measure you can take to make the WordPress backend safe for clients to use and make worst case scenarios less likely.
Create the Client’s Login Info
We all know that creating safe login details is WordPress Security 101. Proper user names and strong passwords are the first line of defense against brute force attacks and other hacking attempts.
Yet, while you know that and I know that the client might not. In fact, the client might be inclined to use the same easy-to-remember (read unsafe) password they use everywhere else – if you let them.
However, you don’t have to. It’s perfectly reasonable to go ahead and create a safe custom login for them during the setup of the site. That way, they are bound to the information you provide and you know that at least this part is taken care of.
Take Control of User Levels
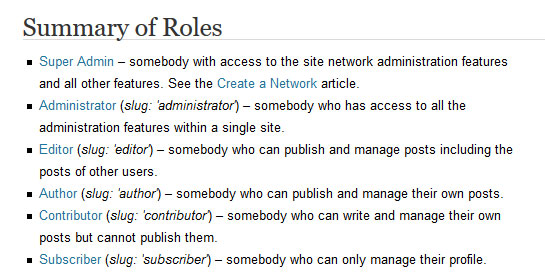
In addition to safe login details, depending on how much maintenance you will be doing for the client, you might want to limit their access to parts of the site. That’s exactly what user roles are for.
If all the client needs to do is modify content, an editor user role is completely enough. In fact, if at all possible, always keep the admin user for yourself. Most clients have no need for the power it provides, so there is no need to run the risk of giving it to them.
However, what if the site won’t stay in your capable hands for maintenance? In that case, you should still advise your clients to refrain from using the admin account except when absolutely necessary. Most of the time, a more limited user role is adequate for their everyday needs and eliminates the risk of them messing something up.
Aside from that, you also have plugins at your disposal to control what users can do and see on the site. These include User Role Editor and Admin Menu Editor. The latter even lets you create custom menus that point to wherever you want including external links.
Streamline the WordPress Dashboard
In addition to user roles and permissions, you can also customize the dashboard via functions.php. The code below allows you to hide parts of the WordPress main menu view. That way, you can keep your clients from risky places.
function custom_remove_menu_pages() {
  // remove_menu_page( 'index.php' );                  //Dashboard
  // remove_menu_page( 'jetpack' );                    //Jetpack*
  // remove_menu_page( 'edit.php' );                   //Posts
  // remove_menu_page( 'upload.php' );                 //Media
  // remove_menu_page( 'edit.php?post_type=page' );    //Pages
  // remove_menu_page( 'edit-comments.php' );          //Comments
  // remove_menu_page( 'themes.php' );                 //Appearance
  // remove_menu_page( 'plugins.php' );                //Plugins
  // remove_menu_page( 'users.php' );                  //Users
  // remove_menu_page( 'tools.php' );                  //Tools
  // remove_menu_page( 'options-general.php' );        //Settings
}
add_action( 'admin_menu', 'custom_remove_menu_pages' );
Just remove the // in front of the page you want to make vanish from the WordPress menu. Be aware, however, that this only hides the menu items, it doesn’t eliminate them. Clients can still theoretically access these menus with a direct link.
An additional thing to do, not just for client safety but security in general, is removing the WordPress theme and plugin editor. We already talked about that in How WordPress Sites Get Hacked (And What to Do About It). Doing so will keep hackers from accessing important files through the WordPress backend. It can also do the same with clients, especially the kind that likes to google their own solutions.
To eliminate the editor, simply add the following line to wp-config.php:
define( 'DISALLOW_FILE_EDIT', true );
Simplify the Visual Editor
I love the WordPress editor. I personally think it’s one of the main reasons for the platform’s wide success. It makes creating web pages and posts as easy (and sometimes easier) than using a word processor.
Most clients I work with also have an easy time grasping how to work with it. However, the editor also gives them access to options that they should completely stay away from, for example changing font color and alignment. The theme should take care of these design decisions, not the individual user and they are one of the easiest ways to make a well-constructed site look cheap and ugly.
Thankfully, there are plugins like TinyMCE Advanced that allow you to take control of what is and isn’t available in the editor. It allows you to add and subtract functionality at will and has additional options that don’t come with the standard editor (in case your client needs them).
An alternative is Client-proof Visual Editor. This plugin reduces the editor options to a bare minimum so clients can’t get into the more complex stuff.
Finally, you can also remove single buttons and create a custom editor on your own with the following code:
function remove_tinymce_buttons( $buttons ) {

	//Remove text color selector
	$remove = array( 'forecolor' );

	return array_diff( $buttons, $remove );
 }
add_filter( 'mce_buttons_2', 'remove_tinymce_buttons' );
Find the names of the different buttons here. Plus, if you’d like to know more about customizing the WordPress editor, we have an entire article on that very topic.
Provide Detailed Instructions
When it comes to the WordPress dashboard, you can not only take stuff away but also add things. This is especially useful when you use it to leave behind instructions for the client (in addition to the help section that comes with WordPress out of the box).
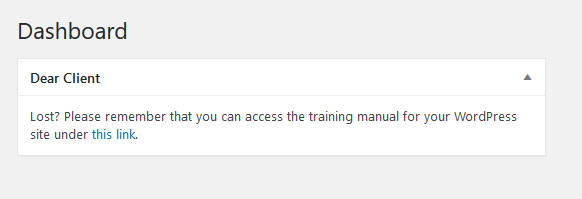
One way of doing so is to add helpful widgets to the dashboard. Here you can leave any information you think the client might need while running their site including links to videos or external sources. It’s excellent customer service and as easy as adding the following code to functions.php:
// Add a custom dashboard widget

// Function that outputs the contents of the dashboard widget
function custom_dashboard_widget_text( $post, $callback_args ) {
    echo "
Lost? Please remember that you can access the training manual for your WordPress site under <a href='http://example.com/training-manual'>this link</a>.
";
}

function add_dashboard_widgets() {
    wp_add_dashboard_widget('dashboard_widget', 'Dear Client', 'custom_dashboard_widget_text');
}

// Register the new dashboard widget
add_action('wp_dashboard_setup', 'add_dashboard_widgets' );
Here’s what it ends up looking like:
Taking this one step further is adding to the WordPress-internal help. This can be done with the following code. We are using the widget page for this example.
// Add help text to widgets page

function custom_help_tab() {

$screen = get_current_screen();

    if ($screen->id == "widgets" ) {
        $screen->add_help_tab( array(
            'id' => 'post',
            'title' => ( 'Help Tab Title' ),
            'content' => '<strong>Contextual help</strong>
                <ul>
                    <li>Can include list items</li>
                    <li>Can include list items</li>
                    <li>Can include list items</li>
                </ul>'
            ) );
    }
}

add_action( 'admin_head', 'custom_help_tab');
Here is the result:

Take Advantage of Must-Use Plugins
Must-use plugins are sometimes new even to WordPress veterans. These are plugins that are automatically active and can not be disabled by accident. They are ideal for code that’s needed for the site to work properly and that would otherwise end up in functions.php (where it only works as long as the theme in question is active). It’s an ideal place for code that clients should never get their hands on.
To create must-use plugins, create a directory called mu-plugins inside wp-content and place your plugin files in there. Since there are certain considerations for their use, you best read more about must-use plugins inside the WordPress Codex.
Set Up Security Systems
If your work with a client won’t continue, it’s important to leave behind systems that will take care of the site even after you stop being around.
Step one of that is security. A good WordPress security plugin can be the silent guardian of the site in your stead. It can force clients to use strong passwords, fight off brute force attacks and overall keep the site safe. Plus, you have a bunch to choose from.
The second step is to set up an automatic backup system (something you should do anyway, regardless of whether you and the client continue working together). When choosing a solution, make sure it comes with an automatic backup schedule and doesn’t rely on anyone backing up the site manually. Also, go for something that offers restoration if things go south. Otherwise, it’s not really worth it.
Check out this article for some excellent options.
Track What Your Clients Are Doing
Finally, if you are called by a frantic client who has managed to take down their site and wants you to bring it back, the last thing you want to do is have to engage in guesswork as to what went wrong.
Luckily, you don’t have to. With Stream, you can track what logged-in users are doing on the site. From messing with posts and pages, WordPress core updates to the theme editor — you will be able to see exactly who did what and when. That will make it much easier to pinpoint where the problem comes from.
The plugin also supports a number of popular plugins like Advanced Custom Fields and Yoast SEO.
Final Thoughts
Making WordPress client proof can seem tedious but is a necessary evil. As easy as the platform is to work with, if you don’t know what you are doing, it’s just as easy to break things by accident. For that reason, taking steps to protect your work from overly zealous clients is crucial.
Above we have shown you several ways of making the WordPress backend safer for clients. From creating safe logins, streamlining the WordPress dashboard and simplifying the editor to leaving detailed instructions and setting up security systems, there is plenty you can do. That way, you can rest easy that the site will stay intact and online even when you are not around to take care of it.
How do you keep your client sites safe? Any additional tips? Let us know in the comments section below!


5 Comments