Getting locked out of your WordPress admin screen can be frustrating, especially if you don’t know the exact cause. It’s also important to attend to the issue quickly, as downtime is never a good aspect of User Experience (UX.)
There are several reasons why you may no longer be able to access your admin screen. Fortunately, some scenarios are more common than others, and established solutions can be found for all of them. With some patience and time, you’ll be up and running again.
In this article, we’ll discuss why you may have been locked out of your WordPress admin screen, as well as offer solutions for resolving each scenario. Let’s get started!
1. Change Your Password Through phpMyAdmin
If you’re using a plugin that enables limited login attempts, entering the wrong username or password one too many times can get you locked out of your WordPress dashboard.
The first thing you’ll want to try here is resetting your password from the admin login screen:
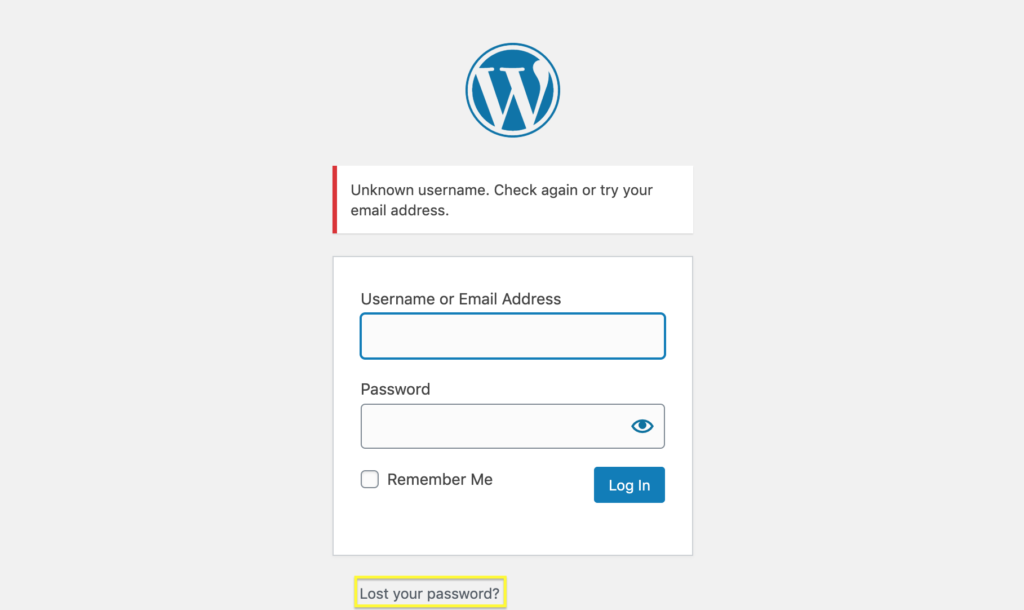
If this fails – either because you don’t have access to the associated email address or because you didn’t receive an email reset password – you’ll have no option but to reset it using phpMyAdmin.
To get started, you’ll need to log into your web host. Next, find the relevant site from the Sites screen, and then you’ll want to click on it to reach its Overview screen. Once there, find the link to your WordPress database.
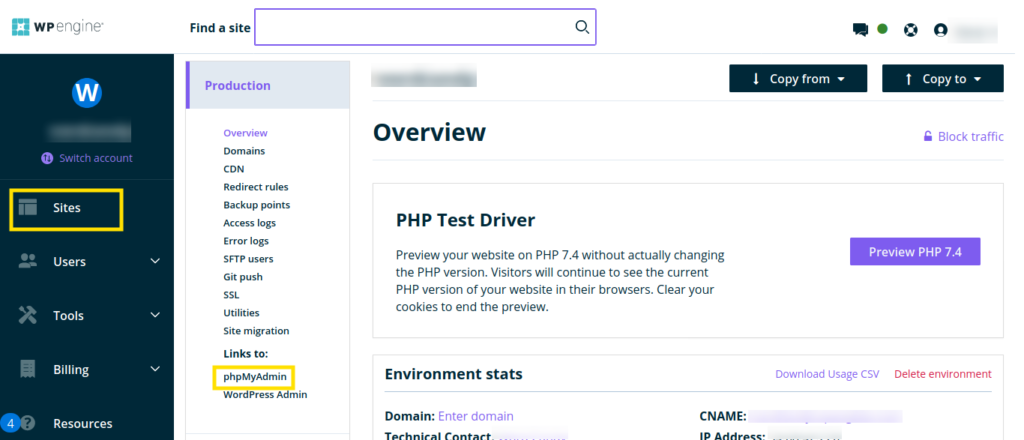
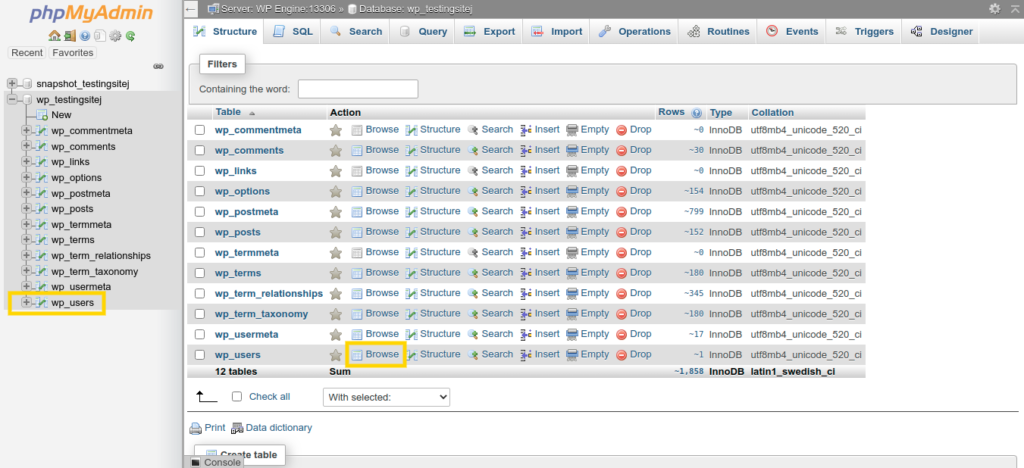
When phpMyAdmin is launched, you’ll want to find your database from the left sidebar and expand it using the Plus symbol (+), which will list all the tables your database contains. Here, you’re looking for the wp_users table (or equivalent if you’ve changed your database prefix.)
Another way to open this table, is by clicking the Browse link beside the table within the Structure tab:
Once the wp_users table loads, click on Edit next to your username:
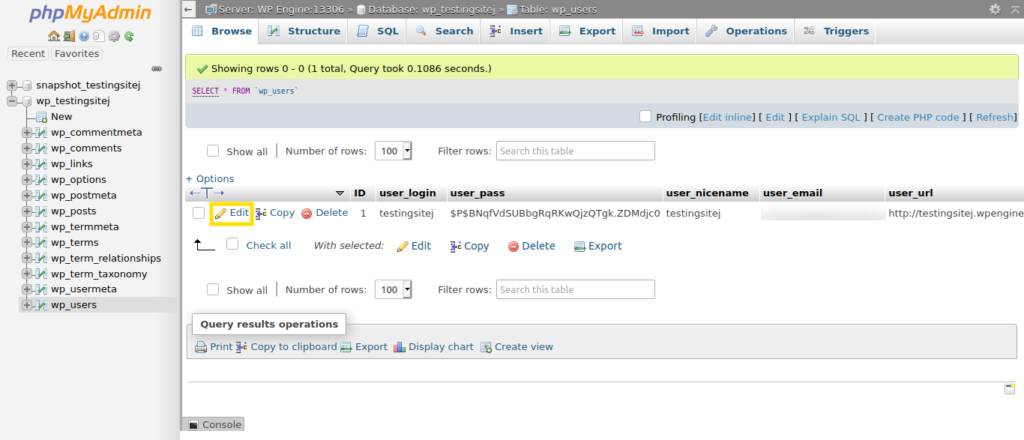
Next, replace what is in the user_pass field – your encrypted current password – with a new password, and set the encryption in the Function drop-down to MD5:
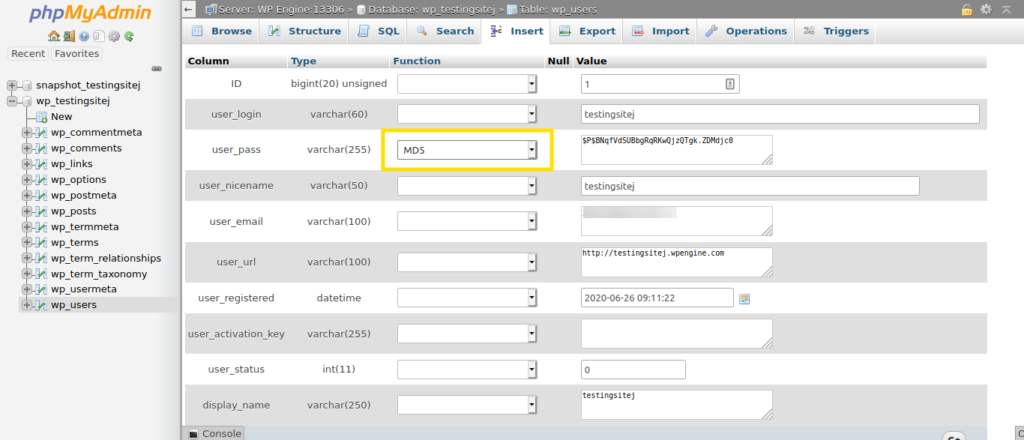
At this point, click Go to save your changes, and attempt to log back into your site.
2. Use FTP to Circumvent the ‘White Screen of Death’
The White Screen of Death (WSoD) is simply a blank white screen with no error message, which can make it difficult to put things right. However, there are some common causes, and hacks to fix the issue.
We’ve talked about this particular problem a few times before, and that’s because it’s a hard nut to crack.
While we won’t go into the full details here, you’ll want to use File Transfer Protocol (FTP) to access your server, and initially carry out the following:
- Check your plugins and themes for errors or corruption.
- Potentially raise your PHP memory limit through the wp-config.php file.
- Enable Debug mode to see if this displays an error when you try to access your site.
The last element is really the ‘white flag’ for you. If you have no solutions to fix this particular problem and access your WordPress site, you’ll want to contact your host and let them know what you’ve already tried.
3. Check That Your Database Credentials Are Correct
Your WordPress database is the reason why your site shows up in the first place, and contains your pages, posts, comments, and much more.
An Error establishing a database connection, means one of the following may have happened:
- Your database may have become corrupted.
- Your sites server could have developed a fault.
- The wp-config file could contain incorrect database details.
Regardless of the cause, you’ll likely be locked out of your site, which you’ll need to resolve quickly.
Your first port of call should be to check that your database details are correct. These are stored in your wp-config file, access through FTP.
Once you’ve logged into your server and opened the file in your text editor, look for the following lines at the top:

Your hosting account should have this information, usually on the main account page. Your approach should be simply to check the credentials are correct, and if they are, move onto other solutions.
There’s a similar error you may encounter reading: “One or more database tables are unavailable. The database may need to be repaired.” If this is true for you, add the following to your wp-config.php file right above “That’s It. Pencils down”:
define('WP_ALLOW_REPAIR', true);Next, visit http://www.yoursite.com/wp-admin/maint/repair.php (obviously replacing the placeholder with your own domain:)
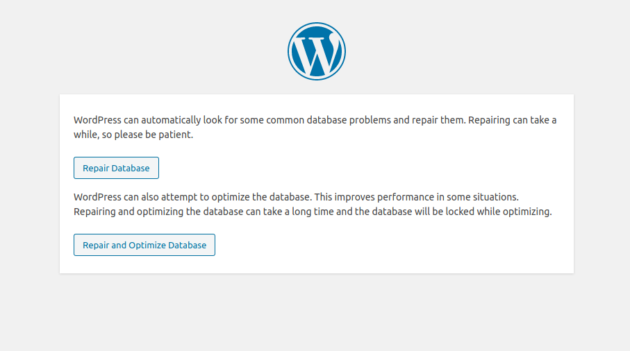
Here, click on either Repair Database or Repair and Optimize Database. The latter will take a much longer time than the former.
Note that the line of code above gives anyone access to the repair screen whether or not they’re logged in. Therefore, once the error is fixed, you’ll want to remove it.
If this doesn’t grant you access to your admin screen, you’ll want to contact your web host for a fix, detailing all of the steps you’ve tried so far.
4. Re-Establish Your Lost Admin Privileges
It may be that you can log in, but are unable to access admin functionality. In this case, one of the following may have happened:
- Your admin account was deleted.
- The site owners have revoked your admin rights.
To begin to fix this, you’ll need to create a new user. We’ll again need to use phpMyAdmin, and find the wp_users table. This time, head to the Insert tab:
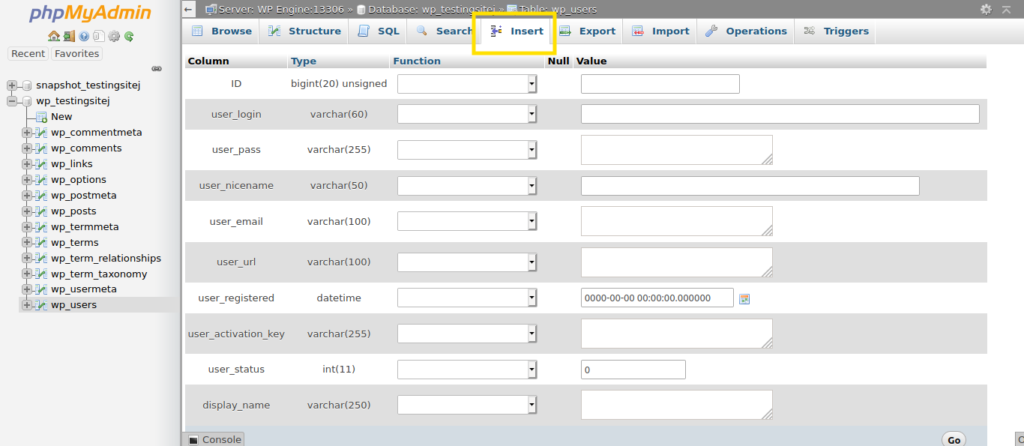
You’ll need to fill in the following information:
- ID: You want to pick a number here and note it for later.
- user_login: Use your username here.
- user_pass: Enter a password, and select MD5 from the drop-down under the Function column.
- user_nicename: You can choose a nickname here. Note that it’ll be visible to other people, so pick something good!
- user_email: This is your email address.
- user_registered: This should be set as today’s date.
- user_status: Set this to 0 (zero).
- display_name: You can set this to your nickname too.
Save your changes, then open the wp_usermeta table. You’ll need to enter the following values in the Insert tab:
- unmeta_id: This is autogenerated, so leave it blank.
- user_id: Enter the ID you chose in the previous step.
- meta_key: Enter “wp_capabilities”.
- meta_value: Enter
a:1:{s:13:"administrator";s:1:"1";}.
Next, you want to enter the following values into a new row:
- unmeta_id: Leave this blank.
- user_id: This should be the same ID from the last two steps.
- meta_key: Enter “wp_user_level”.
- meta_value: Set this value to “10”.
Save your changes, then log in with the new credentials. You’ll also want to edit your user profile after login to ensure everything is as it should be.
If this was an unexpected deletion, it’s a good idea to take a thorough look at your security provision, and protect your site from further attacks.
5. Fix Any PHP Errors Within Your Core Files
If you recently edited some files and now find yourself locked out with a Parse error, you may have introduced errors unintentionally. It’s something that happens to everyone, although it’s more common if you’re new to editing code. Commonly, a simple missing semi-colon is the cause.
Even so, you’ll want to connect to your site through FTP, and rectify the errors in your files. You can use any of several text editors available to make your edits.
Admittedly, rooting out the errors you’ve introduced could be tough if you’ve not kept a detailed log of your changes. The best place to begin is with the last change you made – although it won’t be able to help you hunt out your lost keys.
Conclusion
No matter the reason, it can be frustrating to get locked out of your website. However, with a little digging you can find the culprit and fix the issue.
Some possible reasons for getting locked out of your admin screen include:
- Having an incorrect password, which may need to be reset through phpMyAdmin.
- An error such as the WSoD, which will need FTP skills to resolve.
- Incorrect database credentials, that can usually be fixed through repairing your database.
- Losing your admin privileges, leading you to create new ones via phpMyadmin.
- PHP errors, usually through coding errors.
Do you have any questions about resolving a locked out WordPress admin screen? Let us know in the comments section below!

No Comments