There are certain times when you just don’t want every aspect of your website hanging out in the breeze. That is, you don’t want every templated aspect of a page, post, header, or footer shown in every instance it appears. And while it might seem as though you have to rewrite the template or theme code for each time you want this omission to occur, that’s not actually true.
In fact, you can hide elements on your website quickly using just CSS. And it’s actually pretty easy. Today, we’re discussing eight different ways to do so. Each of these options describe a legitimate way to obscure site elements. We’re not taking shortcuts here. But you will find that these methods are quite easy to implement.
Why Hide Elements Using CSS in the First Place?
There are several reasons you may want to hide elements on your website. Often, it comes down to saving time on redesigns and such. But four popular reasons include:
- When you want to hide meta data on WordPress pages and posts without having to rewrite your theme or make a ton of customizations.
- Making temporary changes to your site’s fonts, font sites, and other design elements is a popular choice during certain holiday seasons. Hiding elements can take care of this without necessitating a full redesign.
- Not every page or post needs comments. And if you still want them enabled elsewhere, you can remove them from specific places by hiding elements.
- Often, you may find that you want certain pages to not display your site’s standard header. This is especially useful if you want to create a landing page without having to build a new landing page template from scratch. Just hide the header on a standard page template and you’ll be good to go.
With these reasons in mind, let’s now explore eight ways you can hide elements using CSS on your website.
1. Use display: none
First up is one of the most popular ways to hide elements using CSS. It’s simply add the value of none to the display property. Here’s an example of what that looks like:
.my-class {
	display: none;
}
When you include the above in your custom CSS field or child theme, the element in question will no longer load. Important: that includes assistive devices like screen readers. More on that topic in a bit.
Unfortunately, this technique is not the best option to hide stuff on your pages. This has a lot to do with the fact that display has many other values attached to it already. And undoing none can create some unique headaches after the fact.
2. Use visibility: hidden
Another method is to use the visibility: hidden;. It works similarly to display: none; but instead of actually removing the element it just hides it and makes it invisible. So, if the element took up some amount of space before, it will still take up the same amount of space within your visible design — visitors just won’t be able to see it.
This obviously doesn’t work well if you wanted to render your site’s header invisible, for example, as all content would be shifted downward and the space in which the header usually resides would appear blank.

Yet, visibility:hidden; is actually quite useful for hiding sections without affecting the overall formatting of the page. All nested elements will still be used. This is not the case with display: none; where all nested elements and styles are removed entirely.
This method only works if you want to maintain the same design spacing but want the element to disappear.
3. Hide an Element Via CSS on a Specific Page or Post
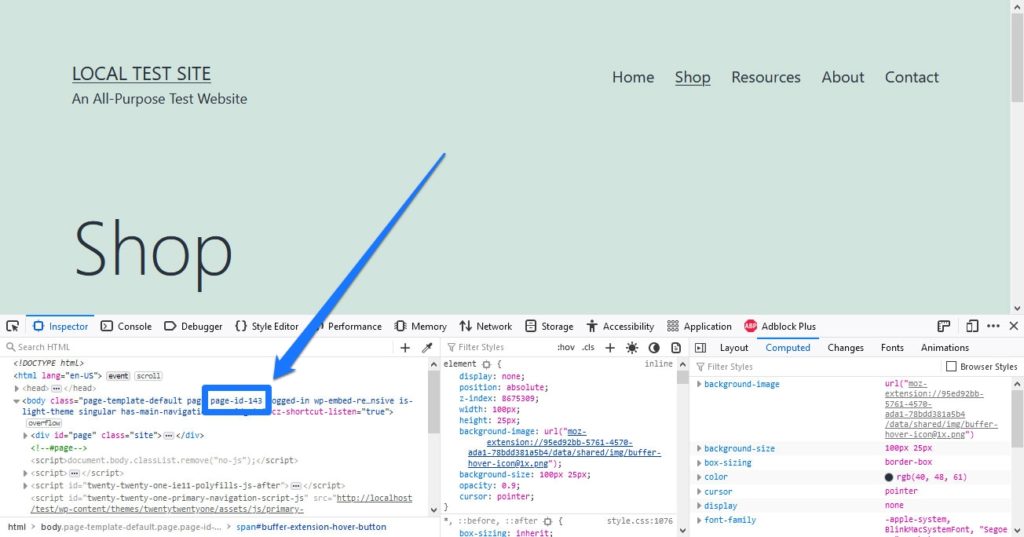
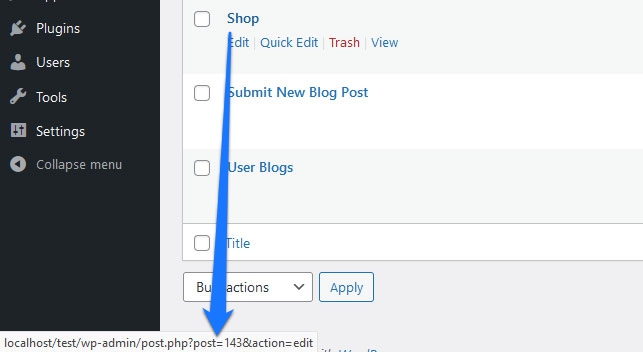
Though you can use display: none; to hide elements on pages and posts in WordPress, there is a bit more to it when making changes to the overall site structure of the CMS. If you want to do that, your first task is to find the page ID of the page in question.
One possibility is to examine it with your browser development tools and look at its body class.

Alternatively, hover over its name in the Pages menu and look at the URL displayed at the bottom of the browser window.
In addition, you need the HTML class or id of the element you want to hide on that page, such as .site-header. After that, it’s simply a matter of using the right selector.
.page-id-143 .site-header {
	display: none;
}
4. Use the transform Property
Another way to hide elements on your website via CSS is the transform property. This one allows you to manipulate page components in a variety of ways to hide them:
- Use
scale (0)to shrink an element until it’s no longer visible. - Apply
translate (-999px, 0px)to shift an element off screen.
This is a really useful methodbecause it moves the element you want to hide onto another layer and doesn’t affect your original design in any way. The element won’t trigger on page load, so it is totally hidden and out of view.
5. Use the hidden Attribute for Any Element
Or you might want to use the hidden attribute. This one can apply to any element. It actually works nearly identically to display: none; but actually has the benefit of working in a larger number of cases. Some content management systems don’t allow you to make style changes (or you have to jump through a lot of hoops to accomplish it) so the hidden attribute is super helpful in these situations. You’d use it like this:
<p hidden>

// All the content you want to hide goes here.

</p>
However, it does carry all the same drawbacks as display: none;. Whatever is hidden will still be readable by assistive reading devices.
6. Use clip-path
Another option is to use the clip-path property. It works by making a clipping region that sets which aspects of an element can be seen and which are rendered invisible. Here’s how it works in practice:
.my-class {
	clip-path: circle(0);
}
One drawback here is that it’s not very backward compatible and only works in modern browsers. This could result in elements you want hidden still appearing in older browsers for some visitors. Something to keep in mind.
7. Overlay an Element Using CSS
Moving on, something you might want to try is overlaying an element to hide aspects of your site. With this method, you’re literally placing one element on top of another so that the one underneath is no longer visible to site visitors. So long as the element positioned on top has the same color as your site background, it’ll effectively hide the element you want to obscure. A good way to implement this is the ::after pseudo-element:
<div class="item-to-hide"><div>

.item-to-hide {
	color: red;
	height: 200px;
	position: relative;
	width: 200px;
}

.item-to-hide::after {
	background-color: #fff;
	bottom: 0;
	content: '';
	left: 0;
	position: absolute;
	right: 0;
	top: 0;
}
However, it might be a bit more finicky to work with than some of the other methods detailed here. Plus, you still run into the issue of assistive devices reading the hidden element. Additionally, in this case, it could be even more confusing, as it would be reading the hidden element and the one overlaid, which isn’t a good look.
8. Employ position: absolute
Another way to hide elements with CSS is to use the position property. Here, you’re basically removing the element you want to hide from the normal HTML flow and place it outside of the visible realm. Setting an elements positioning to absolute places it at a specific point relative to the web browser, not in relation to other elements. Here’s how to use this trick to hide things on your page:
.my-class {
	position: absolute;
	left: -999px;
}
This shifts the chosen element off-screen so it’s no longer visible. Often, it won’t be readable for assistive devices either.
Hiding Elements with Accessibility in Mind
So far, we’ve discussed eight different effective ways to hide elements on your website by using CSS. However, many of these tactics only hide the elements for sighted people, leaving them still visible to assistive devices like screen readers. As you can imagine, this can create a lot of confusion when a hidden element is suddenly read aloud. Whoops!
A popular example of this happening is when people simply make the text color match the background color of a website. Sure, most people won’t be able to see it but assistive technologies still can and will read out its content. It’s not a good look. At best, it means content you didn’t want to be visible still is to some users. But at worst, it indicates your website is not accessible, which just isn’t acceptable in 2021.
Many of the above mentioned methods to hide elements can be made accessible simply by making use of the aria-hidden="true" attribute, which will hide the element in question from screen readers as well. ARIA stands for Accessible Rich Internet Applications and is a series of attributes that you can apply to your website and apps to make them accessibility ready.
<div class="my-class" aria-hidden="true"></div>If your site relies on animations to hide elements, it may be a good idea to disable them for visitors who don’t handle them well. To do this, you can use the prefers-reduced-motion media query. That way, if a visitor has animations turned off in their user preferences, this CSS will honor that and you’ll be assisting those who have seizures and migraines.
@media (prefers-reduced-motion) {
	.my-class {
		animation: none;
	}
}
Conclusion: How to Hide Elements On Your Site Using CSS
Sometimes there are good reasons to hide parts of your website from visitors. Thankfully, you can easily do so via CSS markup. By using the methods described above, you can quickly and easily make changes without having to recode your entire site. And by keeping accessibility in mind in your modifications, you’re serving a larger portion of your potential audience.
What’s your favorite CSS hack to hide site elements? Please share your tips in the comments!


4 Comments