
Running an online store comes with a unique set of challenges and demands, from order fulfillment and tracking to customer service and support. However, managing an eCommerce business becomes even more complicated when you (or your clients) have multiple sites to handle.
Fortunately, combining WooCommerce with WordPress Multisite can make it significantly easier. Whether your client has one big online store they wish to separate into individual shops or a variety of separate sites they want to run from a single dashboard, setting up a network lets them monitor and maintain everything with ease.
In this post, we’ll discuss what a WooCommerce Multisite network is and the benefits of it. Then we’ll take you through how to set one up and provide some key maintenance and aftercare tips. Let’s get started!
An Introduction to WooCommerce Multisite Networks
As you may know, WooCommerce is a powerful and flexible WordPress plugin you can use to create and manage an online store on your personal or business website:

However, when you have multiple eCommerce sites to run, setting up individual domains for each and switching between dashboards can be time-consuming, expensive, and above all else, inefficient. That’s where WooCommerce Multisite networks come in.
In addition to being compatible with single WordPress installations, the WooCommerce plugin also works with the Multisite feature. When combined, they result in an eCommerce network.
With a WooCommerce Multisite network, you can configure each site to be its own eCommerce store. Once the WooCommerce plugin is installed and activated on the main site, it will be available across the network. This means you can monitor, manage, and maintain all your stores from a single dashboard.
You can enable the WooCommerce functionality for one, some, or all of the subsites within a WordPress Multisite network. Moreover, each online store can be managed individually as well if you need to make adjustments to a particular subsite.
The Benefits of Using a WooCommerce Multisite Network
A WooCommerce Multisite network can help streamline the maintenance of multiple eCommerce sites and boost overall productivity by letting you manage your stores from a centralized hub. You can create individual, independent shops or break a single online store into separate categories with their own subdomains.
For example, perhaps your client wants a different subsite for each product line or brand they offer. Not only can this help customers find what they’re looking for faster, but it can also make it easier to target specific audiences.
With WooCommerce Multisite, you can also let users sign up to create their own online stores within the network. This is similar to online marketplace platforms such as Etsy.
Additional benefits of setting up a WooCommerce Multisite network include:
- Quickly and easily create online stores for different countries and currencies
- Control and manage multiple, individually run online brands and companies from the same WordPress installation
- Install WooCommerce themes and plugins once, then use them for each site in the network
- Access detailed reports for every site, making it easier to monitor performance and effectively control the operations of each of them
It’s worth noting that, while installing the WooCommerce plugin on a WordPress Multisite network streamlines a lot of monitoring and maintenance activities, it doesn’t let you share or sync settings across stores (at least not by default). For that, you would need to leverage an additional WooCommerce extension or custom code.
How to Set Up a WooCommerce Multisite Network (In 4 Steps)
Whether you’re developing eCommerce sites for your clients or simply want a better way of monitoring all of your stores from one place, knowing how to set up a WooCommerce Multisite network is helpful. Let’s take a look at how to do so in four steps.
Note that for the purposes of this post, we’re assuming you already have a WordPress installation set up.
Step 1: Enable the WordPress Multisite Feature
New WordPress installations do not come with the Multisite feature turned on by default. Some hosting providers give you the option to activate it when you install WordPress.
Otherwise, you can enable it manually by editing your wp-config.php file. To do so, connect to your server via your preferred File Transfer Protocol (FTP) client.
Within the wp-config.php file, above where it says “/* That’s all, stop editing! Happy blogging. */”, add the following line of code:
define( 'WP_ALLOW_MULTISITE', true );Save the file. When you’re done, return your WordPress admin dashboard.
Step 2: Create Your Multisite Network
Next, navigate to Tools > Network Setup. You’ll be asked to choose your preferred URL structure (if it’s a new WordPress installation), a network title, and a network admin email address:
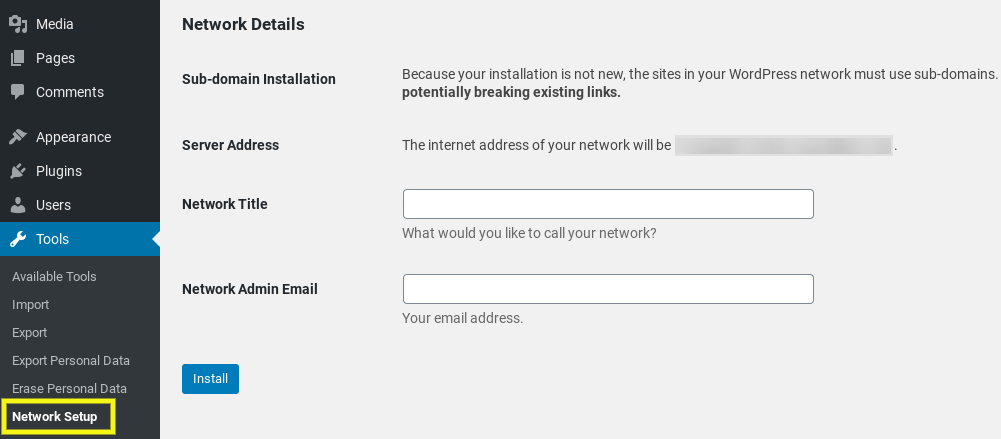
When you’re done, click on the Install button. It will present you with two respective snippets of code to add to your .htaccess and wp-config.php files:
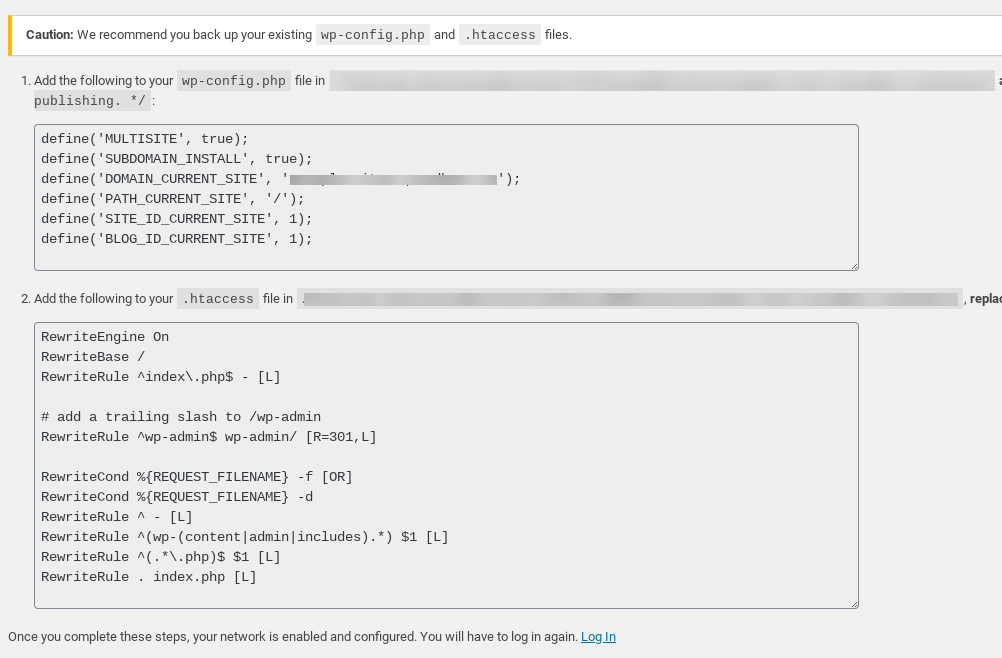
Once you do that, log back into your WordPress admin dashboard. You can now begin adding sites to your network.
We won’t go into this process in detail in this post. However, if you need further guidance, you check out our previous post on how to set up WordPress Multisite.
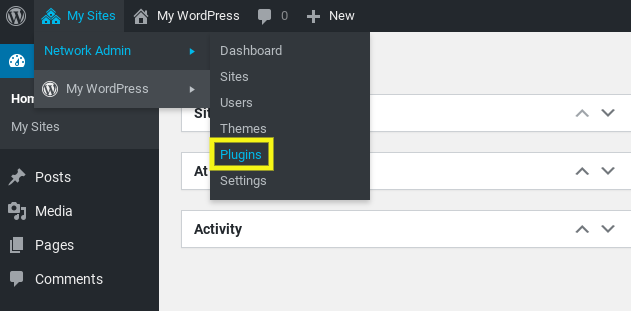
Step 3: Install the WooCommerce Plugin on Your Multisite Network
Once you have your Multisite network set up, the next step is to add the WooCommerce plugin. To do so, hover over My Sites > Network Admin, then click on Plugins:
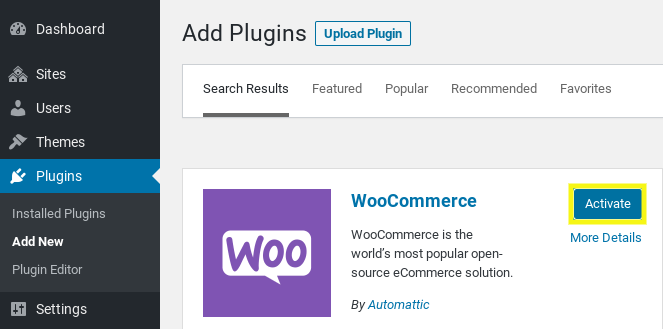
From here, you can add a plugin as you normally would. Click on Add New, then search for “WooCommerce”. Select the Install Now button, followed by Activate:
This will activate the WooCommerce plugin at the network level. Next, navigate to Sites. Under your main website, select the Dashboard link:
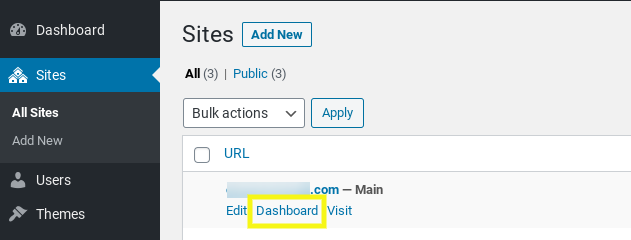
It will automatically bring you to the WooCommerce Setup Wizard.
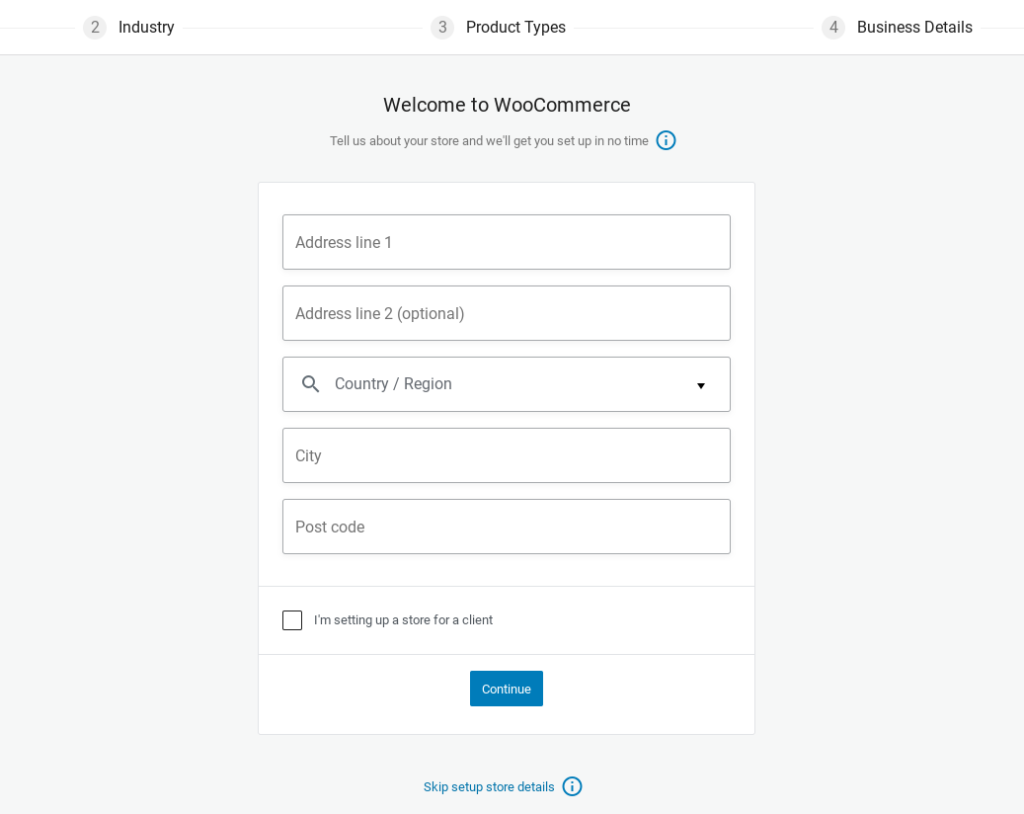
Step 4: Configure the WooCommerce Store Settings for Each Site
The WooCommerce Setup Wizard guides you through a series of prompts to fill out your store and business details. You can complete these forms immediately or click on the link at the bottom of the screen to skip them for now:
Remember that each site in the network requires you to manage its settings individually. For example, adding new products to one store will not add them to the rest of the stores on the network. The same is true for customer registrations, payments, shipping options, and more.
Therefore, you will need to configure your stores separately. To navigate between sites, hover over My Sites:
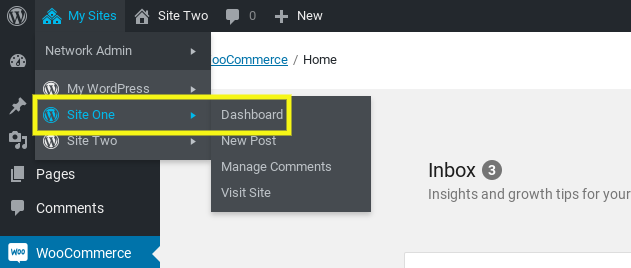
Then select the site you want to configure from the list. Repeat this process until you’ve configured all your network’s stores.
Maintenance Tips for WooCommerce Multisite Networks
Once you have your WooCommerce Multisite network up and running, it’s essential to make sure you properly maintain it. Let’s take a look at a few key maintenance and aftercare tips for eCommerce networks.
Choose a Fast and Reliable Host
Although a WooCommerce Multisite network enables site owners to run multiple eCommerce shops as individual subsites, they are all powered by the same hosting plan. As such, it’s important to choose a reliable WooCommerce hosting provider that is optimized for eCommerce sites and provides a positive customer experience.
Therefore, if your current web host is not equipped to handle sudden spikes in traffic or your network is hosted on a shared server, you might want to consider upgrading to a different plan or provider. We recommend Virtual Private Server (VPS) or dedicated hosting for this type of setup.
Keep Each Store Updated
All of the subsites within a WooCommerce Multisite network share the same database, which can pose some security risks. Therefore, it’s essential to stay on top of updates to help safeguard your eCommerce stores.
To update WooCommerce, navigate to Dashboard > Updates from your Network Admin screen:
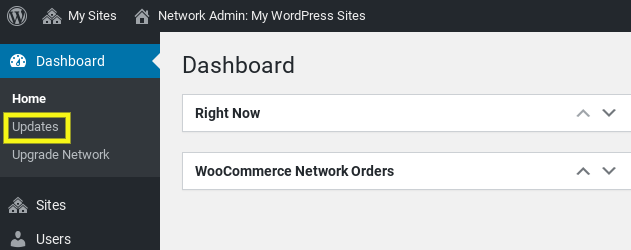
Updating the WooCommerce plugin here will install the latest version across all your sites.
Leverage WooCommerce Extensions to Expand Multisite Functionality
There are some functions and features that aren’t available with WordPress and WooCommerce alone. However, there are third-party extensions you can use to acquire them.
For example, WooCommerce Global Cart is a premium plugin that lets you create a shared checkout and shopping cart for your entire Multisite network. That means customers won’t have to switch between stores and make multiple purchases if they want to buy products from more than one subsite. This is useful if you plan to use the network as an eCommerce marketplace.
Another extension you might consider is Multistore with WooCommerce. With this plugin, you can streamline inventory management and distribute products across your network.
Conclusion
There are many different reasons for and benefits of running multiple eCommerce sites, whether it’s for the same brand or several different ones. However, trying to manage them individually is a waste of time, especially when you can set up a WooCommerce Multisite network to streamline the process.
As we discussed in this post, you can set up a WooCommerce Multisite network in four easy steps:
- Enable the Multisite feature on your WordPress installation.
- Create your Multisite network.
- Install the WooCommerce plugin on your network.
- Configure each store’s WooCommerce settings.
Do you have any questions about setting up a WooCommerce Multisite network? Let us know in the comments section below!
No Comments