If you have ever asked yourself “how do you change text in CSS?”, this is the right post for you. In the following, we will go over the many ways you can customize text on a website using CSS markup.
Why does this matter?
Because typography is an important part of web design. Just like using custom fonts, the ability to style text on your website to make sure it fits the rest of your branding is paramount.
Thankfully, CSS offers a lot of styling options to help with that. In this post, we will cover all the most important ones and some lesser known.
17 Different Ways to Style Text Via CSS
What follows are different ways to customize text on web pages via CSS properties. You can try all of these out easily using your browser developer tools. That’s right, you don’t even have to have your own website, you can try it out on any web page that has text on it.

1. font-family
The first thing we want to talk about is the font-family property. This one determines which font your text will use.
It’s pretty easy to use. Below is the accompanying code for the example above.
#div-one {
	font-family: Arial;
}

#div-two {
	font-family: Courier;
}

#div-three {
	font-family: Impact;
}
You simply determine the element that you want to change the font of with a CSS selector, add the font-family property, and include the name of the font as the value.
Values can either be font family names like Arial and "Open Sans" or generic font declarations such as serif or monospace. If you use the latter, the browser will use the closest approximation it has.
If the value contains whitespace, such as “Times New Roman", you need to use double quotation marks, if it doesn’t, like Tahoma or sans-serif, you can omit them.
Creating Font Stacks
In web design, you usually include fallback fonts by giving a list of fonts (a so-called font stack) divided by commas.
#div {
	font-family: "Open Sans", Arial, sans-serif;
}
These are in case the browser does not have the original font available (e.g. because it’s not installed on the user computer or missing on the website). It then moves on to the second in the list, and so forth until it finds one that it can work with.
This way, you can make sure that your website still looks most like what you originally had in mind even if a visitor can’t make use of the font you had intended.
For that to work, the last two fallbacks are usually a web safe font that is most likely to be available on any computer and then a generic declaration such as serif or sans-serif. You can find web safe fonts and their compatibility here.
Another common practice is to define default fonts at the beginning of the style sheet by assigning them to the body selector and all headings, then use other font families for specific elements further below.
body {
	font-family: Garamond, "Times New Roman", serif;
}

h1,
h2,
h3,
h4,
h5,
h6 {
	font-family: "Roboto", "Helvetica Neue", sans-serif;
}

.page-title {
	font-family: Garamond, serif;
}
2. font-size
As is probably obvious, with this CSS property you can customize the size of text.
You have two choices: set absolute sizes (e.g. in px) or relative (in em, rem, or similar).
#div-one {
	font-size: 20px;
}

#div-two {
	font-size: 8em;
}

#div-three {
	font-size: 5rem;
}
The latter is more common these days as it’s more useful for responsive design and accessibility.
When using em, 1em equals 16px (that’s the browser default font size). You can calculate other font sizes from there, just divide the pixel value you want by 16 to arrive at the em value. For example, these two font-size declarations will come out the same size:
#div-one {
	font-size: 32px;
}

#div-two {
	font-size: 2em;
}
There is a bunch more math involved in using em and rem sometimes and you can read more about it here.
3. font-weight
Use font-weight to control the thickness of your fonts.
There are several ways to do this. Either use one of the pre-existing font weight designations (thin, light, normal, bold, extra-bold, etc.) or input a bold value number (between 1 and 1000 for variable fonts, in steps of one hundred between 100 and 900 for non-variable fonts).
#div-one {
	font-weight: light;
}

#div-two {
	font-weight: 800;
}

#div-three {
	font-weight: bolder;
}
You can also use lighter and bolder to state that you want to increase/decrease the weight by one step in comparison to the parent element. However, this is very rare.
Be aware that, in order to use a particular font weight, it needs to be present on your site or user’s machine (and available in the chosen font to begin with). That’s why, when installing custom fonts, you can choose which font weights to include.

If a weight is not loaded, the browser can not use it.
4. font-style
In almost all cases this CSS property is used to make a font italic. It only takes three values: normal (default), italic, and oblique.
oblique is almost the same as italic but simulates italicized fonts by slanting the original font. Also, browser support is worse. Here’s how to use font-style:
#div-one {
	font-style: normal;
}

#div-two {
	font-style: italic;
}

#div-three {
	font-style: oblique;
}
5. font-variant
font-variant only has one use: to make fonts appear in small caps, which means lowercase letters transformed into smaller uppercase. Sounds unclear? Here’s what I mean:
Don’t ask me for a use case for this, that’s probably from the ancient times of the Internet. If you want to give it a try, here’s how to do it:
#div {
	font-variant: small-caps;
}
6. font
This is a shorthand property that you can use to declare font-style, font-variant, font-weight, font-size, line-height, and font-family all in one declaration.
#div {
	font: italic small-caps 300 40px/200px Impact;
}
Here’s the syntax for how to use it (note the slash between font-size and line-height, this is mandatory if you want to declare both):
font: font-style font-variant font-weight font-size/line-height font-family;Only font-size and font-family are required, the rest will fall back to the default if it’s not declared.
There are also some other values that you can use such as caption, icon, and small-caption. More about this here.
7. color
The color property determines, you guessed it, the font color and only the font color (including any text-decoration elements). Many beginners (me included) might think that it should also determine the color of the entire elements but for that you have to look into background-color (because, technically, color colors the foreground).
Using color is simple enough:
#div-one {
	color: #f2db3f;
}

#div-two {
	color: #1bf20f;
}

#div-three {
	color: #412535;
}
You can define the color of text in several different ways:
- Using a color name like
red,pink,bluebut alsopapayawhipornavajowhite(there is an extensive list of predefined HTML colors to choose from). - As a hex value, e.g.
#ff0000. - An RGB color value such as
rgb(255, 0, 0);.
For more information, check the our extensive tutorial on how to define colors in CSS.
8. background-color
If you want to go even further, you can also use background-color. As already mentioned above, this is the property that controls the color of the text backdrop. It’s often useful in combination with color in order to make sure that the text has enough contrast to remain legible. You can use this tool to be sure that is true.
This, too, is an important factor in accessibility. Here’s how you can achieve the above in CSS:
#div {
	color: #f2db3f;
}

#div p {
	background-color: #000;
}
9. text-transform
Another way to customize text on your website via CSS is to use text-transform. It has only three use cases: make text all uppercase, all lowercase, or capitalize the first letter of every word.
It’s also very simple to use:
#div-one {
	text-transform: uppercase;
}

#div-two {
	text-transform: lowercase;
}

#div-three {
	text-transform: capitalize;
}
There is another value for text-transform, which is full-width. It transforms all letters to be placed inside a fixed-width square. This is usually only relevant when using glyphs of Asian languages like Japanese or Korean, especially in combination with the Latin alphabet.
10. text-decoration
This is actually a shorthand for four different properties: text-decoration-line, text-decoration-color, text-decoration-style, and text-decoration-thickness.
However, in most cases, you simply use text-decoration on its own. What kind of values do the different properties take and what do they do?
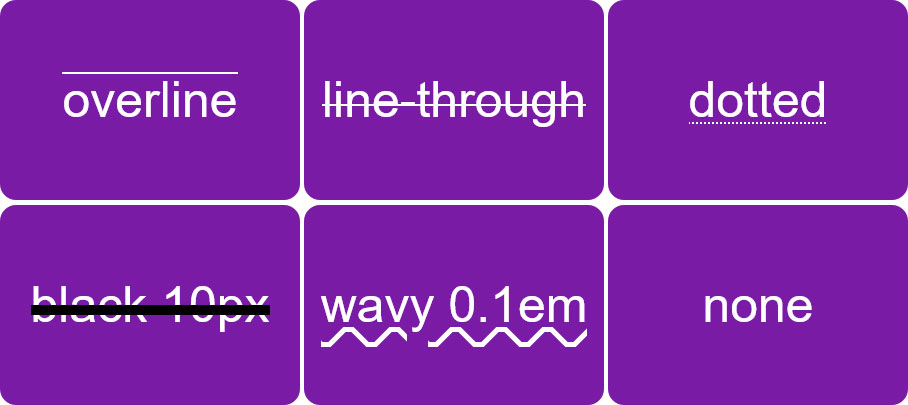
text-decoration-line— You can useoverline,line-through,underline, andnoneto create lines above, below, or through text.noneis most often used to remove the standard underlining of links. You can also use more than one value in combination.text-decoration-color— Controls the color of the line. It takes the usual CSS color declarations.text-decoration-style— Change the style of the decoration. It can besolid,double,dotted,dashed,wavy, andnone.text-decoration-thickness— Set how thick the line appears via the usual values, likepx,%, andem. It also takesautoandfrom-font, which uses any value that might be included in the chosen font.
How to Use text-decoration
You can use these on their own but, as mentioned, it’s more common to use the shorthand instead. Here’s the syntax for that:
text-decoration: text-decoration-line text-decoration-color text-decoration-style text-decoration-thickness;Only the value for text-decoration-line is required, the rest is optional. To achieve the effects seen in the example image above, you can use the code below.
#div-one {
	text-decoration: overline;
}

#div-two {
	text-decoration: line-through;
}

#div-three {
	text-decoration: underline dotted;
}

#div-four {
	text-decoration: line-through black 10px;
}

#div-five {
	text-decoration: underline wavy 0.1em;
}

#div-six {
	text-decoration: none;
}
Quick tip: a common alternative to using text-decoration for underlining text such as links, is to use the border property instead. It offers the benefit that you can control the distance between the line and the text and can also make the line extend beyond the text. Both are not possible with text-decoration.
11. text-shadow
If you have read our tutorial on CSS box shadows, text-shadow should not pose a big problem for you. Basically, you can use it to give text a shadow including control over its orientation, color, and blur.
#div-one {
	text-shadow: -5px 4px black;
}

#div-two {
	text-shadow: 0 0 20px #fff;
}

#div-three {
	text-shadow:
	-10px -10px rgba(0, 0, 0, 0.4),
	-20px -20px rgba(0, 0, 0, 0.3),
	-30px -30px rgba(0, 0, 0, 0.2),
	-40px -40px rgba(0, 0, 0, 0.1),
	-50px -50px rgba(0, 0, 0, 0.05);
}
text-shadow takes up to four values: horizontal offset, vertical offset, blur, and color.
text-shadow: offset-x offset-y blur-radius color;The first two are mandatory when using text-shadow, the others are optional. Note that the offsets take negative values to move the shadow left and up, positive values for right and down.
You can define both offsets, blur, and color in the usual ways for determining dimensions and colors in CSS. Except for color, they most commonly use px.
Also, just like for box-shadow, you can also set several shadows to the same element in one declaration, just comma separate them.
12. text-align
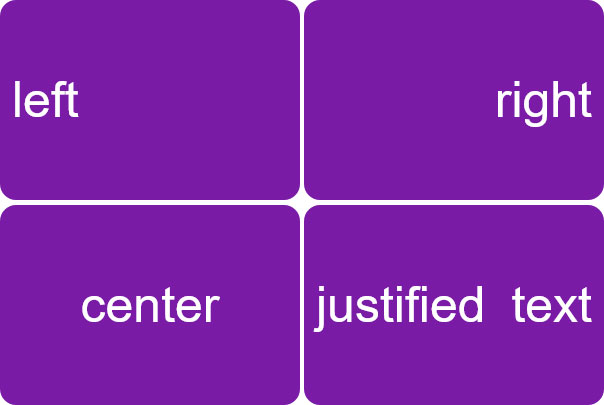
With the CSS property text-align, you can customize the horizontal alignment of text on your website. It can either be left, right, center, or justify (meaning the spaces between words stretch to make the text fit the available space).
Here’s the accompanying code to the image above:
#div-one {
	text-align: left;
}

#div-two {
	text-align: right;
}

#div-three {
	text-align: center;
}

#div-four {
	text-align: justify;
}
Note that, depending on the text direction (left to right or right to left), the default alignment is either left or right and there is no need specifically define it via CSS as it happens automatically.
Related properties to text-align are:
text-align-last— Works the same as text-align but only affects the last line of text in an element.direction/unicode-bidi— Allow you to change the direction of text (e.g. right-to-left).
13. – 16. Text Spacing
There are a number of CSS properties you can use to change spacing in website text.
line-height
This can make a difference in the spacing between lines of text. It takes the usual CSS size and length units but is most commonly simply defined as a multiplier without a unit.
div {
	line-height: 2;
}
When you do that, the line height will simply be a product of the font size and the value in line-height.
word-spacing
This property gives you control over the distance between individual words (you would have never guessed that, I am sure).
As you can see from the image above, it also takes negative values to make the distance smaller. Aside from that, you can use it with most length and size unit declarations available in CSS.
div {
	word-spacing: 10px;
}
letter-spacing
The name also already gives it away, you can use this to increase or decrease the space between letters.
The latter happens, of course, via negative values and letter-spacing, too, takes the usual units for declaring sizes.
div {
	letter-spacing: 12px;
}
text-indent
This CSS property gives you the ability to indent the first line of text in the element that you apply it to.
Here’s how it looks like in markup:
div p {
	text-indent: 25%;
}
You can use the usual width and length units as well as percentage. Negative values also allow you to move text to the left.
17. Other Ways to Customize Text Via CSS
Besides what we have already covered, there are additional ways to target text in CSS. To do so, it makes sense to learn about HTML classes and ids, custom properties, and pseudo elements like ::first-letter or ::first-word. While this is a bit beyond the scope of this article, but be sure to check out the linked tutorials.
There are also more CSS properties that let you work with text and really get into the nitty gritty. You may want to look into things like word-break, hyphen, or font-kerning if you want to get really nerdy.
Text Customization in CSS in a Nutshell
CSS provides many ways to customize text on your website. Together with custom fonts, it allows you to make your page copy look exactly the way you want.
Above, we have gone over the most important CSS properties to allow you to make sweeping changes. While there are a bunch more out there, these are the core of what you need.
Do you know any other useful CSS properties you can use to customize text on websites? If so, let us know in the comments!


2 Comments