Question: Which plugin appears first in Google when you type in “WordPress SEO,” has over five million active installs, a 4.8-star rating in the WordPress directory, and is a regular on the most popular plugins list? If you just answered “Yoast SEO,” you would be correct and in this tutorial, you will learn how to use it correctly.
The plugin by team Yoast is one of the best out there. It’s powerful, offers tremendous value, is meticulously updated and supported, and literally millions of people use it.
That includes me. I have the plugin installed on basically all of my blogs and client websites (even though lately I have been looking into alternatives).
However, with its multitude of settings, the plugin can be overwhelming — especially for beginners. Therefore, in this article we will take an in-depth look at how to use Yoast SEO. We will look at everything from setup and configuration to day-to-day use optimizing your posts for search engines.
Well, we have a lot of ground to cover, so let’s get going.
Why Yoast?
Every site needs to be optimizing their content in order to rank higher in the SERPs. This is one of the best ways to generate organic traffic. By utilizing the right keywords, formatting your content properly, and adding an attractive and clickable meta description, you cn attract clicks and get more visitors essentially for free.
But many SEO options, such as the ability to add a meta description or analyze your content for keyword usage, aren’t present in WordPress by default. This is where Yoast comes into play. Here is why it’s a great option:
- With 5+ million active installs, it’s the most popular SEO plugin and indeed one of the most popular WordPress plugins of all time.
- The plugin has been around since 2008, and has always maintained a high rating with frequent updates.
- All the SEO features you’ll need, both simple and highly technical, are available to fine-tune your site’s content.
- Post analysis features rate your content and give actionable tips on how to improve.
- Get full control over how your pages appear in Google search results. Change titles and description and set up schema so you’re more likely show up in rich results.
- Integrates seamlessly with many plugins, including both Gutenberg and the Classic Editor plugin, as well as Advanced Custom Fields, Zapier, Elementor, and more.
If you need an SEO plugin, then there’s little reason not to pick Yoast. But all those settings can be difficult to wrap your head around. Our guide will walk you through setup and configuration so you can get the hang of Yoast SEO.
How to Install and Configure Yoast SEO
Installing Yoast is much the same as any other plugin in the repository. The easiest way is to log into your dashboard and go to Plugins > Add New. If you click to the Popular tab you can find Yoast right there, or you can type in “Yoast” or “SEO” into the search box.
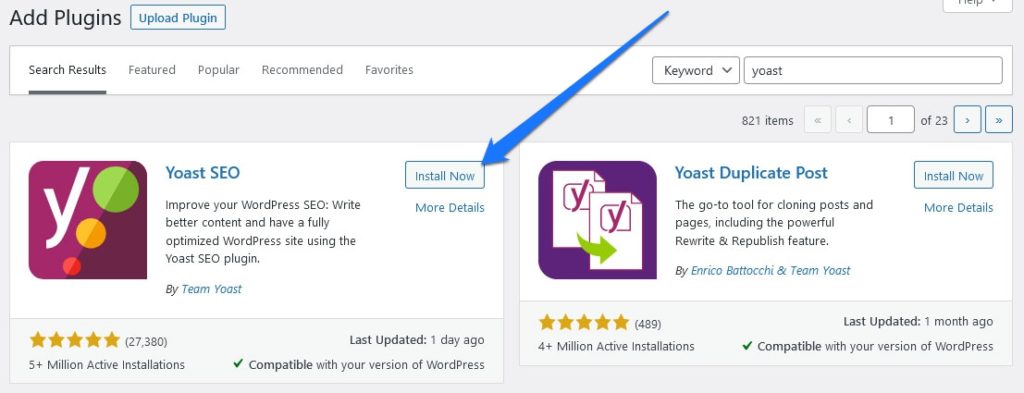
Either way, click Install Now and then Activate once it finishes installing. You can also go to Plugins > Installed Plugins and activate it from there.
Alternatively, upload a plugin file by going to Plugins > Add New and clicking Upload Plugin. If you manually downloaded it from the WordPress repository, or have purchased Yoast Premium and need to install it, this is what you should do.
First-Time Configuration Wizard
With Yoast installed and activated, your next step should be to run the first-time SEO configuration.
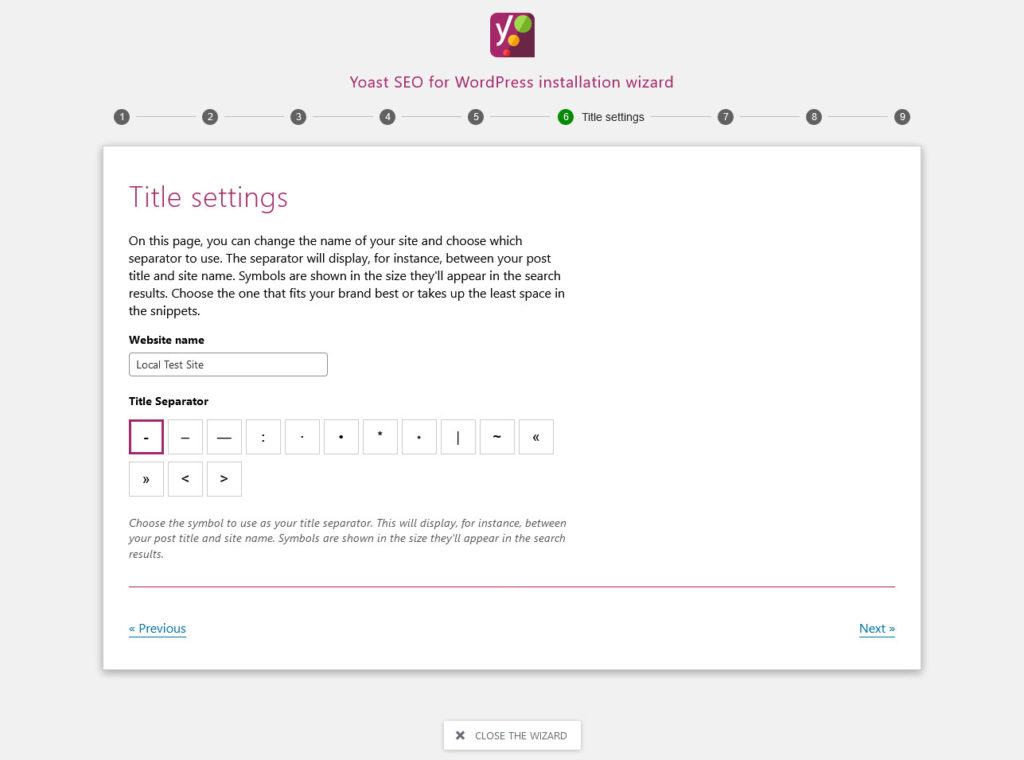
You can get to this either by hovering the Yoast icon in the top bar and clicking Configuration Wizard, or clicking on the new SEO settings in the left sidebar and finding the box at the top prompting you to go through the first-time setup.
You’ll be taken to a series of steps:
- Step 1 – Environment. Choose Option A if your website is live and you want it to be visible on Google and sites like it. Pick Option B if your site is still in development.
- Step 2 – Site Type. Pick what your site best represents, such as a blog or online business. If none fit, just select Something else.
- Step 3 – Organization or Person. Enter your organization info, or your name if this is just a personal site. Yoast will use this to set up a Knowledge Graph Card in Google, so people see your name, logo, and links to your social media when they look up your business.
- Step 4 – Search Engine Visibility. Choose whether posts and/or pages should appear in public search results.
- Step 5 – Multiple Authors. Will your site have multiple people publishing content on it? If not, Yoast will disable links to author archives to minimize the risk of getting an SEO penalty for duplicate content.
- Step 6 – Title Settings. Name your website and select a cosmetic symbol to serve as a separator between your site name and page title.
- Step 7 – Tracking. Are you comfortable with anonymous info being collected and used to improve the plugin? If you want to avoid all tracking, choose no.
- Step 8 – Learning. This is just an invitation to join the newsletter and some links to SEO training videos. If you don’t need this, you can skip through.
With that, you’re finished and your site is ready to go. You can always reopen the configuration wizard in SEO > General if you need to.
These are the basic settings and should be enough for many users, but there are plenty more to dig through if you really want to optimize everything.
SEO Data Optimization
There’s one last important step before you move on to the rest of the plugin. Once Yoast is active, you may find a notification in the top bar. Hover over the Yoast icon and click Notifications (1). Or just go straight to SEO > General.
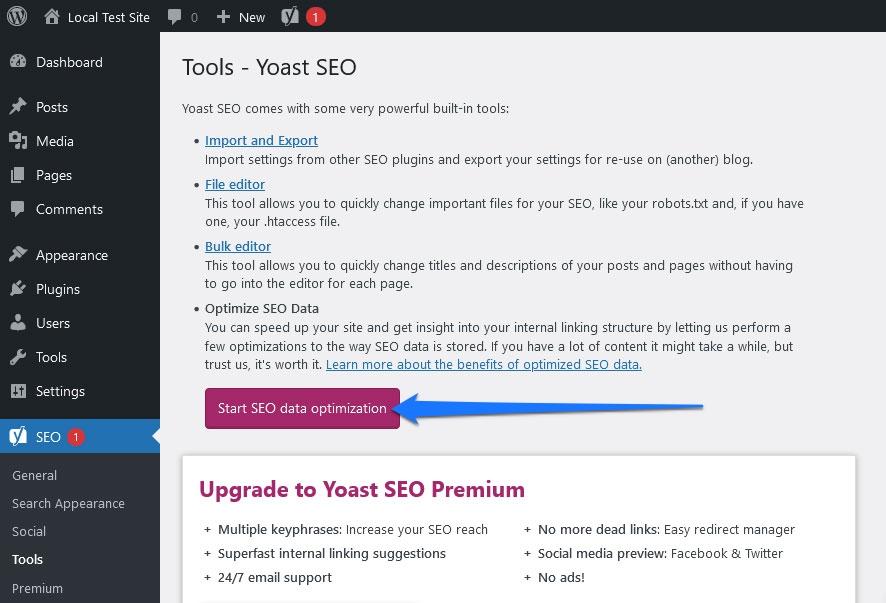
Under Notifications, find the message informing you that you should optimize your content and click the Start SEO Data Optimization button.
This will index your data and help Yoast speed up your site by adding metadata info to their database tables. It can take a while to run on large sites, but it’s definitely a good thing to do when you first get Yoast.
If you choose not to run this now, Yoast will index your content slowly over time as people visit your pages.
You can always find this setting under SEO > Tools if you didn’t receive a notification.
How to Use Yoast SEO’s Settings
Following the setup wizard should only take a few minutes, but extensively configuring Yoast SEO is a little more work. There are a lot of settings to go through as it lets you control many aspects of your site.
We’ll first go over how to configure the global settings to ensure your website appears correctly in the search results. After that, we will move on to the post analysis tools you’ll be using day to day.
The Yoast Dashboard Widget
One small addition from Yoast is the dashboard widget, which you can find on the Dashboard > Home page as soon as you login to your back end.
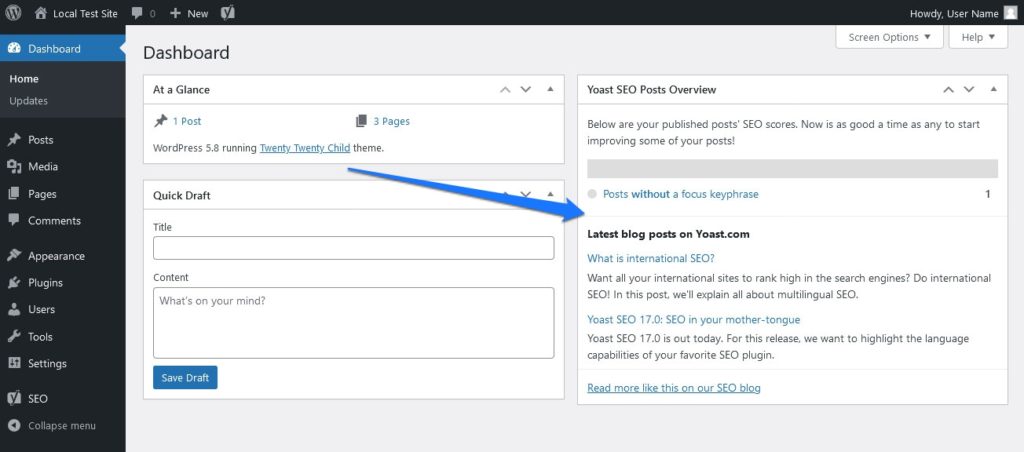
You’ll find a new box labeled Yoast SEO Posts Overview. This gives you a quick glance at your SEO status and provides info and quick links to posts that haven’t been optimized at all yet, and those few that need a little more attention.
You can always click the arrow in the box’s top right corner to minimize it, or if you don’t want it on your dashboard at all, find Screen Options in the top right corner of the page and untick the Yoast SEO Posts Overview box.

General
If you click on the newly-generated SEO menu in the main menu, you are first taken to the general settings tab. It is further divided into a number of submenus.
Dashboard
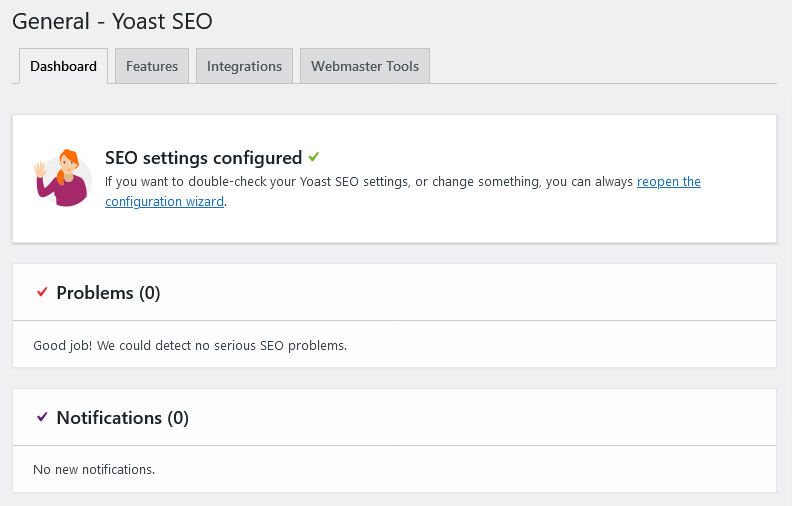
The dashboard is your hub for all important notifications about your website and content. You’ll find a link to the configuration wizard, along with a list of problems and any notifications that pop up. If anything changes with your website, you can find it here.
Most of the time, any notifications will appear in the Yoast symbol in the top bar, so you won’t need to check this page often.
Features
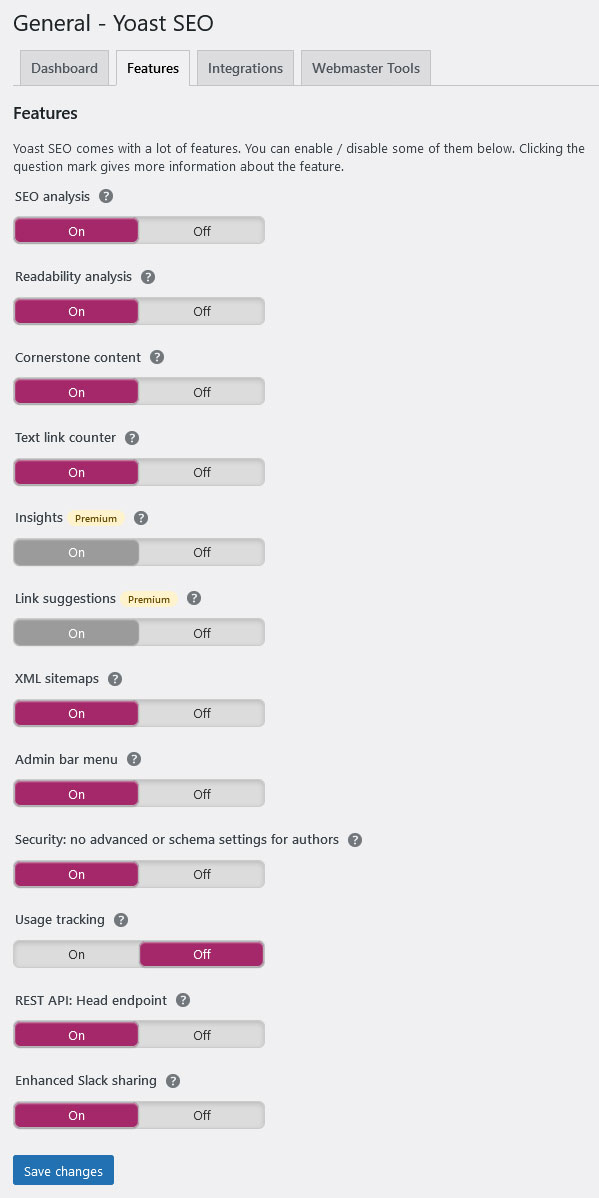
Yoast SEO is packed with features, and not everyone needs all of them. To reduce clutter and trim the plugin down a bit, you can disable any extra features you won’t be using. Here’s the list:
- SEO analysis – These are the suggestions you use to improve your posts. You’ll still be able to change settings like the meta description and title if you switch this off.
- Readability analysis – These suggestions help you improve your content structuring and grammar. If you already have a grammar plugin, you may want to turn it off.
- Cornerstone content – Marking your most important articles as cornerstone content improves their priority for internal linking suggestions and also makes the SEO/readability analysis more strict.
- Text link counter – The link counter lets you know how many of your articles link to and from a single post. Yoast informs you about orphaned articles that have no links to them.
- Insights – This premium feature lists prominent words that appear in your articles so you can compare them against your focus keyword.
- Link suggestions – Another premium feature offers internal linking suggestions for your other posts.
- XML sitemaps – If you have another sitemap plugin, you may want to turn this off to avoid SEO issues.
- Admin bar menu – If you don’t like the Yoast icon in the top bar, shut it off here.
- Security – Turning this off allows all users, not just editors and administrators, to change post schema and remove posts from search results. It’s best to leave on unless you know what you’re doing.
- Usage tracking – You can toggle this on or off here if you ever want to change the tracking settings you set during the first-time setup.
- Rest API – Unless you’re using headless WordPress, this setting is usually not necessary, but is also safe to leave on.
- Enhanced Slack sharing – This adds a rich snippet to your articles shared on Slack.
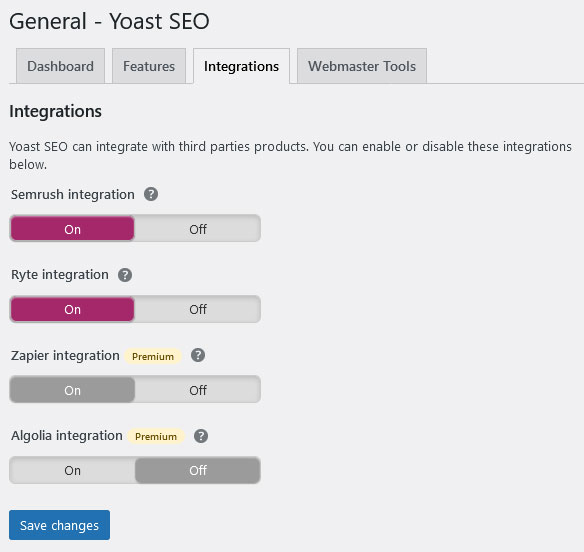
Integrations
Yoast comes with several integrations, which you can leave on default settings with no drawbacks. Alternatively, disable them if you don’t plan on using these services. Here are the current integrations:
- Semrush – An all-in-one SEO platform, which will offer extra insight into your focus keywords. Turn this off if you don’t want to see the “related keywords” prompt when setting a focus keyphrase.
- Ryte – A service designed to improve user experience that also periodically checks if your site is being indexed properly.
- Zapier – This is a workflow automation tool. Yoast connects with it to publish your posts automatically to social media platforms.
- Algolia – A site search tool that hooks with Yoast’s cornerstone content feature to push your most important articles to the top.
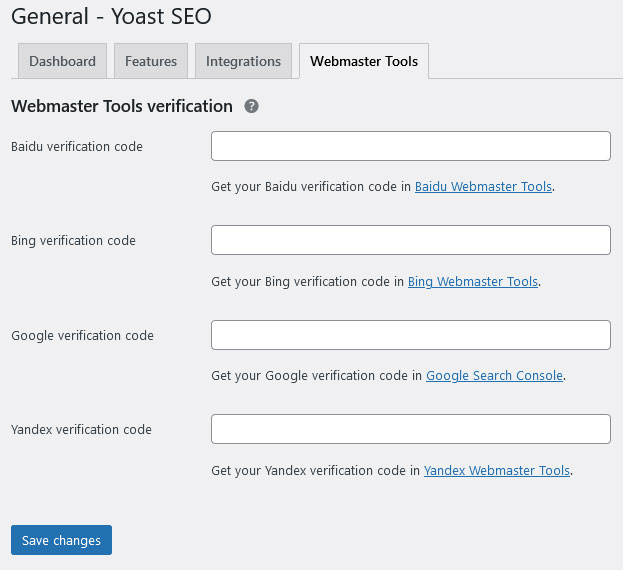
Webmaster Tools
Lastly, Yoast integrates with several search engines—Google, Baidu, Yandex, and Bing—to verify your domain when you attempt to claim ownership over your site.
When you sign up for a platform like Google Search Console, you need to prove that you’re the owner, or else anyone could just claim your site. Yoast will take a verification code provided by these services and insert it into your homepage automatically.
Search Appearance
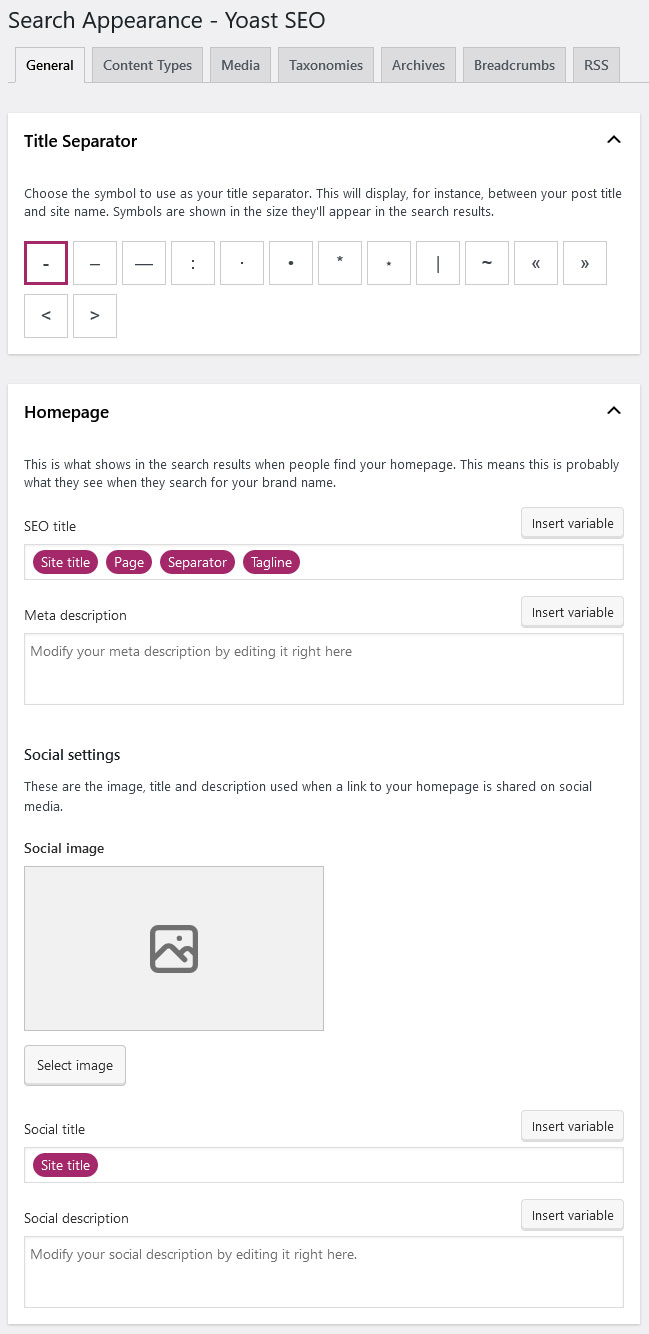
The Search Appearance settings allow you to change how your website will look when indexed by search engines.
General
On the General tab, you can pick a separator for your page title. This is purely cosmetic and therefore completely up to your taste. You can also modify your Google Knowledge Graph if you ever need to update company info.
We already configured both of these options in the installation wizard.
Content Types
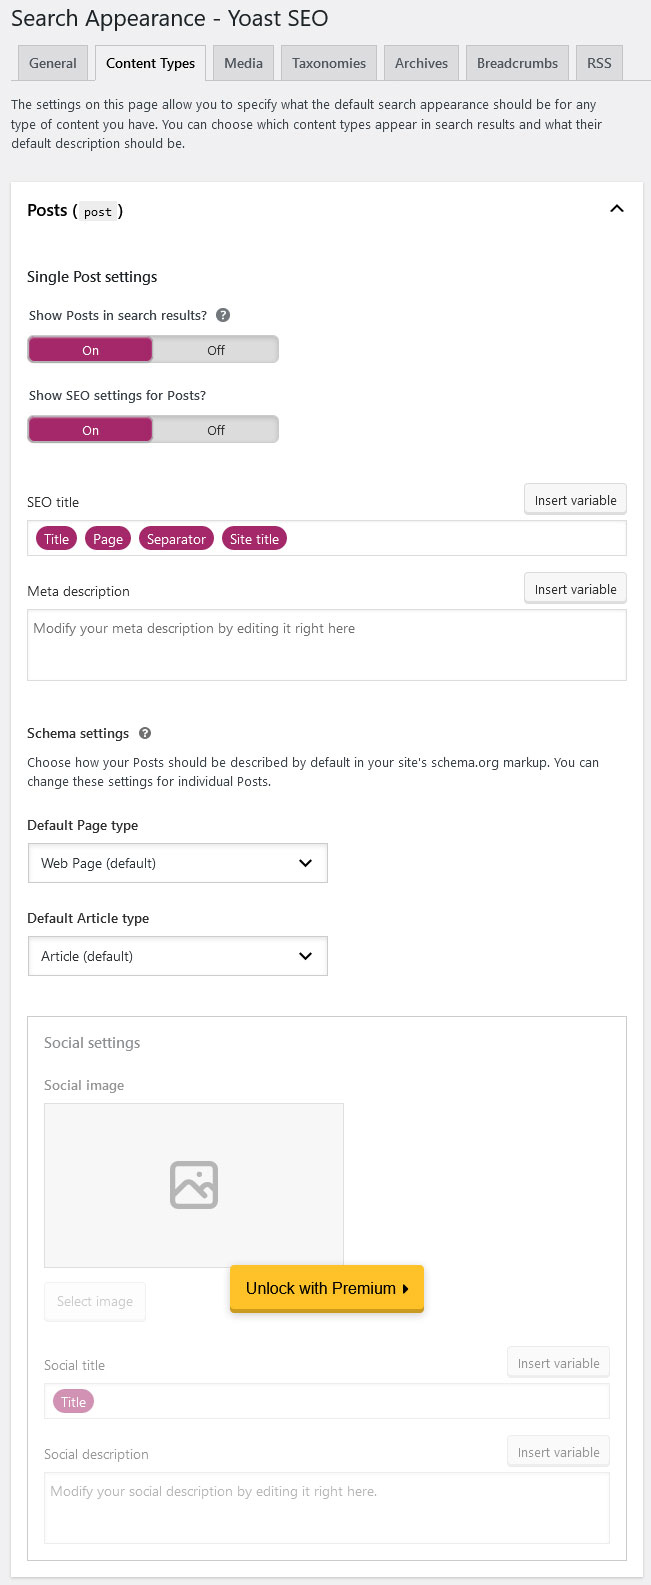
This is where you set the title format and meta description template for your posts, pages, media pages, and any custom post types. You can always overwrite whatever you add here locally, but it can save you some time to have a basic structure set up.
You can create defaults for posts and pages separately. Both use the same template:
- Show Posts/Pages in search results? – If you turn this off, your posts or pages will have the
noindexflag applied, so search engines won’t crawl them. - Show SEO settings for Posts/Pages? – If you’re not going to edit meta settings for posts or pages, you can disable Yoast’s SEO suggestions for a cleaner UI.
- SEO title – This allows you to set up the ordering of your titles. It’s a good idea to go with post title first, followed by your site name. Search engines and human visitors care more about the beginning of your title, so that’s where your article’s topic should appear. It’s also a good idea to attach your brand name to the post so people can start recognizing you in the search results.
- Meta description – You can set a default description for all posts or pages.
- Schema settings – This allows you to configure your schema so you’re more likely to get your pages to show up as rich snippets.
- Social settings – Premium users can select default images, titles, and descriptions for sharing on social media.
Yoast’s standard settings are sufficient for most cases.
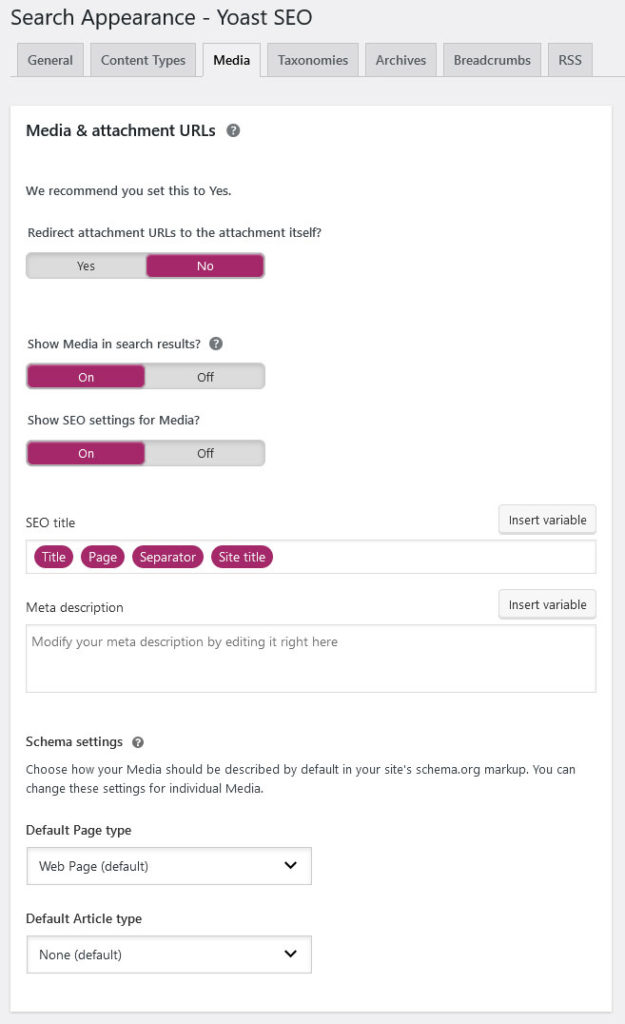
Media
There’s just one single setting here: Redirect attachment URLs to the attachment itself. When you upload attachments like images to WordPress, the platform creates a page for it which can damage your SEO due to thin content.
Leave this setting on, and visitors will be redirected straight to the image itself rather than the empty attachment page.
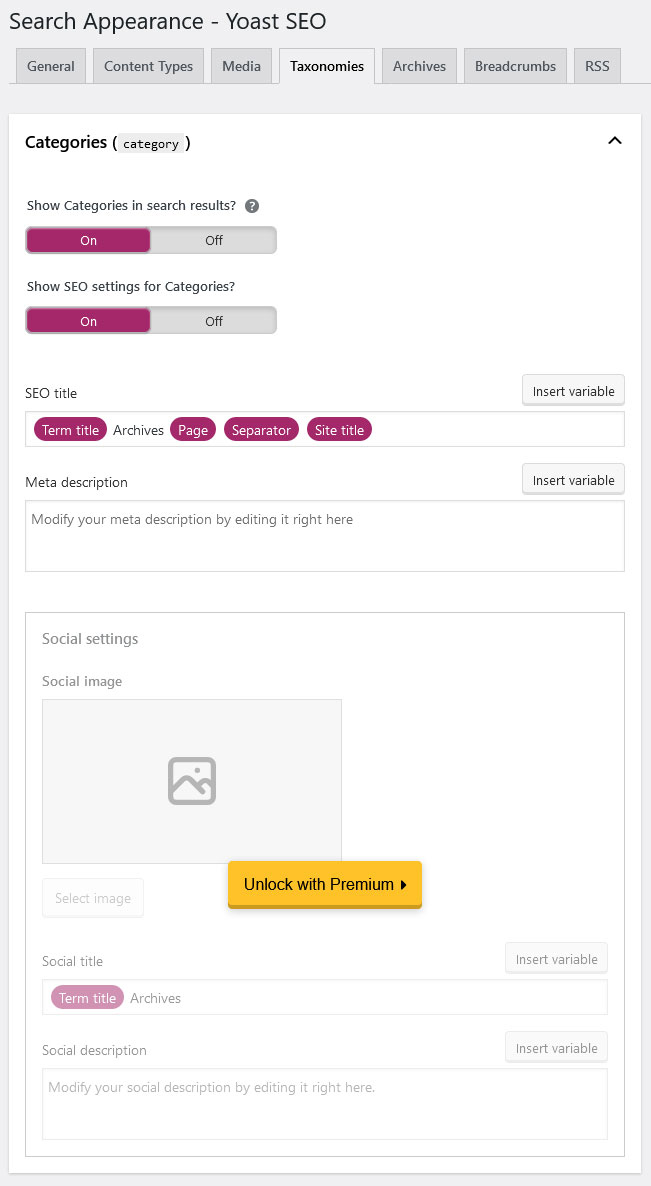
Taxonomies
WordPress creates some taxonomies by default—namely categories, tags, and post format. Depending on your settings, you might find additional ones on this page.
Here you can noindex any category pages you don’t want in search engines on a global level. You are also able to change the title formatting and meta description. Again, the standard title format should be fine, so not much work to do here. You can provide meta descriptions and SEO titles for taxonomies on a local level later.
Finally, you can choose to remove the /category/ URL prefix, but this is safe to leave on the default setting.
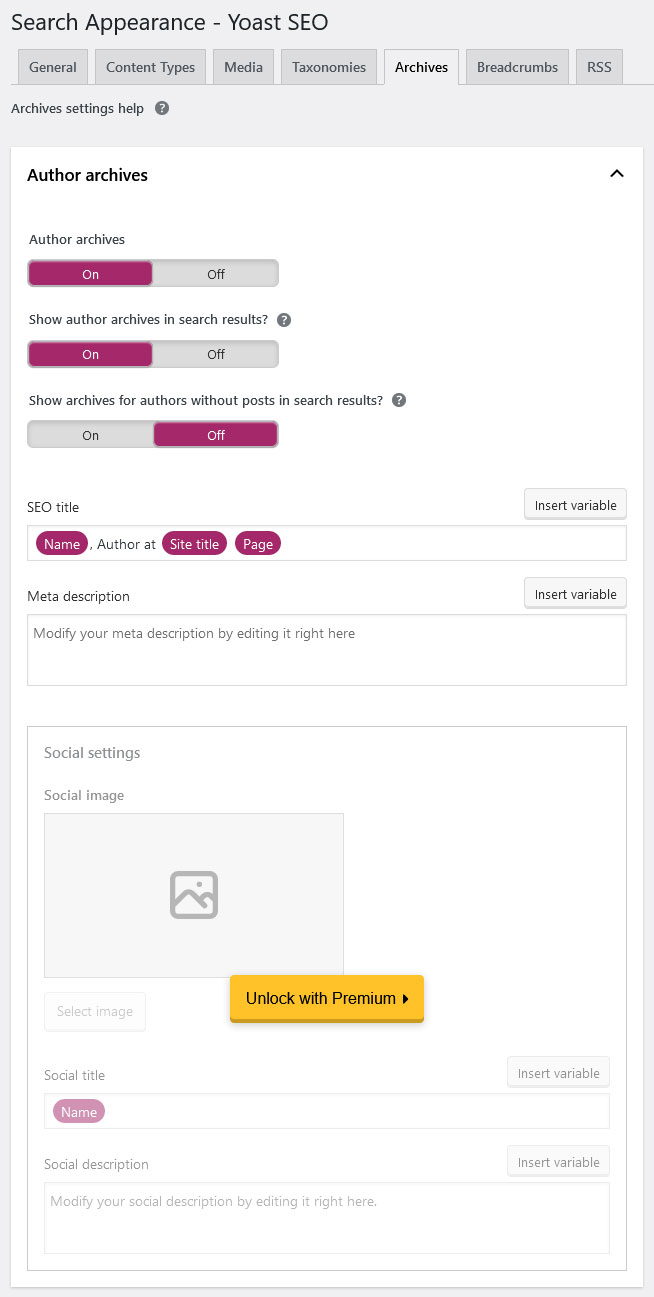
Archives
Besides setting the titles for your different archives on this page, the biggest concern is to determine which ones search engines should index and which not. WordPress comes with a number of archives by default and not all of them make sense for every site.
- Author Archive – If you run a single-author blog, the author archive will look exactly like your normal blog page. You should therefore set it to
noindexto prevent duplicate content. - Date Archive – This doesn’t really provide any important info to search engines, so you can leave it as
noindex. - Search Pages, 404 Pages – These pages will not show up in search results by default. Configure the title format here and you are done. (PS: Check out our article on how to build a custom 404 error page for WordPress).
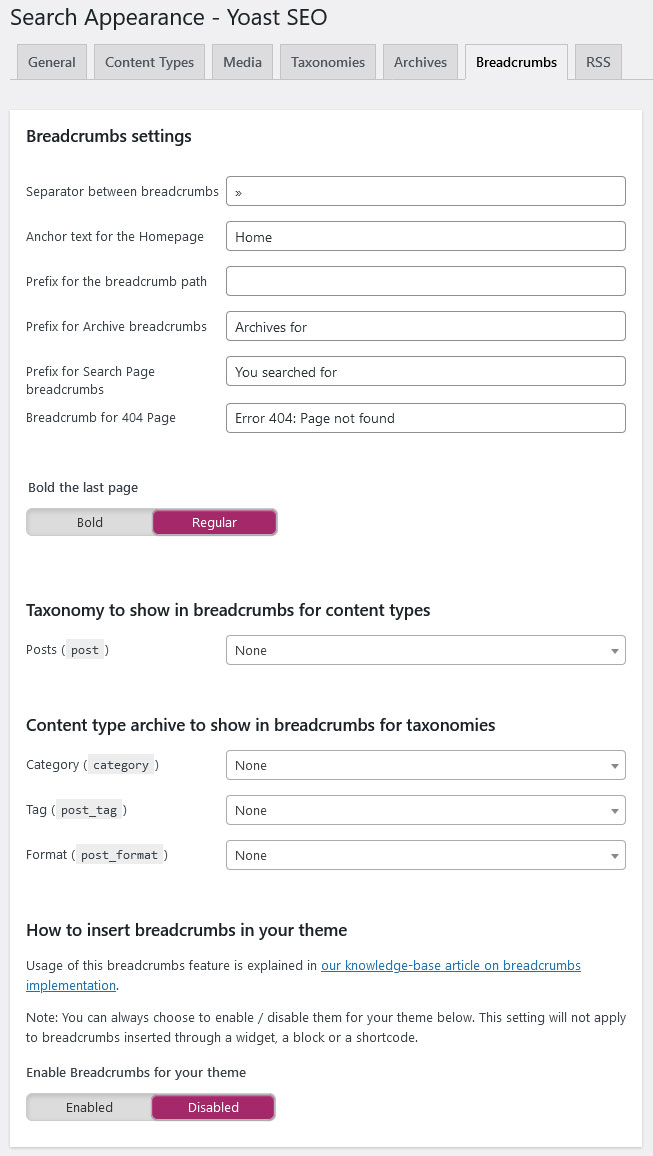
Breadcrumbs
Breadcrumbs are the links at the top of your page which display the path users have taken to get to the content they’re currently viewing.

Not only is this very comfortable from a visitor perspective, but they also help search engines to understand the structure of your site better. They will even show up in the search results in place of the usual URL.
Enabling breadcrumbs is not a must. Yoast recommends it, but it’s also a matter of personal preference. If you do decide to enable them, you may need to do extra setup to get them to show up on your site.
On this page you can configure the separator, title settings, and other small cosmetic details to perfect your breadcrumbs’ formatting.
RSS
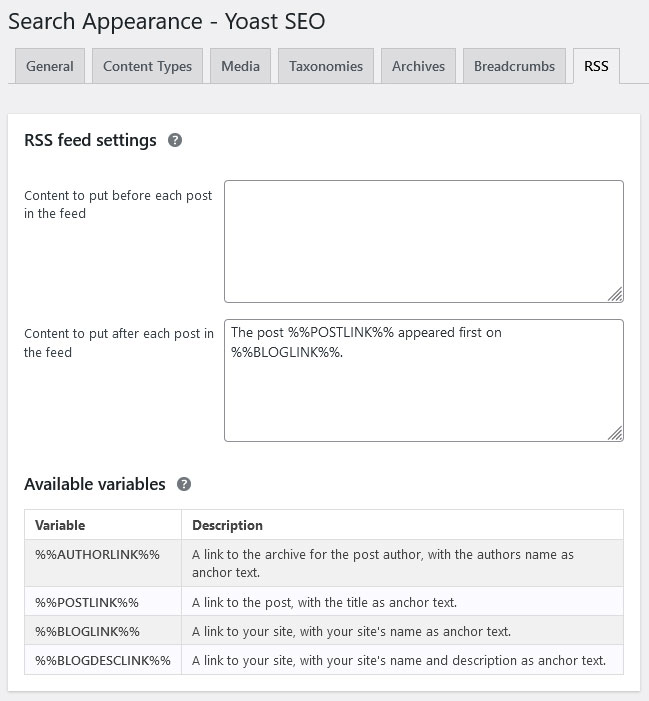
RSS feeds allow users and automated applications to get updates when a website delivers new content. You can access your own site’s RSS feed by adding /rss to the end of your URL.
This menu allows you to add content at the beginning or end of your articles when delivered via RSS. It will help identify you as the original source if content scrapers forget to remove this. You can use several variables, but the given option is usually good enough.
Social
In the Social menu, you can configure options for publishing your content on social media. I probably don’t have to tell you that social platforms are of SEO significance these days. Therefore, there are a bunch of pretty important settings to adjust here.
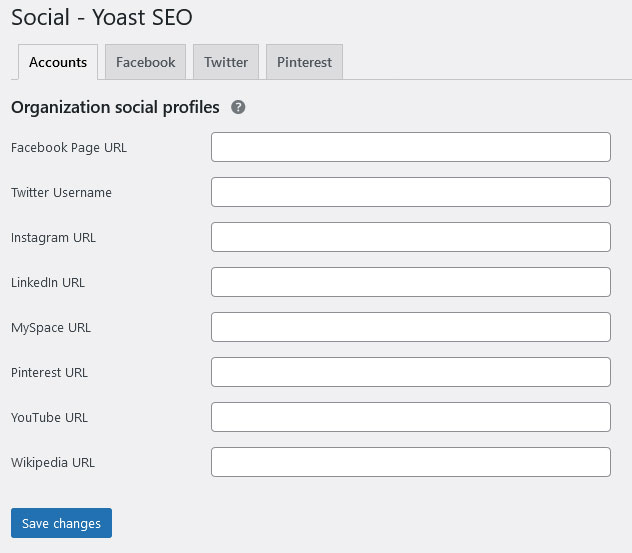
Accounts
All you have to do here is enter your social media accounts. This will signal to Google that they belong to your site and might cause them to show up on the side of the SERPs when someone searches for your brand name.
Facebook, Twitter, & Pinterest
These subsections exist mainly to ensure that your content looks its best when showing up on different social platforms.
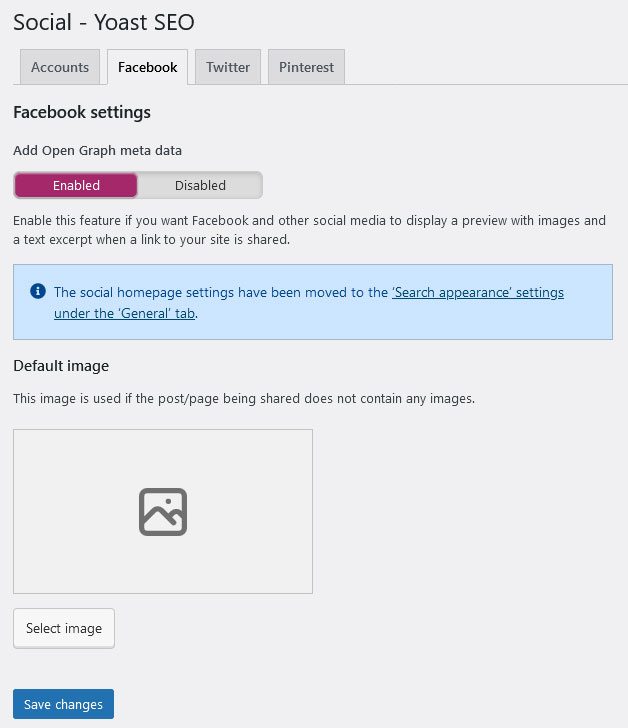
- Facebook – Enable Add Open Graph meta data. This will display a preview with an image and meta description for any content shared on Facebook. It also allows you to provide a fallback image that will show up in case the post or page doesn’t come with its own.
- Twitter – Pick which type of Twitter card you want your site to have. I recommend Summary with large image.
- Pinterest – If you want, you can verify your site with Pinterest here by adding the confirmation meta tag provided by the platform.
Tools
We have already looked at the Tool menu earlier. It contains a number of utilities to make your transition to Yoast a bit easier.
- Import/Export – Import settings from other SEO plugins (in case you were using a different one before), or export your own if you want to use them in another site. Simply creating a backup for emergencies is also possible.
- File Editor – Directly edit important files such as robots.txt and
.htaccess. You can also make changes to both of these files via FTP. You should generally stay away from them unless you really know what you are doing. Inputting something wrong here can completely disable your site for search engines. - Bulk Editor – Edit post titles and meta descriptions en masse instead of one by one. This is very nice if you are installing the plugin on a site that already has a bunch of content on it.
- Optimize SEO Data – If you didn’t run this earlier, or if you’re prompted to run it again, you can find the option here. It’s a good idea to optimize your site with this tool, as it can speed things up a lot.
Premium & Extensions
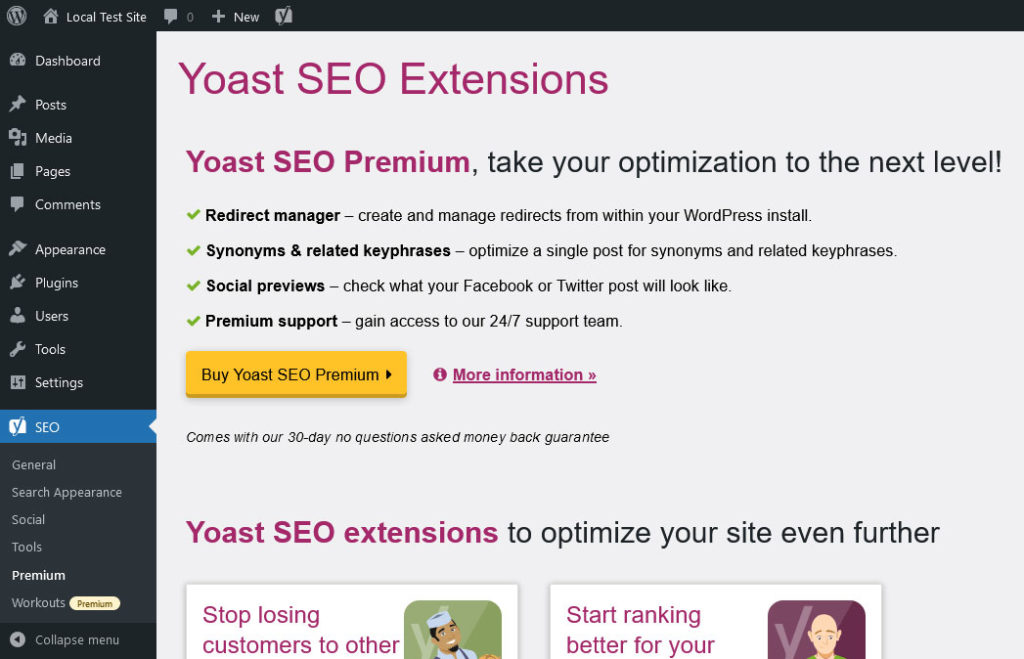
Here the plugin will suggest to update to the premium edition of Yoast if you haven’t already done so.
Optional extensions are also available. This menu item offers three premium addons for Yoast: local SEO, video, and Google News support. These are a little more niche and only suitable for certain sites, which is why they are beyond the scope of this article.
Workouts
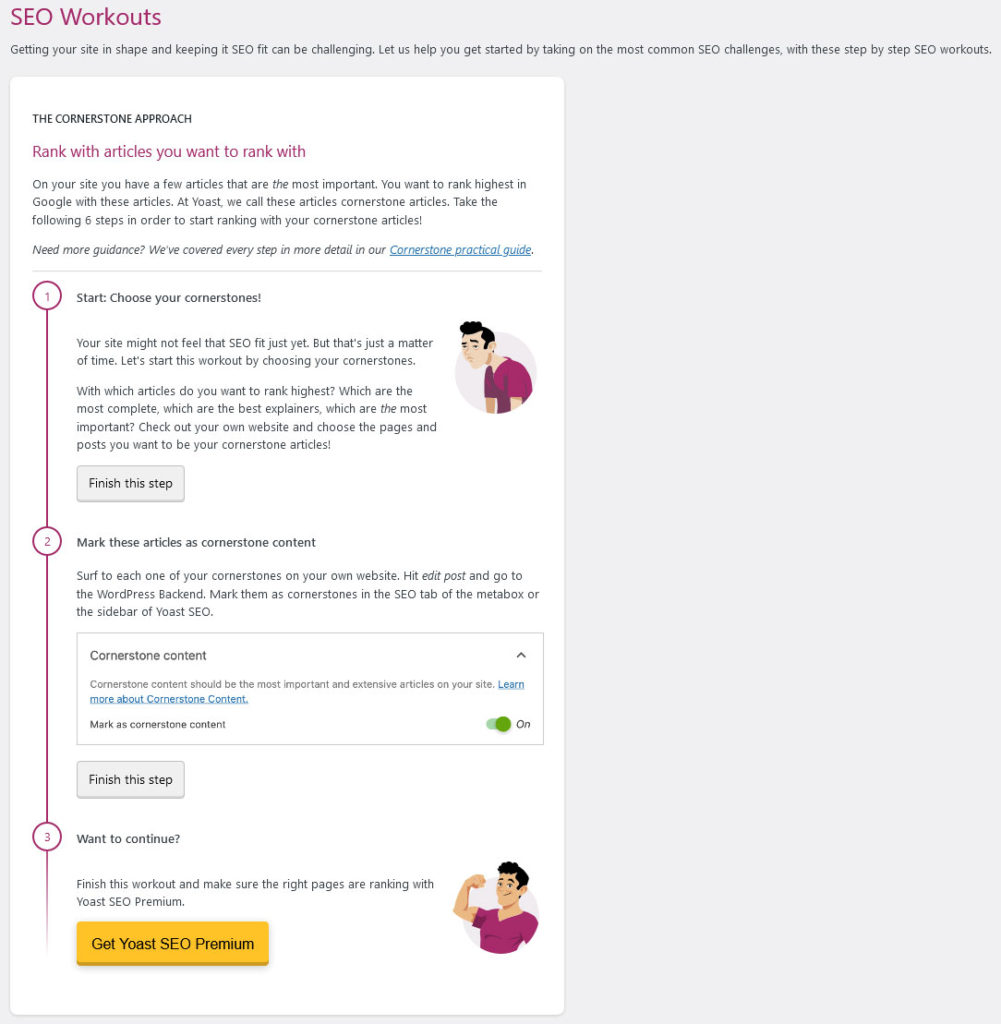
Last but not least we have workouts, a premium-only feature. If you need a little direction and have trouble knowing where to start in optimizing your SEO, Yoast’s workouts will set you on the right path. They’ll help you fix up your cornerstone content, link to orphaned articles, and much more to come as this feature is growing.
How to Improve Your Posts With Yoast Content Analysis
Now that you have all the basic settings, we can move on to a more granular level of the plugin. We’ll now concentrate on the day-to-day usage of Yoast: the real-time content analysis tools available in the post and page editors in Gutenberg.
Yoast SEO will also help you with keyword research and on-page SEO. We will quickly go over these two and then move on to the extensive content analysis, which is really the core of the plugin.
Keyword Research
As you will notice, the plugin adds a couple new items for keyword research to the WordPress admin bar. Namely, you will find Yoast’s Keyword Research Training course, as well as direct links to Google Ads and Google Trends.
Yoast SEO will also support you in finding keywords while writing content, provided you’ve enabled the integration with SEMrush. More on that below.
Page Analysis
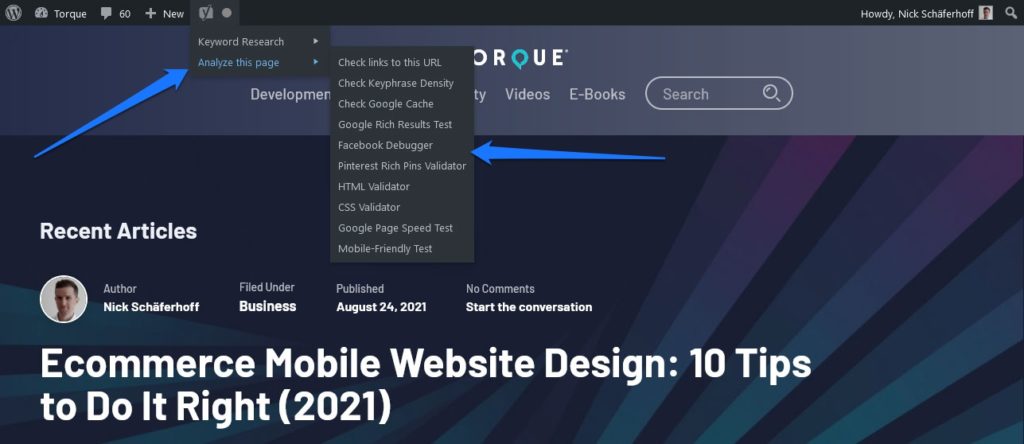
With Yoast activated, when having a close look at the admin bar on the front end of your site, you will see that there’s a number of links that let you gain insights into your on-page SEO.
By hovering over the Yoast logo in the admin bar and then clicking Analyze this page, you can feed it directly into a number of services and check your page for all sorts of important SEO markers:
- Check links to this URL – See how many other websites are linking to this page.
- Analyze Keyphrase Density – Analyze keyphrase density compared to your competitors.
- Check Google Cache – See the version of this page cached by Google.
- Google Rich Results Test – Ensure you’re following Google’s structured markup standards to get this page in the rich results.
- Facebook Debugger – Test how this page will look if shared on Facebook.
- Pinterest Rich Pins Validator – See if Pinterest has enabled rich pins for this page.
- HTML Validator & CSS Validator – Test your HTML and CSS against common coding standards.
- Google Page Speed Test – See how fast this page loads and optimize any issues.
- Mobile-Friendly Test – Check if this page is optimized for mobile devices like tablets and phones.
As you can see, the plugin doesn’t perform page analysis itself, but helps you connect your content directly to a number of services that do. Quite a nice touch, if you ask me.
Content Analysis
Alright, now we are getting to the part where Yoast’s plugin really shines. After installing it, you will quickly notice an additional box at the bottom of the WordPress editor as well as in the sidebar on the right. You can click the Yoast icon in the top right corner to quickly jump right to its settings.
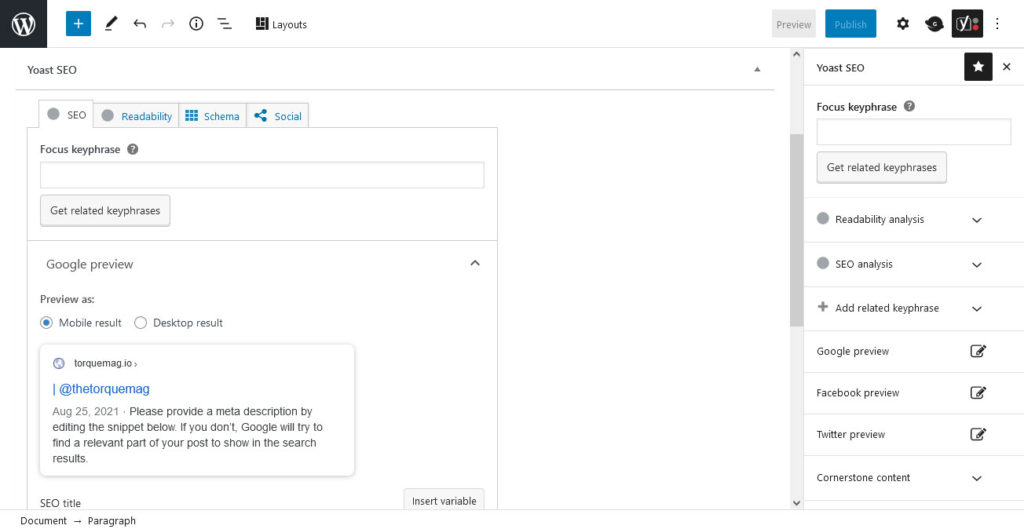
The settings in the sidebar and when you scroll down are identical, so you can use either — whatever you find most comfortable.
Here you can make important changes to your content that will influence how search engines, users, and social platforms will see and render it. You will also find important information about how good your content optimization is, so take good care that you understand what’s coming next.
SEO Analysis and Focus Keyphrase
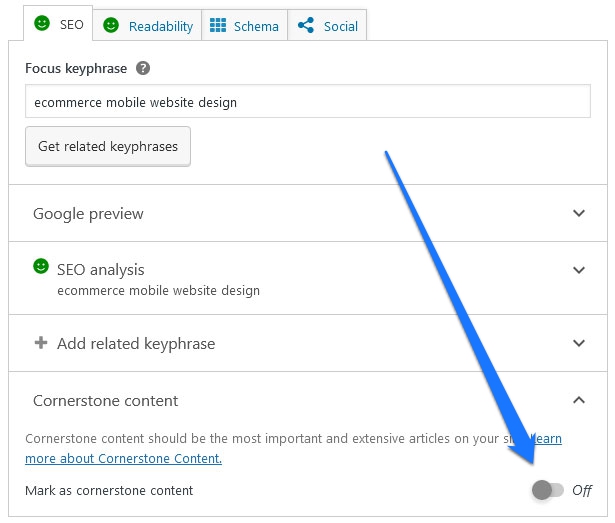
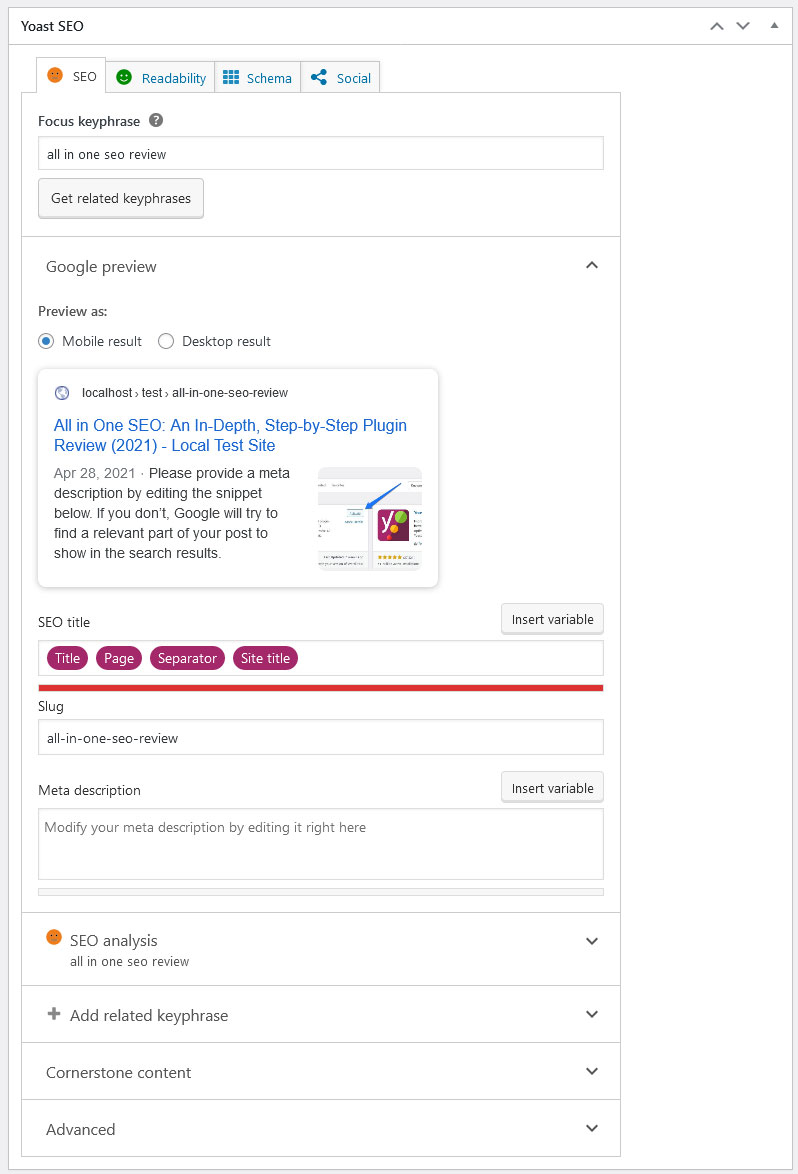
Whether you’re using the sidebar or bottom view, the very first setting you’ll notice is the focus keyphrase. This is the core of Yoast and what the entire SEO analysis is based on.
The focus keyword or keyphrase is what you hope to rank for when someone types it into a search engine. Providing a focus keyphrase also allows the plugin to determine how well your article is optimized, making it one of the most important settings.
If you’re connected with SEMrush, you can click the Get related keyphrases button to receive suggestions on similar keywords. (You can turn this off on the General > Integrations page if you don’t intend on using SEMrush.)
Yoast Premium users can also use the Add related keyphrases box to set similar keywords and synonyms for them, so you don’t just have to deal with one keyphrase.
On-Page Analysis
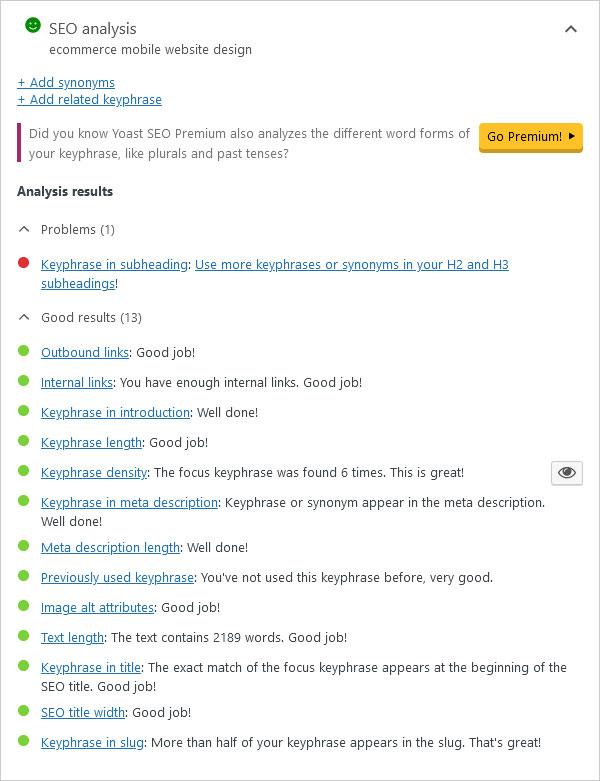
With a keyphrase set, you’re ready to dive into SEO analysis. Yoast will check if and how often your keyword appears in important places such as the heading and title, URL, content, and meta description. In addition to that, a red, orange, or yellow circle in the SEO analysis box will rank your article’s SEO. That way you can understand at a glance if further optimization is necessary.
In addition, Yoast provides a list of big problems and small improvements you can make to improve your ranking, along with what you’ve done right. A green light in Yoast won’t instantly improve your SEO, but their suggestions are generally sound and will push you in the right direction.
Basically, it’s like having an SEO expert look over your shoulder at all times. It is immensely helpful because it eliminates much of the guesswork.
What’s very useful about this feature is that it also appears in the list for all your posts and pages. That way you can filter the list by SEO score to quickly find content that needs improvement.
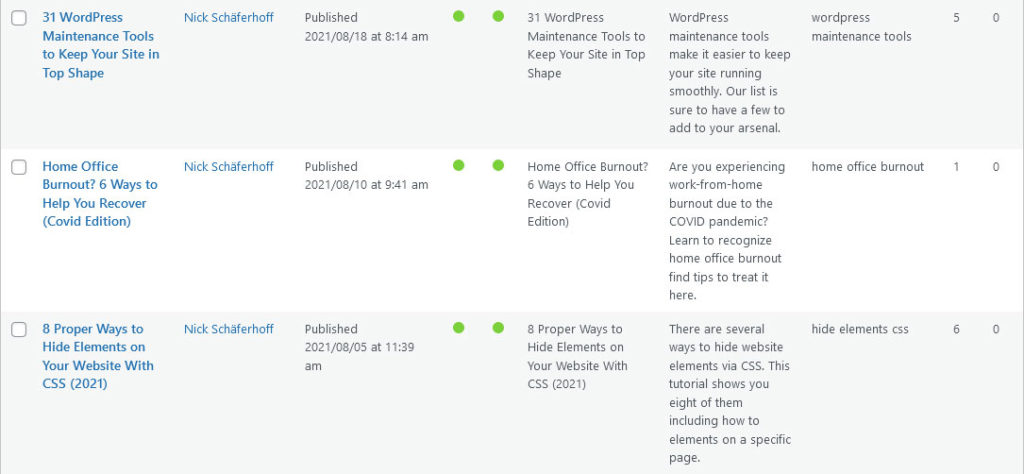
Configure Search Snippet
SEO analysis is the meat of Yoast and what you should focus on mastering, but there are other crucial settings in the SEO tab as well.
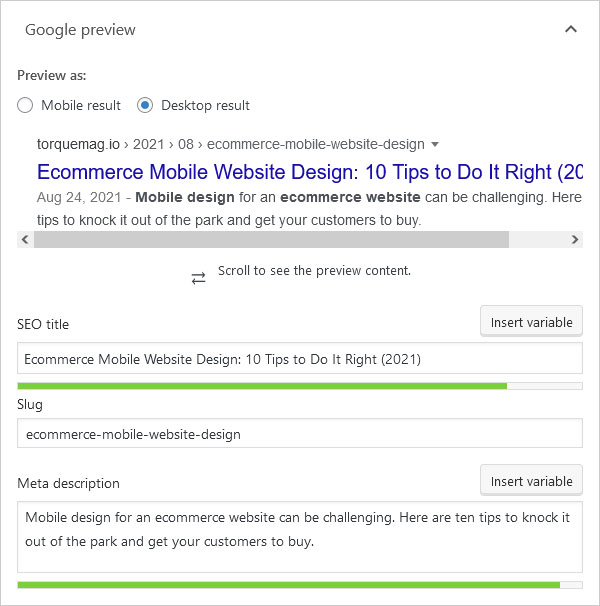
You’ll also find your Google preview settings here. If you have ever used Google, this should look very familiar. You can set your SEO title, slug, and meta description and see both a mobile and desktop preview of it.
That way you can ensure your meta tags all fit within the SERP’s dimensions.
- SEO Title – Here you can set a different blog post title to display for search engines. Very useful if the title you want on your blog is too long or not snappy enough. Be deliberate about this setting since the title tag is most important for search engines to determine the topic of your content.
- Slug – Put simply, the URL slug functions similarly to the title, and makes a cluttered URL easy to read. It can be a good idea to include your focus keyphrase here.
- Meta Description – The meta description is the text that appears below your title and URL. You can (and should) provide a custom description here that contains your keyword. Failing to do so, the search engines will pull what they think is relevant text from your content but which might not be the most descriptive at all.
Advanced & Cornerstone Content
Under the Cornerstone content tab, you can mark your article to have it judged far more strictly.
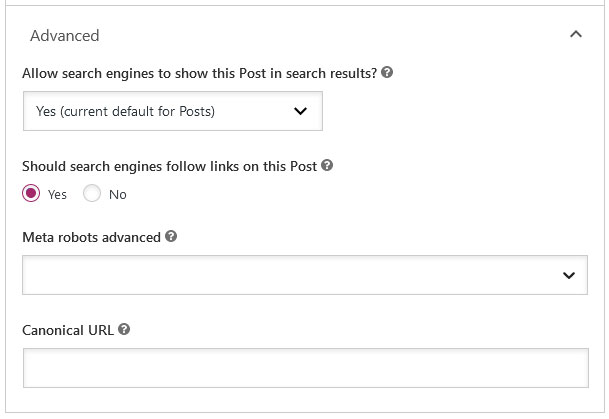
Finally, there’s the Advanced tab. This harbors a number of powerful features.
Usually you should not have to change anything here since all important settings are already set up site-wide. However, for completion’s sake, let’s go over what each setting is for.
- Allow search engines to show this Post in search results? – This determines whether search engines should index the post or page or not.
- Should search engines follow links on this Post? – You can nofollow all links on a post or page. Usually this shouldn’t be set at the page level except in certain cases; instead pick out certain links, like paid links or links to embeds, you want to exclude.
- Meta Robots Advanced – A number of meta tags you will probably never use.
- Breadcrumbs Title – Change the title used for this content inside your breadcrumbs.
- Canonical URL – This feature is very useful if you’re reposting content that has already appeared somewhere else on the web or on your site. Instead of risking a penalty for duplicate content, you can tell Google where the original article resides.
Readability Analysis
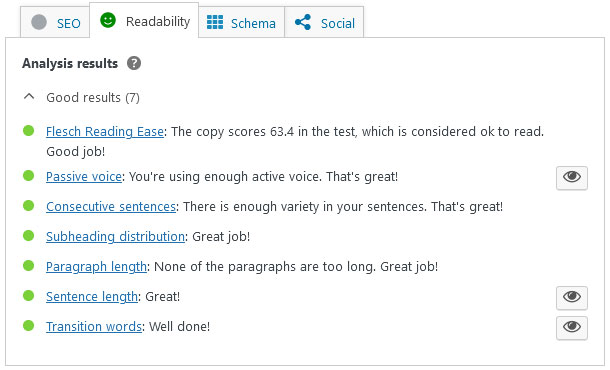
Not only is readability important to your readers, it’s also important to search engines. To that end, Yoast provides several tools to gauge how easy your text is to consume and also points out common errors like use of passive voice and uniform sentence structure.
It’s important to not just blindly follow everything you find here. Keep in mind that content should always be written for readers first and search engines second. Don’t sacrifice readability for technicalities.
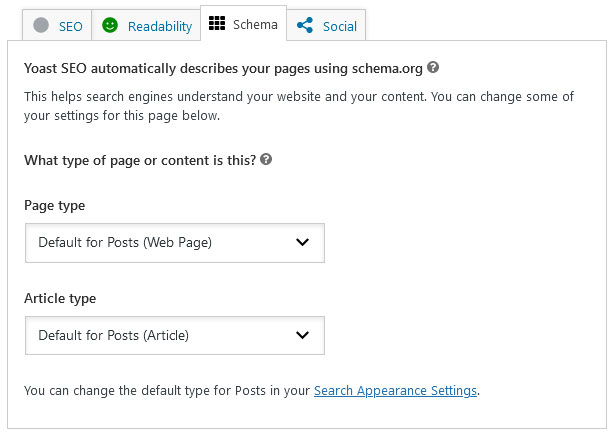
Schema
When it comes to schema, Yoast already does much of the work for you in setting that up. Just installing it is enough to increase your chance of landing a coveted rich snippet.
But you can set what sort of post or page you’ve created here, for instance if this is an item in your store or a scholarly article. Your rich snippet will look more suitable for the content and may attract extra clicks.
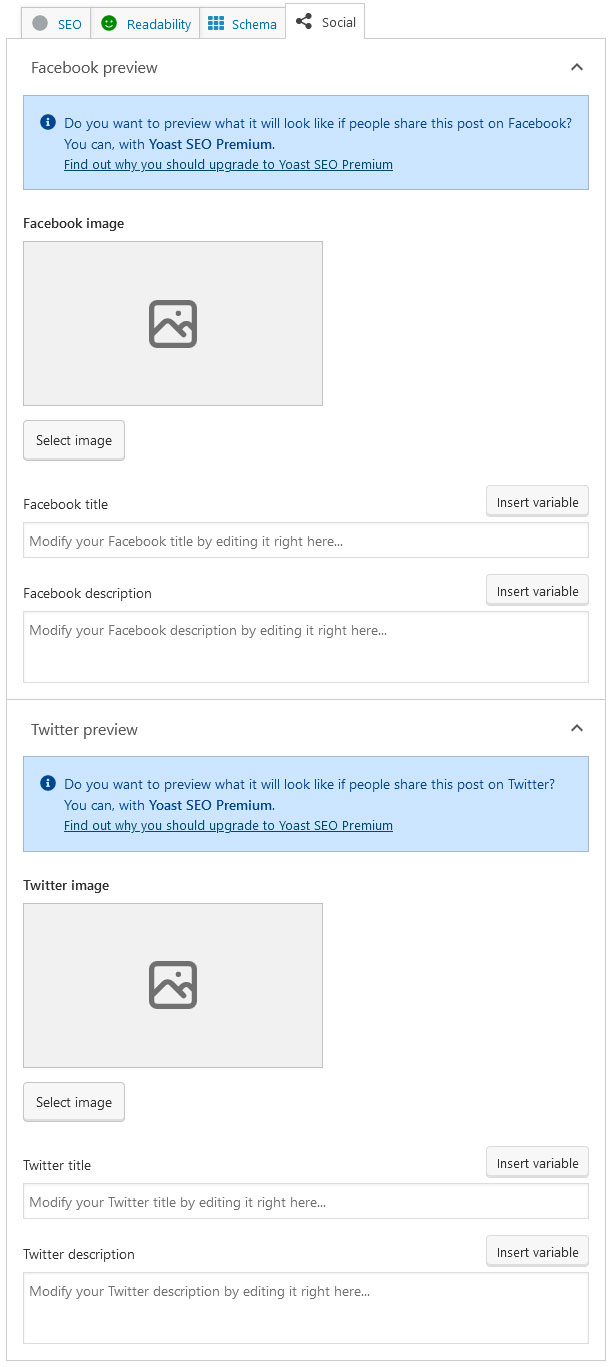
Social
When your content gets posted to Facebook or Twitter, these services will attempt to glean important information like title, description and images from the rich snippets of your page.
Since not all platforms adhere to the same standards and measurements, it can sometimes be necessary to adjust the title length or image size of your posts for different services. All of that happens in this tab.
The plugin allows you to specify titles, descriptions, and featured images for Facebook and Twitter. If you are confused about ideal image sizes for the different platforms, the Buffer blog has an excellent article on that.
Yoast SEO and the Classic Editor
Not everyone has made the switch to Gutenberg, so you might be wondering how all this changes if you still use the Classic editor.
Good news: Yoast’s interface is pretty much exactly the same whether you’re on Gutenberg or Classic. It’s very easy to switch between them, or even to use both at once. There are just a few small changes in the UI.
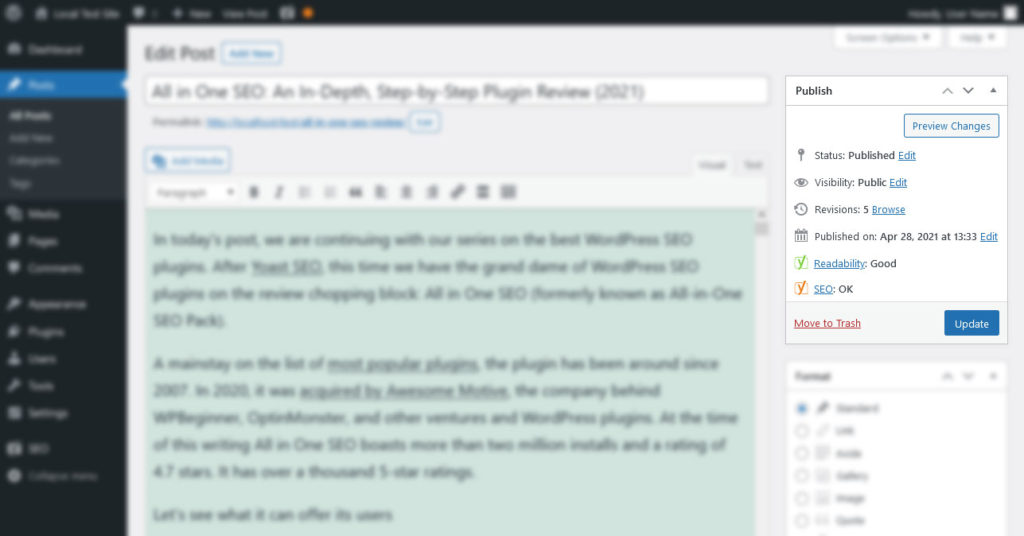
Yoast makes it very easy to see what your status in SEO and readability is at all times. Look to the Publish box on the right, which show red, green, or yellow depending on your score.
As for the content analysis box itself, you can still find it by scrolling to the bottom of the page, and it’s totally identical in every way.
If you find Yoast overwhelming in the Gutenberg, due to it taking up space both in the sidebar and at the bottom of the page, then the Classic editor offers a slightly cleaner SEO optimization experience.
How to Use Yoast — In a Nutshell
Yoast SEO is an extremely powerful plugin. It lets you control every important optimization aspect of your WordPress site. From title formats, to indexing rules, to search engine appearance, there is very little you can’t change.
At the same time, the plugin provides you with the knowledge to easily create highly optimized content, gives detailed input on how to improve your posts and pages, and even lets you control your content’s appearance on social platforms. It takes most of the guesswork out of optimizing your site and provides invaluable input for growth.
Looking at all of Yoast’s settings can feel overwhelming to start, but it’s super easy to use once you’ve got the hang of it. After the initial setup phase, it should be smooth sailing in the editor.
While Yoast won’t shoot you automatically to the first place in Google, using it is definitely a step in the right direction. I hope that this tutorial has helped you understand how the plugin can benefit your site as well.
Do you use Yoast SEO? Would you configure it differently? What are your experiences? Tell us in the comments.





11 Comments